3-860-243-11(1) Stereo Cassette Deck Operating Instructions EN GB F ES P TC-WE405 TC-WR661 TC-WR350Z 1997 by Sony Corporation
WARNING To prevent fire or shock hazard, do not expose the unit to rain or moisture. For the customers in the United States This symbol is intended to alert the user to the presence of uninsulated “dangerous voltage” within the product’s enclosure that may be of sufficient magnitude to constitute a risk of electric shock to persons. This symbol is intended to alert the user to the presence of important operating and maintenance (servicing) instructions in the literature accompanying the appliance.
TABLE OF CONTENTS Welcome! Thank you for purchasing the Sony Stereo Cassette Deck. Before operating the unit, please read this manual thoroughly and retain it for future reference. About This Manual The instructions in this manual are for models TC-WE405, TC-WR661 and TCWR350Z. Check your model number by looking at the rear panel of your tape deck. In this manual, the TC-WE405 is the model used for illustration purposes.
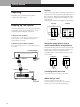
Getting Started Hookups Unpacking Check that you received the following items: • Audio connecting cords (2) When connecting an audio connecting cord, be sure to match the color-coded cord to the appropriate jacks on the components: Red (right) to Red and White (left) to White. Be sure to make connections firmly to avoid hum and noise. Connect the tape deck to the amplifier as shown below. Tape deck Hooking Up the System This section describes how to hook up the tape deck to an amplifier.
Basic Operations Basic Operations Playing a Tape 2 4 3 AUTO REC LEVEL DOLBY NR OFF B C DIRECTION D a RELAY 4 5 6 3 SYNCHRO DUBBING A→B HIGH/NORMAL FADER ARL PAUSE REC MUTE REC DECK B COUNTER RESET 0 P R r POWER p 0 ) ª · p § § 8 1 START(DECK B P) DECK A 7 2 ) ª 9 0 10 PHONES · 1 Turn on the amplifier and select the tape deck position. z 2 Press POWER, and then press § and insert a cassette.
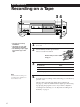
Basic Operations Recording on a Tape 2 34 AUTO REC LEVEL DOLBY NR OFF B C DIRECTION D a RELAY 4 5 6 3 SYNCHRO DUBBING A→B HIGH/NORMAL FADER DECK B COUNTER RESET 0 1 POWER p ª PAUSE REC MUTE REC P R r 0 ) · p § § 8 ARL START(DECK B P) DECK A 7 2 ) ª 9 0 10 PHONES · 5 • See page 4 for hookup information. • Use deck B (on your right hand side) for recording. • See "Dubbing a Tape" (page 9) to make a copy of the tape.
Basic Operations z To protect recordings against accidental erasure Break out the record-protect tab(s) (see page 11). z Press PAUSE P or ·. 6 Start playing the program source. Recording starts. To Press Stop recording p Start recording from the reverse side ª twice in Step 5 Pause PAUSE P. Press the button again to resume recording.
Advanced Recording Operations Adjusting the Recording Level Automatically (Auto Rec Level) z —The recording level cannot be adjusted properly due to excessive noise in the program source. —The program source level is too low and the recording level does not increase. During a quiet passage in a program source such as classical music, the recording level may not increase for some time.
Advanced Recording Operations Fading In and Out (Fader) Dubbing a Tape You can gradually increase the recording level at the beginning of a recording (fade in) or gradually decrease the recording level at the end of a recording (fade out). It is convenient to use this function, for example, when the tape reaches to its end and you don’t want the track to be cut off abruptly. You can do fade in or out recording only when you have adjusted the recording level manually (see page 7).
Advanced Recording Operations z During high-speed dubbing Only p is operative. z You don‘t have to adjust the recording level or select the Dolby NR system during dubbing Dubbing is automatically performed with the same recording level and Dolby NR system as the original in deck A. If, however, you want to monitor the sound during normal-speed dubbing, set DOLBY NR to match the tape in deck A (see page 5).
Additional Information Precautions On safety • Do not disassemble the cabinet — this may result in an electrical shock. Refer servicing to qualified personnel only. • Should any solid object or liquid fall into the cabinet, unplug the tape deck and have it checked by qualified personnel before operating it any further. On power sources • Before operating the tape deck, check that the operating voltage of the tape deck is identical with your local power supply.
Additional Information Demagnetizing the heads Cleaning After 20 to 30 hours of use, or when you notice a hissing sound or loss of high frequencies, demagnetize the heads with a commercially available demagnetizer for tape decks. Please refer to the instructions of the demagnetizer.
Additional Information Troubleshooting If you’ve experienced any of the following difficulties while using the tape deck, use this troubleshooting guide to help you remedy the problem. Should the problem persist, consult your nearest Sony dealer. There is excessively loud tape transport noise during fast-forwarding or rewinding. / This noise is caused by the cassette and is not a mechanical problem. § does not work.
Additional Information General Specifications System Power requirements Where purchased Power requirements U.S.A. and Canada 120 V AC, 60 Hz U.K. and Continental Europe 220 - 230 V AC, 50/60 Hz Australia 240 V AC, 50/60 Hz Other countries TC-WE405/WR350Z: 120/220/240 V AC, 50/60 Hz TC-WR661: 120/220/230 - 240 V AC, 50/60 Hz Recording system 4-track 2-channel stereo Fast-winding time (approx.) 180 sec.
Index Index Index Names of Controls Buttons A, B Adjusting recording level automatically. See Auto rec level recording level manually 7 volume 5 Audio connecting cord 4, 14 Auto play 5 Auto rec level 8 C ARL (automatic recording level adjustment) 8 § (eject) 5 - 7, 12, 13 HIGH/NORMAL 9 PAUSE P 5, 7 - 10, 13 REC (recording) r 6 - 8 REC MUTE (record muting) R 10 p (stop) 5, 7 - 10, 13 · (forward play) 5 - 10, 13 ª (reverse play) 5, 7, 9, 13 ), 0 (fast-forwarding and rewinding) 5, 13 Switches Cassette.
Sony Corporation Printed in China