3-860-880-11 (1) Video Cassette Player Operating Instructions PAL NTSC SLV-XA147JE/MJ/PS SLV-XF247ME/PS ©1997 by Sony Corporation
WARNING To prevent fire or shock hazard, do not expose the unit to rain or moisture. To avoid electrical shock, do not open the cabinet. Refer servicing to qualified personnel only. The mains lead must only be changed at a qualified service shop. Precautions Safety • This unit operates on 110 – 240 V AC, 50/60 Hz. Check that the unit’s operating voltage is identical with your local power supply.
Table of contents Getting Started Getting Started 4 5 6 8 Step 1: Step 2: Step 3: Step 4: Unpacking Setting up the remote commander Connecting the unit Tuning your TV to the unit Basic Operations 10 Playing a tape Additional Operations 15 Playing/searching at various speeds 17 Adjusting the picture 18 Editing with another VCR Additional Information 21 Troubleshooting 23 Specifications 24 Index to parts and controls back cover Index Introduction 3
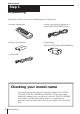
Getting Started Step 1 Unpacking Check that you have received the following items with the unit: • Remote commander • Audio/video cable (3-phono to 3phono) (SLV-XF247ME/PS only) • R6 (Size AA) batteries • Plug adaptor (SLV-XA147JE/MJ and XF247ME only) • Aerial cable Checking your model name The instructions in this manual are for the 5 models: SLV-XA147JE, XA147MJ, XA147PS, XF247ME and XF247PS. Check your model number by looking at the rear panel of your unit.
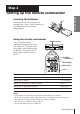
Step 2 Setting up the remote commander Getting Started Inserting the batteries Insert two R6 (size AA) batteries by matching the + and – on the batteries to the diagram inside the battery compartment. Using the remote commander You can use this remote commander to operate the unit and a Sony TV. To operate this unit, point at the remote sensor on the unit. To operate the TV, point at the remote sensor on the TV.
Step 3 Connecting the unit AERIAL OUT Aerial cable (supplied) AERIAL IN to mains : Signal flow 1 Disconnect the aerial cable from your TV and connect it to AERIAL IN on the rear panel of the unit. AERIAL OUT IN 2 3 Connect AERIAL OUT of the unit and the aerial input of your TV using the supplied aerial cable. AERIAL OUT IN Connect the mains lead to the mains. Use the supplied plug adaptor, if necessary, depending on the design of the mains (SLV-XA147JE/MJ and XF247ME only).
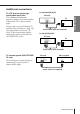
Additional connections If you want to use the Trinitron TV Synchro Play function (see page 14), this connection is necessary. (If your TV has two or more inputs, connect the audio/video cable to the VIDEO IN 1 jacks.) For SLV-XA147JE/MJ/PS This unit TV AUDIO VIDEO LINE IN LINE OUT IN VIDEO AUDIO Audio/video cable (not supplied) Getting Started To a TV that has phono type audio/video input jacks This additional connection improves picture and sound quality. Connect the TV as shown on the right.
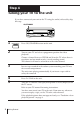
Step 4 Tuning your TV to the unit If you have connected your unit to the TV using the audio/video cable, skip this step. ON/STANDBY REC 1 ON/STANDBY 2 Press ON/STANDBY to turn on the unit. Turn on your TV and select a programme position for video playback. Choose a channel between UHF 30 and 39 on the TV where there is no picture and no sound or only a steady rustling sound. This channel will now be referred to as the video channel.
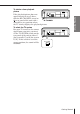
To select the TV system For your TV to receive the correct signal from your unit, you must set the TV SYSTEM switch on the rear panel of the unit to either G (for system B/G) or K (for system D/K). If this switch is set to the wrong position, the sound will be distorted.
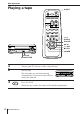
Basic Operations Playing a tape 6 EJECT 3/# SEARCH P PAUSE ) FF · PLAY p STOP 0 REW REC NTSC PB COLOR SYSTEM 1 2 Turn on your TV and set it to the video channel. Insert a tape. The unit turns on, and starts playing automatically if you insert a tape with its safety tab removed. 3 PLAY REC Press · PLAY. When the tape reaches the end, it will rewind automatically.
Additional tasks To Press Stop play p STOP Pause play P PAUSE Resume play after pause P PAUSE or · PLAY Search forward ) FF or # SEARCH during playback Search backward 0 REW or 3 SEARCH during playback Fast-forward the tape ) FF during stop Rewind the tape 0 REW during stop Eject the tape 6 EJECT If your tape was recorded in Set COLOR SYSTEM to PAL PAL/MESECAM NTSC NTSC MESECAM PAL/MESECAM Basic Operations To set the colour system If streaks appear during playback, set COLOR SYSTEM
Playing a tape (continued) Notes • Depending on your TV, the following may occur while playing an NTSC-recorded tape: – the picture is black and white, – the picture shakes, – no picture appears on the TV screen, – black streaks appear horizontally on the TV screen, and – the colour density increases or decreases. • You can eject a tape even when the power is off. When you press 6 EJECT, the unit turns on automatically. After ejecting the tape, the unit turns off again.
Selecting the sound during playback (SLV-XF247ME/PS only) AUDIO MONITOR Press AUDIO MONITOR to select the sound you want. Each press of the button changes the indicator in the display window. When you play a tape recorded in stereo or with a bilingual sound track, the Hi-Fi Stereo indicator in the display window lights up.
Playing a tape (continued) Turning on the unit and TV, and starting playback automatically (Trinitron TV Synchro Play) You can only use this function if your TV is made by Sony (Trinitron TV). How to connect to use this function Connect the unit and TV with the audio/video cable (see “To a TV that has phono type audio/video input jacks” on page 7). Be sure to connect the audio/video cable to the VIDEO IN 1 jacks on the TV if the TV has two inputs or more.
Additional Operations Playing/searching at various speeds SLOW +/– · PLAY 0 3 REW ) # FF 3/# SEARCH 7 FRAME ) FF · PLAY 0 REW REC Playback options Operation Fast-forward/rewind During stop, press ) FF or 0 REW. View the picture during fastforward or rewind During fast-forward, hold ) FF down. During rewind, hold 0 REW down. Play at high speed During playback or pause, press # SEARCH or 3 SEARCH . Play in slow motion During playback or pause, press SLOW+/–.
Playing/searching at various speeds (continued) To resume normal playback Press · PLAY. Tip • If the picture shakes while in the still mode, adjust the picture using $/4 TRACKING NORMAL/SLOW STILL ADJUST. Notes • Streaks or snow cannot be eliminated completely in the various playback operations, especially in the slow motion mode. • The sound is muted during these operations. • If you press 7 FRAME during playback, playback continues at the normal speed but the sound is muted.
Adjusting the picture Adjusting the tracking Although the unit automatically adjusts the tracking when playing a tape, distortion may occur if the tape was recorded in poor condition. If so, manually adjust the tracking. TRACKING AUTO/MANU $/4 TRACKING NORMAL/ SLOW Press $/4 TRACKING NORMAL/SLOW to obtain the best possible picture. The distortion should disappear as you press one of the two buttons.
Editing with another VCR How to connect to record on this unit TV This unit (Recorder) LINE 1 IN Other VCR (Player) LINE OUT Audio/video cable (not supplied) : Signal flow Tips • (SLV-XA147JE/MJ/PS only) Use a commercially available 2-phono to 2-phono type audio/video cable. If the other VCR has AUDIO L and R jacks, use a commercially available 3-phono to 2phono type audio/video cable.
Operation (when recording on this unit) SLV-XF247ME/PS You can make a copy of a tape using this unit for recording or playback. The unit cannot record TV programmes directly since it does not have a TV tuner. Before you start editing • Turn on your TV and set it to the video channel. 1 2 P PAUSE REC r REC INPUT SELECT SLV-XA147JE/MJ (SLV-XF247ME/PS only) Set INPUT SELECT to LINE 1 (or LINE 2).
Editing with another VCR (continued) To save a recording To prevent accidental erasure, break off the safety tab as illustrated. To record on a tape again, cover the tab hole with adhesive tape. Safety tab Tips • To edit more precisely, press the P PAUSE buttons on the units to release pause. • To cut out unwanted scenes while editing, press P PAUSE on this unit when an unwanted scene begins. When that scene ends, press P PAUSE again to resume recording.
Additional Information Troubleshooting Symptom Remedy The ON/STANDBY switch does not function. • Connect the mains lead securely. The power is turned on but the unit does not operate. • Moisture condensation occurs. Turn the power off, unplug the mains lead and leave the unit to dry for over an hour. The VCR enters standby mode or turns off automatically.
Others Recording Troubleshooting (continued) Symptom Remedy The tape starts playing as soon as it is inserted. • The safety tab has been removed. To record on this tape, cover the tab hole. The tape is ejected when you press r REC. • Check that the safety tab has not been removed. Nothing happens when you press r REC. • Make sure the tape is not at its end. • (SLV-XF247ME/PS only) Select the correct source with the INPUT SELECT switch, LINE 1 or LINE 2. No tape can be inserted.
Specifications System Supplied accessories RF output signal UHF channels 30 to 39 Aerial out 75-ohm asymmetrical aerial socket Remote commander (1) R6 (Size AA) batteries (2) Aerial cable (1) Audio/video cable (3-phono to 3-phono) (SLV-XF247ME/PS only) (1) Plug adaptor (SLV-XA147JE/MJ and XF247ME only) (1) Inputs and outputs LINE IN (SLV-XA147JE/MJ/PS) LINE 1 IN/LINE 2 IN (SLV-XF247ME/PS) VIDEO IN, phono jack (1) Input signal: 1 Vp-p, 75 ohms, unbalanced, sync negative AUDIO IN, phono jack (1) (SLV-XA14
Index to parts and controls Refer to the pages indicated in parentheses ( ) for details.
Rear panel (SLV-XA147JE/MJ/PS) Rear panel (SLV-XF247ME/PS) 1 Mains lead (6) 2 RF CHANNEL screw (9) 3 AERIAL OUT connector (6) 4 LINE IN VIDEO/AUDIO jacks (SLV-XA147JE/MJ/PS only) (18) LINE 1 IN VIDEO/AUDIO L/R jacks (SLV-XF247ME/PS only) (18) 5 LINE OUT VIDEO/AUDIO jacks (SLV-XA147JE/MJ/PS only) (7) LINE 1 OUT VIDEO/AUDIO L/R jacks (SLV-XF247ME/PS only) (7) 6 AERIAL IN connector (6) 7 TV SYSTEM switch (9) continued Additional Information 25
Index to parts and controls (continued) Remote commander 1 6 EJECT button (11) 2 TV control buttons (Only for TV) (5) TV/VIDEO ; (TV power) u (on/standby) VOL +/– PROG (CH) +/– 3 EFFECT button (This button doesn’t work with this unit.) 4 TRACKING AUTO/MANU button (17) 5 TV/VTR button (This button doesn’t work with this unit.) 6 r REC button (19) 7 AUDIO MONITOR button (This button works only for SLV-XF247ME/ PS.
Additional Information 27
Index A, B H, I, J, K Accessories supplied 4 Adjusting picture 17 tracking 17 Aerial hookup 6 Audio track 13 Auto head cleaner 22 AV connection 7 Hi-fi audio track D Dubbing.