
User manual
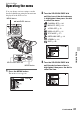

Table Of Contents
- Read this first
- Identifying parts and controls
- Screen indicators
- Table of Contents
- Getting Started
- Step 1: Checking supplied accessories
- Step 2: Charging the battery pack
- Step 3: Attaching the microphone and the lens hood with lens cover
- Step 4: Attaching the accessory shoe
- Step 5: Turning on the camcorder and setting the date and time
- Step 6: Adjusting the LCD screen and viewfinder
- Step 7: Preparing the recording media
- Recording
- Recording
- Adjusting the focus
- Changing the recording setting
- Adjusting the brightness
- Adjusting the color tone
- Audio setup
- Useful functions
- Recording in dim places (Video light)
- Selecting the suitable setting automatically for the recording situation (AUTO MODE setting)
- What you can do with the Wi-Fi function of the camcorder
- Downloading “PlayMemories Mobile”
- Connecting the camcorder to an Android smartphone equipped with the NFC function using One-touch
- Using a smartphone as a remote controller
- Transferring images to a smartphone
- Connecting without using the NFC function (Android)
- Connecting without using the NFC function (iPhone/iPad)
- Customizing the picture quality (Picture profile)
- Setting time data
- Recording with the Slow & Quick Motion function
- Reviewing the most recently recorded scene (Last Scene Review)
- Assigning the functions to the ASSIGN buttons
- Playback
- Editing
- Using the Menu
- Connecting with another device
- Troubleshooting
- Additional Information

90
720p/480i
B 1080i/480i
480p
480i
PAL model:
1080p/576i
720p/576i
B 1080i/576i
576p
576i
z Tips
• See page 72 on the output resolution of the
signal for each connecting cable.
x DOWN CONVERT TYPE
You can select a down convert type when
you down-covert video signal.
Use this function for outputting movies and
still images recorded in
16:9.
B SQUEEZE
Outputs a horizontally compressed image
while maintaining its original height.
LETTER BOX(16:9)
Outputs a vertically compressed image
while maintaining its original aspect ratio.
EDGE CROP
Outputs the central portion of the original
image by cropping its right and left edges.
x WIDE CONVERT
You can select a down convert type when
you down-covert video signal.
Use this function for outputting DV movies
recorded with [ WIDE REC] set to
[ON].
B SQUEEZE
Outputs a horizontally compressed image
while maintaining its original height.
LETTER BOX(16:9)
Outputs a vertically compressed image
while maintaining its original aspect ratio.
EDGE CROP
Outputs the central portion of the original
image by cropping its right and left edges.
b Notes
• When you view a movie recorded in standard
definition image quality (DV) with [ WIDE
REC] set to [ON] on a standard 4:3 TV, images
may appear horizontally compressed while
maintaining its original height. In such a case,
select [LETTER BOX(16:9)] or [EDGE
CROP].
• If you change the setting from [SQUEEZE] to
another option, or from another option to
[SQUEEZE], the screen will go out
momentarily, and the image and sound will be
intermitted.
x HDMI TC OUTPUT
You can set whether to output time code to
other professional-use devices, using
HDMI.
B OFF
Does not overlap the time code
information on HDMI output signal.
ON
Overlaps the time code information on
HDMI output signal*. The data is
transmitted as digital data, not as a
projected image, and the connected device
identifies the time data by referencing the
transmitted digital data.
* If the frame rate is 24p, 2-3 pulldown is
performed and the converted information is
automatically added and transmitted.
Press the MENU button t select (REC/OUT SET) with the SEL/PUSH EXEC dial.