
User manual
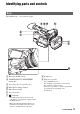
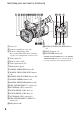
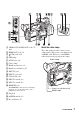
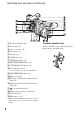
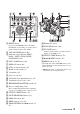
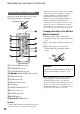
Table Of Contents
- Read this first
- Identifying parts and controls
- Screen indicators
- Table of Contents
- Getting Started
- Step 1: Checking supplied accessories
- Step 2: Charging the battery pack
- Step 3: Attaching the microphone and the lens hood with lens cover
- Step 4: Attaching the accessory shoe
- Step 5: Turning on the camcorder and setting the date and time
- Step 6: Adjusting the LCD screen and viewfinder
- Step 7: Preparing the recording media
- Recording
- Recording
- Adjusting the focus
- Changing the recording setting
- Adjusting the brightness
- Adjusting the color tone
- Audio setup
- Useful functions
- Recording in dim places (Video light)
- Selecting the suitable setting automatically for the recording situation (AUTO MODE setting)
- What you can do with the Wi-Fi function of the camcorder
- Downloading “PlayMemories Mobile”
- Connecting the camcorder to an Android smartphone equipped with the NFC function using One-touch
- Using a smartphone as a remote controller
- Transferring images to a smartphone
- Connecting without using the NFC function (Android)
- Connecting without using the NFC function (iPhone/iPad)
- Customizing the picture quality (Picture profile)
- Setting time data
- Recording with the Slow & Quick Motion function
- Reviewing the most recently recorded scene (Last Scene Review)
- Assigning the functions to the ASSIGN buttons
- Playback
- Editing
- Using the Menu
- Connecting with another device
- Troubleshooting
- Additional Information

9
A RESET button
If you press the RESET button, all settings
including the clock setting (except the picture
profile settings) return to the default.
B VISUAL INDEX button (64)
C Playback control buttons (PREV,
PLAY*, NEXT, STOP, PAUSE,
SCAN/SLOW) (64)
D DATA CODE button (69)
E DISPLAY button (69)
F LCD screen/touch panel (24)
G Handle zoom switch (31)
H Viewfinder (24)
I Large eyecup (24)
J Viewfinder lens adjustment lever (24)
K Viewfinder release lever (124)
L HEADPHONE MONITOR switch (45)
M Rear recording lamp (100)
The recording lamp flashes if the remaining
capacity of recording media or battery is low.
N STATUS CHECK button (70)
O PICTURE PROFILE button (53)
P DISPLAY button (69)
Q MENU button** (23, 81)
R SEL/PUSH EXEC dial/B/b button (23,
81)
S Illuminance sensor
T VOLUME buttons* (64)
U TC/U-BIT button
Switches between time code and user bit to
display on the LCD screen.
V STATUS CHECK button (70)
W V/v/B/b/EXEC buttons (81)
X MENU button (23, 81)
* The right side of the VOLUME+ button, and
PLAY button have raised tactile dots for easy
button location.
**MENU button has a raised tactile bar for your
convenience in locating the buttons.
Continued ,