
User manual
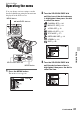

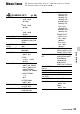
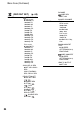
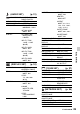
Table Of Contents
- Read this first
- Identifying parts and controls
- Screen indicators
- Table of Contents
- Getting Started
- Step 1: Checking supplied accessories
- Step 2: Charging the battery pack
- Step 3: Attaching the microphone and the lens hood with lens cover
- Step 4: Attaching the accessory shoe
- Step 5: Turning on the camcorder and setting the date and time
- Step 6: Adjusting the LCD screen and viewfinder
- Step 7: Preparing the recording media
- Recording
- Recording
- Adjusting the focus
- Changing the recording setting
- Adjusting the brightness
- Adjusting the color tone
- Audio setup
- Useful functions
- Recording in dim places (Video light)
- Selecting the suitable setting automatically for the recording situation (AUTO MODE setting)
- What you can do with the Wi-Fi function of the camcorder
- Downloading “PlayMemories Mobile”
- Connecting the camcorder to an Android smartphone equipped with the NFC function using One-touch
- Using a smartphone as a remote controller
- Transferring images to a smartphone
- Connecting without using the NFC function (Android)
- Connecting without using the NFC function (iPhone/iPad)
- Customizing the picture quality (Picture profile)
- Setting time data
- Recording with the Slow & Quick Motion function
- Reviewing the most recently recorded scene (Last Scene Review)
- Assigning the functions to the ASSIGN buttons
- Playback
- Editing
- Using the Menu
- Connecting with another device
- Troubleshooting
- Additional Information

86
z Tips
• You can display the [EDIT] menu by pressing
the MENU button when the VISUAL INDEX or
playback screen is displayed.
(OTHERS) (p. 99)
CAMERA PROFILE MEMORY CARD A,
MEMORY CARD B
ASSIGN BUTTON ASSIGN1, ASSIGN2,
ASSIGN3, ASSIGN4,
ASSIGN5, ASSIGN6
CLOCK SET
AREA SET
SUMMERTIME BOFF, ON
LANGUAGE
DATE REC BOFF, ON
BEEP BOFF, ON
REC LAMP[F] BON, OFF
REC LAMP[R] BON, OFF
REMOTE CONTROL BON, OFF
MEDIA FORMAT MEMORY CARD A,
MEMORY CARD B
REPAIR IMAGE DB
FILE
MEMORY CARD A,
MEMORY CARD B
USB CONNECT
OPERATION TIME
VERSION DISPLAY
CALIBRATION
(EDIT)
PROTECT
DIVIDE
DELETE
PHOTO CAPTURE
COPY
(CAMERA SET)
menu
Settings to adjust your camcorder to the
recording conditions (GAIN SET/
STEADYSHOT, etc.)
The default settings are marked with B.
See page 81 for details on selecting
menu items.
You can set gain values for H, M and L
positions of the gain switch.
Default setting:
[H]: 18dB, [M]: 9dB, [L]: 0dB
1 Select [H], [M] or [L] with the SEL/
PUSH EXEC dial.
2 Set the gain value with the SEL/PUSH
EXEC dial, then press the dial.
You can select a value between -6dB
and 30dB in 3dB increments. The larger
the value, the higher the gain.
3 Select [OK] with the SEL/PUSH EXEC
dial.
You can select the upper limit for the Auto
Gain Control (AGC).
BOFF, 21dB - 0dB (3dB increments)
b Notes
• This function is not effective while you adjust
the gain manually.
You can use the preset white balance. For
more details, see page 41.
Press the MENU button t select
(CAMERA SET) with the SEL/PUSH
EXEC dial.
GAIN SET
AGC LIMIT
WB PRESET
Menu items (Continued)