
User manual
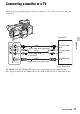

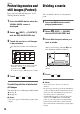
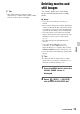
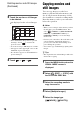
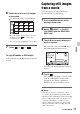
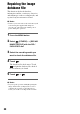
Table Of Contents
- Read this first
- Identifying parts and controls
- Screen indicators
- Table of Contents
- Getting Started
- Step 1: Checking supplied accessories
- Step 2: Charging the battery pack
- Step 3: Attaching the microphone and the lens hood with lens cover
- Step 4: Attaching the accessory shoe
- Step 5: Turning on the camcorder and setting the date and time
- Step 6: Adjusting the LCD screen and viewfinder
- Step 7: Preparing the recording media
- Recording
- Recording
- Adjusting the focus
- Changing the recording setting
- Adjusting the brightness
- Adjusting the color tone
- Audio setup
- Useful functions
- Recording in dim places (Video light)
- Selecting the suitable setting automatically for the recording situation (AUTO MODE setting)
- What you can do with the Wi-Fi function of the camcorder
- Downloading “PlayMemories Mobile”
- Connecting the camcorder to an Android smartphone equipped with the NFC function using One-touch
- Using a smartphone as a remote controller
- Transferring images to a smartphone
- Connecting without using the NFC function (Android)
- Connecting without using the NFC function (iPhone/iPad)
- Customizing the picture quality (Picture profile)
- Setting time data
- Recording with the Slow & Quick Motion function
- Reviewing the most recently recorded scene (Last Scene Review)
- Assigning the functions to the ASSIGN buttons
- Playback
- Editing
- Using the Menu
- Connecting with another device
- Troubleshooting
- Additional Information

74
Editing
Protecting movies and
still images (Protect)
Protect movies and still images to avoid
deleting them by mistake.
1 Press the MENU button when the
VISUAL INDEX screen is
displayed.
2 Select (EDIT) t [PROTECT]
with the SEL/PUSH EXEC dial.
3 Touch the movies or still images
to be protected.
is displayed on the selected images.
• Press and hold the image down to preview
the image. Touch to return to the
previous screen.
• You can select up to 100 images at one time.
4 Touch t t .
To undo the protection of movies and
still images
Touch the movie or still image marked with
in step 3.
disappears.
b Notes
• You cannot protect standard image quality (DV)
images.
Dividing a movie
You can divide a movie at a designated
point.
1 Press the MENU button while
playing back movies.
2 Select (EDIT) t [DIVIDE]
with the SEL/PUSH EXEC dial.
3 Touch X at the point where you
want to divide.
4 Touch t .
b Notes
• You cannot restore movies once they are
divided.
• Do not remove the battery pack, the AC Adaptor
or the recording media that contains the movies
from your camcorder during the operation. It
may damage the recording media.
• A slight difference may occur from the point
where you touch X and the actual dividing
point, as your camcorder selects the dividing
point based in about half-second increments.
• You cannot divide standard image quality (DV)
images.
Returns to the beginning of the selected
movie.
After you select the point with X, make
fine adjustment with these buttons.