
User manual
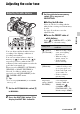
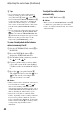
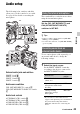
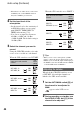
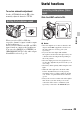
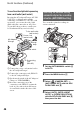
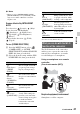

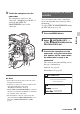
Table Of Contents
- Read this first
- Identifying parts and controls
- Screen indicators
- Table of Contents
- Getting Started
- Step 1: Checking supplied accessories
- Step 2: Charging the battery pack
- Step 3: Attaching the microphone and the lens hood with lens cover
- Step 4: Attaching the accessory shoe
- Step 5: Turning on the camcorder and setting the date and time
- Step 6: Adjusting the LCD screen and viewfinder
- Step 7: Preparing the recording media
- Recording
- Recording
- Adjusting the focus
- Changing the recording setting
- Adjusting the brightness
- Adjusting the color tone
- Audio setup
- Useful functions
- Recording in dim places (Video light)
- Selecting the suitable setting automatically for the recording situation (AUTO MODE setting)
- What you can do with the Wi-Fi function of the camcorder
- Downloading “PlayMemories Mobile”
- Connecting the camcorder to an Android smartphone equipped with the NFC function using One-touch
- Using a smartphone as a remote controller
- Transferring images to a smartphone
- Connecting without using the NFC function (Android)
- Connecting without using the NFC function (iPhone/iPad)
- Customizing the picture quality (Picture profile)
- Setting time data
- Recording with the Slow & Quick Motion function
- Reviewing the most recently recorded scene (Last Scene Review)
- Assigning the functions to the ASSIGN buttons
- Playback
- Editing
- Using the Menu
- Connecting with another device
- Troubleshooting
- Additional Information

47
Recording
b Notes
• When you select [INTELLIGENT AUTO],
[STEADYSHOT] is set to [ACTIVE], and the
angle of view shifts 1.08 times toward the
telephoto side.
Scenes detected by INTELLIGENT
AUTO
Face detection: (Portrait), (Baby)
Scene detection: . (Backlight),
(Landscape), (Night Scene),
(Spotlight), (Low Brightness),
(Macro)
Camera-shake detection: (Walk),
(Tripod)
To use [SCENE SELECTION]
1 Press the MENU button, select
(CAMERA SET) t [SCENE
SELECTION SET] with the SEL/PUSH
EXEC dial, then press the dial.
2 Select the desired setting with the SEL/
PUSH EXEC dial, then press the dial.
* Focuses on only distant subjects.
The Wi-Fi function of the camcorder
enables you to operate the camcorder
remotely by a smartphone, or transfer
recorded images to a smartphone.
Using a smartphone as a remote
controller
(One-touch remote (NFC))
Required equipment/environment
Smartphone or tablet computer
Setting Recording conditions
Night Scene*
([NIGHT
SCENE])
Shoots a night view with a
proper exposure, using a
tripod (sold separately).
Sunrise &
Sunset*
([SUNRISE &
SUNSET])
Shoots the scenes under
the glow of sunset/sunrise
vividly.
Fireworks*
([FIREWORKS])
Shoots fireworks with
optimal exposure.
Landscape*
([LANDSCAPE])
Shoots distant subjects
clearly. This setting also
prevents your camcorder
from focusing on any glass
or mesh in windows
between the camcorder
and the subject.
Portrait
([PORTRAIT])
Brings out the subject, such
as people or flowers, while
creating a soft background.
Spotlight
([SPOTLIGHT])
Prevents people's faces
from appearing excessively
white when subjects are lit
by strong light.
Beach
([BEACH])
Takes the vivid blue of the
ocean or a lake.
What you can do with the Wi-Fi
function of the camcorder
Setting Recording conditions
Continued ,