
User manual
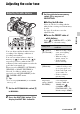
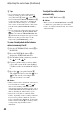
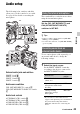
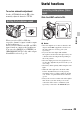
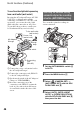

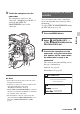
Table Of Contents
- Read this first
- Identifying parts and controls
- Screen indicators
- Table of Contents
- Getting Started
- Step 1: Checking supplied accessories
- Step 2: Charging the battery pack
- Step 3: Attaching the microphone and the lens hood with lens cover
- Step 4: Attaching the accessory shoe
- Step 5: Turning on the camcorder and setting the date and time
- Step 6: Adjusting the LCD screen and viewfinder
- Step 7: Preparing the recording media
- Recording
- Recording
- Adjusting the focus
- Changing the recording setting
- Adjusting the brightness
- Adjusting the color tone
- Audio setup
- Useful functions
- Recording in dim places (Video light)
- Selecting the suitable setting automatically for the recording situation (AUTO MODE setting)
- What you can do with the Wi-Fi function of the camcorder
- Downloading “PlayMemories Mobile”
- Connecting the camcorder to an Android smartphone equipped with the NFC function using One-touch
- Using a smartphone as a remote controller
- Transferring images to a smartphone
- Connecting without using the NFC function (Android)
- Connecting without using the NFC function (iPhone/iPad)
- Customizing the picture quality (Picture profile)
- Setting time data
- Recording with the Slow & Quick Motion function
- Reviewing the most recently recorded scene (Last Scene Review)
- Assigning the functions to the ASSIGN buttons
- Playback
- Editing
- Using the Menu
- Connecting with another device
- Troubleshooting
- Additional Information

42
z Tips
• You can change the outdoor white balance
setting by setting an offset value. Press
(one push) button C while (outdoor) is
selected and turn the SEL/PUSH EXEC dial E
to select an offset value from -7 (bluish) to 0
(normal, the default setting) to +7 (reddish).
You can also set the white balance offset value
from the menu ([WB OUTDOOR LEVEL],
p. 87).
• You can change the color temperature. Press the
(one push) button C when [MANU WB
TEMP] is set. Turn the SEL/PUSH EXEC dial
E until the desired temperature appears on the
LCD screen, then press the dial to set the
temperature ([WB TEMP SET], p. 87).
To save the adjusted white balance
value in memory A or B
1 Set the AUTO/MANUAL switch D to
MANUAL.
2 Press the WHT BAL button A to
display the WHT BAL indicator.
3 Set the white balance memory switch to
A ( A) or B ( B).
4 Capture a white subject, such as white
paper, full-screen in the same lighting
condition as the one in which the subject
is.
5 Press the (one push) button C.
The adjusted value is stored in A or
B. The stored color temperature
appears for about 3 seconds.
b Notes
• When a white balance adjustment value has not
been obtained successfully, A or B
turns to slow flashing. Adjust the subject
appropriately and set the shutter speed to auto or
around 1/60 (NTSC model)/1/50 (PAL model),
then try adjusting the white balance again.
• It may take a long time to adjust the white
balance, depending on the recording conditions.
If you want to perform a different operation
before completing the adjustment, set the white
balance memory switch B to another position
to temporarily suspend white balance
adjustment.
To adjust the white balance
automatically
Press the WHT BAL button A.
b Notes
• When you set the AUTO/MANUAL switch D
to AUTO, iris, gain, shutter speed and white
balance are adjusted automatically. You cannot
adjust manually.
Adjusting the color tone (Continued)