
User manual
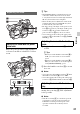
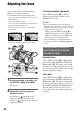
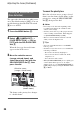

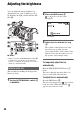
Table Of Contents
- Read this first
- Identifying parts and controls
- Screen indicators
- Table of Contents
- Getting Started
- Step 1: Checking supplied accessories
- Step 2: Charging the battery pack
- Step 3: Attaching the microphone and the lens hood with lens cover
- Step 4: Attaching the accessory shoe
- Step 5: Turning on the camcorder and setting the date and time
- Step 6: Adjusting the LCD screen and viewfinder
- Step 7: Preparing the recording media
- Recording
- Recording
- Adjusting the focus
- Changing the recording setting
- Adjusting the brightness
- Adjusting the color tone
- Audio setup
- Useful functions
- Recording in dim places (Video light)
- Selecting the suitable setting automatically for the recording situation (AUTO MODE setting)
- What you can do with the Wi-Fi function of the camcorder
- Downloading “PlayMemories Mobile”
- Connecting the camcorder to an Android smartphone equipped with the NFC function using One-touch
- Using a smartphone as a remote controller
- Transferring images to a smartphone
- Connecting without using the NFC function (Android)
- Connecting without using the NFC function (iPhone/iPad)
- Customizing the picture quality (Picture profile)
- Setting time data
- Recording with the Slow & Quick Motion function
- Reviewing the most recently recorded scene (Last Scene Review)
- Assigning the functions to the ASSIGN buttons
- Playback
- Editing
- Using the Menu
- Connecting with another device
- Troubleshooting
- Additional Information

40
4 Press the SEL/PUSH EXEC dial
G to lock the shutter speed.
To readjust the shutter speed, repeat
steps from 2.
z Tips
• It is difficult to focus automatically at a lower
shutter speed. Manual focusing with your
camcorder attached to a tripod is recommended.
• When recording under fluorescent lamps,
sodium lamps, or mercury lamps, the picture
may flicker or change colors, or may have
horizontal bands of noise. You may be able to
improve the situation by adjusting the shutter
speed to 1/100 if the power frequency of your
area is 50 Hz, or 1/60 in a 60 Hz area.
• You can switch the shutter speed display
between seconds and degrees ([SHUTTER
DISPLAY], p. 95).
To adjust the shutter speed
automatically
Press the SHUTTER SPEED button D
once.
The shutter speed value disappears, or
appears next to the shutter speed value.
When AE is fixed, appears next to the
shutter speed value.
1 When you set AUTO/MANUAL switch
in [SPOT METER] or [SPOT METER/
FOCUS]
2 When all of iris, gain and shutter speed
are set manually.
3 When the last setting of the exposure is
set to AUTO, and any item in 2 is set to
AUTO.
4 When the last setting of the exposure is
set to MANUAL, and any item in 2 is set
to AUTO.
b Notes
• When you set AUTO/MANUAL switch to
AUTO, or press [EXEC] on the [SPOT
METER] or [SPOT METER/FOCUS] screen,
the exposure is returned to AUTO.
You can record the subject clearly by using
the ND filter B when the recording
environment is too bright.
The ND filters 1, 2 and 3 reduce the volume
of light to about 1/4, 1/16 and 1/64,
respectively.
If flashes during the iris automatic
adjustment, set the ND filter to 1. If
flashes during the iris automatic
adjustment, set the ND filter to 2. If
flashes during the iris automatic
adjustment, set the ND filter to 3.
The ND filter indicator will stop flashing
and remain on the screen.
If flashes, set the ND filter to OFF.
The ND filter icon will disappear from the
screen.
b Notes
• If you change the ND filters B during
recording, the movie and sound may be
distorted.
• When adjusting the iris manually, the ND filter
icon does not flash even if the light volume
should be adjusted with the ND filter.
• If the camcorder cannot detect the ND filter
position (OFF/1/2/3), flashes on the screen.
Make sure that the ND filter is set correctly.
z Tips
• While recording a bright subject, diffraction
may occur if you close the aperture further
down, resulting in a fuzzy focus (this is a
common phenomenon with video cameras). The
ND filter B suppresses this phenomenon and
gives better recording results.
Adjusting the exposure
MANUAL ( )AUTO ( )
MANUAL (all)
Adjusting the volume of light
(ND filter)
Adjusting the brightness (Continued)