
User manual
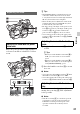
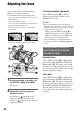

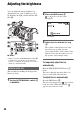
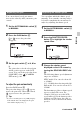
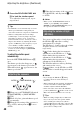
Table Of Contents
- Read this first
- Identifying parts and controls
- Screen indicators
- Table of Contents
- Getting Started
- Step 1: Checking supplied accessories
- Step 2: Charging the battery pack
- Step 3: Attaching the microphone and the lens hood with lens cover
- Step 4: Attaching the accessory shoe
- Step 5: Turning on the camcorder and setting the date and time
- Step 6: Adjusting the LCD screen and viewfinder
- Step 7: Preparing the recording media
- Recording
- Recording
- Adjusting the focus
- Changing the recording setting
- Adjusting the brightness
- Adjusting the color tone
- Audio setup
- Useful functions
- Recording in dim places (Video light)
- Selecting the suitable setting automatically for the recording situation (AUTO MODE setting)
- What you can do with the Wi-Fi function of the camcorder
- Downloading “PlayMemories Mobile”
- Connecting the camcorder to an Android smartphone equipped with the NFC function using One-touch
- Using a smartphone as a remote controller
- Transferring images to a smartphone
- Connecting without using the NFC function (Android)
- Connecting without using the NFC function (iPhone/iPad)
- Customizing the picture quality (Picture profile)
- Setting time data
- Recording with the Slow & Quick Motion function
- Reviewing the most recently recorded scene (Last Scene Review)
- Assigning the functions to the ASSIGN buttons
- Playback
- Editing
- Using the Menu
- Connecting with another device
- Troubleshooting
- Additional Information

33
Recording
The selected area on the LCD screen is
magnified and displayed. It is easier to
confirm the focus setting during manual
focusing. [FOCUS MAGNIFIER] is
assigned to the ASSIGN 6 button (p. 62).
Press ASSIGN 6 button
The center of the screen is magnified.
The setting changes with each press of the
button.
You can adjust the enlarged display
position with the
V/v/B/b button on the
camcorder. Press the EXEC button to set
the enlarged display position back to the
center.
b Notes
• Even though the image appears expanded on the
LCD screen, the recorded image is not
expanded.
z Tips
• You can change the magnification ratio with
[FOCUS MAG RATIO] (p. 94).
Slide the FOCUS switch B to INFINITY
and hold it there.
appears on the screen.
To return to manual focus mode, release the
FOCUS switch B. This function enables
you to set focus on a distant subject even
when the focus is automatically set on a
close subject.
b Notes
• This function is only available during the
manual focus. It is not available during the
automatic focus.
You can focus on the point where you touch
on the LCD screen.
1 Press the MENU button D.
2 Select (CAMERA SET) t
[SPOT FOCUS] with the SEL/
PUSH EXEC dial E.
3 Touch the point to be focused on
the LCD screen.
b Notes
• [SPOT FOCUS] is available only when the
FOCUS switch B is set to MAN.
z Tips
• You can assign this function to an ASSIGN
button (p. 62).
To cancel the spot focus
Press the MENU button D.
Using the expanded focus
(Expanded focus)
Focusing on a distant subject
(Focus infinity)
Enlarged display position
Focusing by touching the LCD
screen (Spot focus)
Continued ,