
User manual
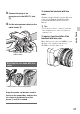
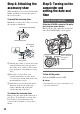
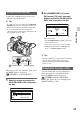
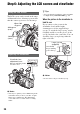
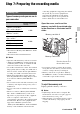
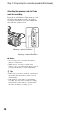
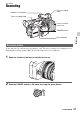
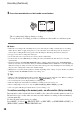
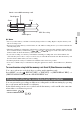
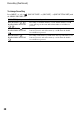
Table Of Contents
- Read this first
- Identifying parts and controls
- Screen indicators
- Table of Contents
- Getting Started
- Step 1: Checking supplied accessories
- Step 2: Charging the battery pack
- Step 3: Attaching the microphone and the lens hood with lens cover
- Step 4: Attaching the accessory shoe
- Step 5: Turning on the camcorder and setting the date and time
- Step 6: Adjusting the LCD screen and viewfinder
- Step 7: Preparing the recording media
- Recording
- Recording
- Adjusting the focus
- Changing the recording setting
- Adjusting the brightness
- Adjusting the color tone
- Audio setup
- Useful functions
- Recording in dim places (Video light)
- Selecting the suitable setting automatically for the recording situation (AUTO MODE setting)
- What you can do with the Wi-Fi function of the camcorder
- Downloading “PlayMemories Mobile”
- Connecting the camcorder to an Android smartphone equipped with the NFC function using One-touch
- Using a smartphone as a remote controller
- Transferring images to a smartphone
- Connecting without using the NFC function (Android)
- Connecting without using the NFC function (iPhone/iPad)
- Customizing the picture quality (Picture profile)
- Setting time data
- Recording with the Slow & Quick Motion function
- Reviewing the most recently recorded scene (Last Scene Review)
- Assigning the functions to the ASSIGN buttons
- Playback
- Editing
- Using the Menu
- Connecting with another device
- Troubleshooting
- Additional Information

29
Recording
b Notes
• Do not eject the memory card that is currently being used for recording. Replace only the memory card
whose slot lamp is off.
• Even if you press the memory card slot button, A or B, while recording movies, you cannot switch the slot
currently being used.
• When the remaining recording time of the memory card being used is less than 1 minute and the other slot
has recordable memory card inserted, [ ] or [ ] appears on the camcorder screen. The
indicator turns off when the memory card is switched.
• If you start recording on a memory card with the remaining recording time of less than 1 minute, the
camcorder may not be able to relay-record. To relay-record without fail, make sure that the memory card
has more than 1 minute when you start recording.
• Seamless playback of relay-recorded movies with this camcorder is not possible.
• You can re-combine relay-recorded movies using the application software “Content Browser” (Windows
only).
To record movies using both the memory card A and B (Simultaneous recording)
You can record movies on both of these recording media simultaneously.
Press MENU t select (REC/OUT SET) t [REC SET] t [SIMUL/RELAY REC] t
[SIMULTANEOUS REC] with the SEL/PUSH EXEC dial.
You can start and stop recording on different recording media at different timing by operating
the record button and the handle record button.
In the default setting, movies are recorded on both the memory card A and B at the same time
when either record button is pressed.
• REC BUTTON:
• HANDLE REC BUTTON:
Changing the setting of the record button/handle record button
Start
Small space
Small space
End
Insert a recordable memory card.
REC: Recording
Continued ,