
User manual
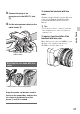
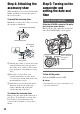
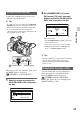
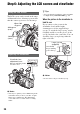
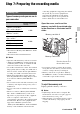
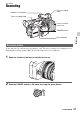
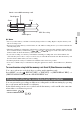
Table Of Contents
- Read this first
- Identifying parts and controls
- Screen indicators
- Table of Contents
- Getting Started
- Step 1: Checking supplied accessories
- Step 2: Charging the battery pack
- Step 3: Attaching the microphone and the lens hood with lens cover
- Step 4: Attaching the accessory shoe
- Step 5: Turning on the camcorder and setting the date and time
- Step 6: Adjusting the LCD screen and viewfinder
- Step 7: Preparing the recording media
- Recording
- Recording
- Adjusting the focus
- Changing the recording setting
- Adjusting the brightness
- Adjusting the color tone
- Audio setup
- Useful functions
- Recording in dim places (Video light)
- Selecting the suitable setting automatically for the recording situation (AUTO MODE setting)
- What you can do with the Wi-Fi function of the camcorder
- Downloading “PlayMemories Mobile”
- Connecting the camcorder to an Android smartphone equipped with the NFC function using One-touch
- Using a smartphone as a remote controller
- Transferring images to a smartphone
- Connecting without using the NFC function (Android)
- Connecting without using the NFC function (iPhone/iPad)
- Customizing the picture quality (Picture profile)
- Setting time data
- Recording with the Slow & Quick Motion function
- Reviewing the most recently recorded scene (Last Scene Review)
- Assigning the functions to the ASSIGN buttons
- Playback
- Editing
- Using the Menu
- Connecting with another device
- Troubleshooting
- Additional Information

28
3 Press the record button or the handle record button.
The recording lamps light up during recording.
To stop the movie recording, press the record button or the handle record button again.
b Notes
• When the access lamp is lit or flashing in red, your camcorder is reading or writing data on recording
media. Do not shake or apply strong force to your camcorder, do not turn the power off, and do not
remove the recording media, battery pack or the AC Adaptor. The image data may be destroyed.
• See page 115 on the recording time of movies.
• Your camcorder can record a movie for about 13 hours continuously.
• If a movie file exceeds 2 GB during recording, the camcorder divides the file and create a new file
automatically.
• The menu settings, the PICTURE PROFILE settings, and the settings made by the AUTO/MANUAL
switch are stored in your camcorder when you slide the POWER switch to OFF. The access lamp lights up
while the settings are being stored. If you remove the battery pack or the AC Adaptor before turning off
the power, the settings may return to the default settings.
• [PP4] may be set for the picture profile by default, depending on the country or region. In that case, [PP4]
is displayed when the POWER switch is set to ON (p. 53).
z Tips
• When recording in high definition image quality (HD), the aspect ratio is fixed to 16:9. When recording in
DV mode, you can switch the aspect ratio to 4:3 ([ WIDE REC], p. 89).
• You can change the screen display during recording (p. 69).
• Indicators displayed on the LCD screen during recording are shown on page 11.
• The recording lamps can be set to stay off ([REC LAMP[F]], [REC LAMP[R]], p. 100).
• You can capture still images from the movies you recorded (p. 77).
To continue recording on the memory cards, one after another (Relay recording)
Insert memory cards each in both slots A and B, so the camcorder switches memory card A (or
B) just before space on the other one runs out, and continues recording on the next memory
card automatically.
Do the following setting before recording.
Press MENU t Select (REC/OUT SET) t [REC SET] t [SIMUL/RELAY REC] t
[RELAY REC] with the SEL/PUSH EXEC dial.
[STBY] t [REC]
Recording (Continued)