
User manual
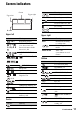

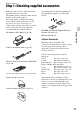
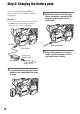
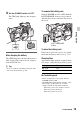
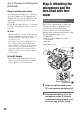
Table Of Contents
- Read this first
- Identifying parts and controls
- Screen indicators
- Table of Contents
- Getting Started
- Step 1: Checking supplied accessories
- Step 2: Charging the battery pack
- Step 3: Attaching the microphone and the lens hood with lens cover
- Step 4: Attaching the accessory shoe
- Step 5: Turning on the camcorder and setting the date and time
- Step 6: Adjusting the LCD screen and viewfinder
- Step 7: Preparing the recording media
- Recording
- Recording
- Adjusting the focus
- Changing the recording setting
- Adjusting the brightness
- Adjusting the color tone
- Audio setup
- Useful functions
- Recording in dim places (Video light)
- Selecting the suitable setting automatically for the recording situation (AUTO MODE setting)
- What you can do with the Wi-Fi function of the camcorder
- Downloading “PlayMemories Mobile”
- Connecting the camcorder to an Android smartphone equipped with the NFC function using One-touch
- Using a smartphone as a remote controller
- Transferring images to a smartphone
- Connecting without using the NFC function (Android)
- Connecting without using the NFC function (iPhone/iPad)
- Customizing the picture quality (Picture profile)
- Setting time data
- Recording with the Slow & Quick Motion function
- Reviewing the most recently recorded scene (Last Scene Review)
- Assigning the functions to the ASSIGN buttons
- Playback
- Editing
- Using the Menu
- Connecting with another device
- Troubleshooting
- Additional Information

18
Step 2: Charging the battery pack
You can charge the “InfoLITHIUM”
battery pack (L series) with the supplied
AC Adaptor
b Notes
• You can use a large capacity battery pack, NP-
F770/NP-F970 (sold separately), with your
camcorder. You cannot use NP-F570.
1 Press the battery pack against the
back of your camcorder and slide
it down.
2 With the B mark on the DC plug
facing outwards, connect the DC
plug to the DC IN jack on your
camcorder.
3 Connect the power cord (mains
lead) to the AC Adaptor and the
wall outlet (wall socket).
DC IN jack
Power cord
(mains lead)
AC Adaptor
To the wall outlet
(wall socket)
DC plug
B mark