
User manual
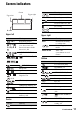

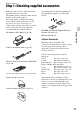
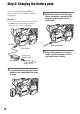
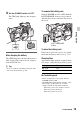
Table Of Contents
- Read this first
- Identifying parts and controls
- Screen indicators
- Table of Contents
- Getting Started
- Step 1: Checking supplied accessories
- Step 2: Charging the battery pack
- Step 3: Attaching the microphone and the lens hood with lens cover
- Step 4: Attaching the accessory shoe
- Step 5: Turning on the camcorder and setting the date and time
- Step 6: Adjusting the LCD screen and viewfinder
- Step 7: Preparing the recording media
- Recording
- Recording
- Adjusting the focus
- Changing the recording setting
- Adjusting the brightness
- Adjusting the color tone
- Audio setup
- Useful functions
- Recording in dim places (Video light)
- Selecting the suitable setting automatically for the recording situation (AUTO MODE setting)
- What you can do with the Wi-Fi function of the camcorder
- Downloading “PlayMemories Mobile”
- Connecting the camcorder to an Android smartphone equipped with the NFC function using One-touch
- Using a smartphone as a remote controller
- Transferring images to a smartphone
- Connecting without using the NFC function (Android)
- Connecting without using the NFC function (iPhone/iPad)
- Customizing the picture quality (Picture profile)
- Setting time data
- Recording with the Slow & Quick Motion function
- Reviewing the most recently recorded scene (Last Scene Review)
- Assigning the functions to the ASSIGN buttons
- Playback
- Editing
- Using the Menu
- Connecting with another device
- Troubleshooting
- Additional Information

17
Getting Started
Getting Started
Step 1: Checking supplied accessories
Make sure that you have following items
supplied with your camcorder.
The number in the parentheses indicates the
number of that item supplied.
Recording media, rechargeable battery
pack, and AC Adaptor/Charger are sold
separately. See page 18 for types of
rechargeable battery packs that you can use
on the camcorder. See page 46 for the
recommended AC Adaptor/Charger.
AC Adaptor (AC-L100C) (1) (p. 18)
Power cord (mains lead) (1) (p. 18)
Wireless Remote Commander (RMT-845)
(1) (p. 10)
A button-type lithium battery is already installed.
Large eyecup (1) (p. 24)
Lens hood with lens cover (1) (p. 21)
Accessory shoe kit (Accessory shoe (1),
Accessory shoe plate (1), screws (4))
(p. 22)
CD-ROM “Manuals for Digital HD Video
Camera Recorder” (1)
Operating Guide (2)
Software Downloads
When the unit is used with a PC
connection, download device drivers, plug-
ins, and application software, where
applicable, from the Sony Professional
products web site.
Sony Professional products web site
homepage:
U.S.A. http://pro.sony.com
Canada http://www.sonybiz.ca
Latin America http://sonypro-latin.com
Europe, Middle East and Africa
http://www.pro.sony.eu
Japan http://www.sonybsc.com
Asia Pacific http://pro.sony-asia.com
Korea http://bp.sony.co.kr
China http://pro.sony.com.cn
Although the data regarding recorded
materials are stored over multiple files and
folders, you can easily handle the clips
without considering its data and directory
structure, by using the dedicated application
software.