
User manual
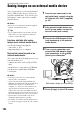
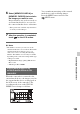


Table Of Contents
- Read this first
- Identifying parts and controls
- Screen indicators
- Table of Contents
- Getting Started
- Step 1: Checking supplied accessories
- Step 2: Charging the battery pack
- Step 3: Attaching the microphone and the lens hood with lens cover
- Step 4: Attaching the accessory shoe
- Step 5: Turning on the camcorder and setting the date and time
- Step 6: Adjusting the LCD screen and viewfinder
- Step 7: Preparing the recording media
- Recording
- Recording
- Adjusting the focus
- Changing the recording setting
- Adjusting the brightness
- Adjusting the color tone
- Audio setup
- Useful functions
- Recording in dim places (Video light)
- Selecting the suitable setting automatically for the recording situation (AUTO MODE setting)
- What you can do with the Wi-Fi function of the camcorder
- Downloading “PlayMemories Mobile”
- Connecting the camcorder to an Android smartphone equipped with the NFC function using One-touch
- Using a smartphone as a remote controller
- Transferring images to a smartphone
- Connecting without using the NFC function (Android)
- Connecting without using the NFC function (iPhone/iPad)
- Customizing the picture quality (Picture profile)
- Setting time data
- Recording with the Slow & Quick Motion function
- Reviewing the most recently recorded scene (Last Scene Review)
- Assigning the functions to the ASSIGN buttons
- Playback
- Editing
- Using the Menu
- Connecting with another device
- Troubleshooting
- Additional Information

108
There is a time difference between the point when the record button is pressed
and the point that the recording movie is started or stopped actually.
• On your camcorder, there may be a slight time difference between the point where you press
the record button and the actual point that recording movie starts/stops. This is not a
malfunction.
The aspect ratio (16:9 (wide)/4:3) cannot be changed.
• The aspect ratio of high definition image quality (HD) movies is 16:9 (wide).
Automatic focus does not function.
• Set the FOCUS switch to AUTO to enable the automatic focus function (p. 32).
• Adjust the focus manually if the automatic focus does not work properly (p. 32).
Menu items are grayed out or do not work.
• You cannot select grayed out display items in the current recording/playback situation.
• There are some functions you cannot activate simultaneously. The following list shows
examples of unworkable combinations of functions and menu items.
Iris, gain, shutter speed, or white balance cannot be adjusted manually.
• Set the AUTO/MANUAL switch to MANUAL.
Tiny spots in white, red, blue, or green appear on the LCD screen.
• This phenomenon appears when using a slow shutter speed (p. 39). This is not a malfunction.
The subjects passing by the frame very fast appear crooked.
• This is called the focal plane phenomenon. This is not a malfunction. Because of the way that
the image device (CMOS sensor) reads out image signals, the subjects passing by the frame
rapidly might appear crooked depending on the recording conditions.
Horizontal stripes appear on the image.
• This occurs when recording pictures under a fluorescent lamp, sodium lamp, or mercury
lamp. This is not a malfunction. This can be improved by changing the shutter speed (p. 39).
Cannot use Situation
[ON/OFF] of [AE SHIFT] All of iris, gain and shutter speed are set manually.
[ZEBRA], [PEAKING] [COLOR BAR] is set to [ON].
[ON/OFF] of [MARKER] [FOCUS MAGNIFIER] is set to [ON].
[TC PRESET] [TC MAKE] is set to [REGENERATE].
[COLOR BAR] Movies are being recorded.
[FOCUS MAGNIFIER] is set to [ON].
Troubleshooting (Continued)