
User manual
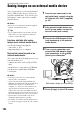


Table Of Contents
- Read this first
- Identifying parts and controls
- Screen indicators
- Table of Contents
- Getting Started
- Step 1: Checking supplied accessories
- Step 2: Charging the battery pack
- Step 3: Attaching the microphone and the lens hood with lens cover
- Step 4: Attaching the accessory shoe
- Step 5: Turning on the camcorder and setting the date and time
- Step 6: Adjusting the LCD screen and viewfinder
- Step 7: Preparing the recording media
- Recording
- Recording
- Adjusting the focus
- Changing the recording setting
- Adjusting the brightness
- Adjusting the color tone
- Audio setup
- Useful functions
- Recording in dim places (Video light)
- Selecting the suitable setting automatically for the recording situation (AUTO MODE setting)
- What you can do with the Wi-Fi function of the camcorder
- Downloading “PlayMemories Mobile”
- Connecting the camcorder to an Android smartphone equipped with the NFC function using One-touch
- Using a smartphone as a remote controller
- Transferring images to a smartphone
- Connecting without using the NFC function (Android)
- Connecting without using the NFC function (iPhone/iPad)
- Customizing the picture quality (Picture profile)
- Setting time data
- Recording with the Slow & Quick Motion function
- Reviewing the most recently recorded scene (Last Scene Review)
- Assigning the functions to the ASSIGN buttons
- Playback
- Editing
- Using the Menu
- Connecting with another device
- Troubleshooting
- Additional Information

105
Troubleshooting
Troubleshooting
Troubleshooting
If you run into any problems using your camcorder, follow the flow chart below.
• Power sources/LCD screen/Wireless Remote Commander···p. 105
• Memory card···p. 106
• Recording···p. 107
• Playback···p. 109
• Connecting to TV···p. 110
• Copying/Editing/Connecting to other devices···p. 110
• Connecting to a computer···p. 111
The power does not turn on or abruptly turns off.
• Attach a charged battery pack to the camcorder (p. 18).
• Use the AC Adaptor to connect the camcorder to a wall outlet (wall socket) (p. 18).
The camcorder does not operate even when the power is set to on.
• Disconnect the power source (battery or AC Adaptor), then reconnect it after about 1 minute.
• Press the RESET button (p. 9) using a pointed object.
The camcorder gets warm.
• The camcorder may get warmer while you use it. This is not a malfunction.
The remaining battery indicator does not indicate the correct figure.
• Ambient temperature is too high or too low, or the battery pack has not been charged enough.
This is not a malfunction.
• Fully charge the battery again. If the problem persists, the battery may be worn-out. Replace
it with a new one (p. 18, 120).
• The indicated figure may not be correct in certain circumstances. For example, when you
open or close the LCD screen, it takes about 1 minute to display the correct remaining
battery.
1 Check your camcorder, referring to the items on pages 105 to 111.
2 Disconnect the power source, reconnect the power source after about 1 minute and turn
on your camcorder.
3 Press the RESET button (p. 9) with a pointed object, then turn on your camcorder.
This operation will reset the date, time and area settings.
4 Consult your Sony dealer or local authorized Sony service facility.
Power sources/LCD screen/Wireless Remote Commander
Continued ,