
User manual
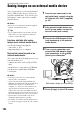


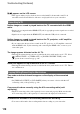
Table Of Contents
- Read this first
- Identifying parts and controls
- Screen indicators
- Table of Contents
- Getting Started
- Step 1: Checking supplied accessories
- Step 2: Charging the battery pack
- Step 3: Attaching the microphone and the lens hood with lens cover
- Step 4: Attaching the accessory shoe
- Step 5: Turning on the camcorder and setting the date and time
- Step 6: Adjusting the LCD screen and viewfinder
- Step 7: Preparing the recording media
- Recording
- Recording
- Adjusting the focus
- Changing the recording setting
- Adjusting the brightness
- Adjusting the color tone
- Audio setup
- Useful functions
- Recording in dim places (Video light)
- Selecting the suitable setting automatically for the recording situation (AUTO MODE setting)
- What you can do with the Wi-Fi function of the camcorder
- Downloading “PlayMemories Mobile”
- Connecting the camcorder to an Android smartphone equipped with the NFC function using One-touch
- Using a smartphone as a remote controller
- Transferring images to a smartphone
- Connecting without using the NFC function (Android)
- Connecting without using the NFC function (iPhone/iPad)
- Customizing the picture quality (Picture profile)
- Setting time data
- Recording with the Slow & Quick Motion function
- Reviewing the most recently recorded scene (Last Scene Review)
- Assigning the functions to the ASSIGN buttons
- Playback
- Editing
- Using the Menu
- Connecting with another device
- Troubleshooting
- Additional Information

104
Creating a standard definition image quality
(DV) disc with a recorder, etc.
You can copy images on your camcorder
onto a disc or video cassette, by connecting
your camcorder to a disc recorder with the
A/V connecting cable (sold separately).
Refer also to the instruction manuals
supplied with the devices to be connected.
b Notes
• High definition image quality (HD) movies will
be copied with standard definition image quality
(DV).
1 Connect your camcorder to the
wall outlet (wall socket) using the
AC Adaptor AC-L100C (supplied)
(p. 20).
2 Insert the recording media in the
recording device.
If your recording device has an input
selector, set it to the input mode.
3 Connect your camcorder to the
recording device (a disc recorder,
etc.) with the A/V connecting
cable (sold separately).
Connect your camcorder to the input
jacks of the recording device.
4 Start playback on your
camcorder, and record it on the
recording device.
For details, refer to the instruction
manuals supplied with the device to be
connected.
5 When copy is finished, stop the
recording device, and then your
camcorder.
b Notes
• Since copying is performed via analog data
transfer, the image quality may deteriorate.
• You cannot copy images to recorders connected
with an HDMI cable.
• When you do not want to display the counter,
etc. on the screen of the recording device, press
the MENU button, and select (DISPLAY
SET) t [DISPLAY OUTPUT] t [LCD
PANEL].
• To copy date/time information and camera data,
press the DATA CODE button and make a
desired setting. In addition, press the MENU
button, select (DISPLAY SET) t
[DISPLAY OUTPUT] t [ALL OUTPUT].
• When the screen size of display devices (TV,
etc.) is 4:3, set [DOWN CONVERT TYPE]
(p. 90).
• When you connect a monaural device, connect
the yellow plug of the A/V connecting cable
(sold separately) to the video input jack, and the
white (left channel) or the red (right channel)
plug to the audio input jack on the device.
• If the recorder has PIN jacks, a BNC to PIN
adapter is required.
VIDEO
AUDIO
(Red)
(White)
(Yellow)