
User manual
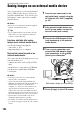
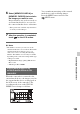


Table Of Contents
- Read this first
- Identifying parts and controls
- Screen indicators
- Table of Contents
- Getting Started
- Step 1: Checking supplied accessories
- Step 2: Charging the battery pack
- Step 3: Attaching the microphone and the lens hood with lens cover
- Step 4: Attaching the accessory shoe
- Step 5: Turning on the camcorder and setting the date and time
- Step 6: Adjusting the LCD screen and viewfinder
- Step 7: Preparing the recording media
- Recording
- Recording
- Adjusting the focus
- Changing the recording setting
- Adjusting the brightness
- Adjusting the color tone
- Audio setup
- Useful functions
- Recording in dim places (Video light)
- Selecting the suitable setting automatically for the recording situation (AUTO MODE setting)
- What you can do with the Wi-Fi function of the camcorder
- Downloading “PlayMemories Mobile”
- Connecting the camcorder to an Android smartphone equipped with the NFC function using One-touch
- Using a smartphone as a remote controller
- Transferring images to a smartphone
- Connecting without using the NFC function (Android)
- Connecting without using the NFC function (iPhone/iPad)
- Customizing the picture quality (Picture profile)
- Setting time data
- Recording with the Slow & Quick Motion function
- Reviewing the most recently recorded scene (Last Scene Review)
- Assigning the functions to the ASSIGN buttons
- Playback
- Editing
- Using the Menu
- Connecting with another device
- Troubleshooting
- Additional Information

103
Connecting with another device
6 Select [MEMORY CARD A] or
[MEMORY CARD B] that contains
the images you want to save.
Images that have not yet been saved on
an external media device are saved on
the connected media device at this time.
• This operation is available only when there
are newly recorded images.
7 After the operation is completed,
touch on the LCD screen.
b Notes
• The number of scenes you can save on the
external media device are as follows. Even if the
external media device has free space, you
cannot save scenes exceeding the following
number. The number of scenes may be smaller
depending on the camcorder setting and the type
of images recorded.
– High definition image quality (HD) movies:
Max. 3,999
– Still images: Max. 40,000
When the camcorder is connected to the
external media device, the images saved in
the external media device are displayed on
the LCD screen of the camcorder. The
recording media icon on the VISUAL
INDEX screen changes as follows.
You can make menu settings of the external
media device such as deleting images.
Press the MENU button and select the
(EDIT) menu.
Playing back images in the
external media device on the
camcorder