Digital Photo Printer DPP-FPHD1 Operating Instructions Before operating this printer, please read this manual thoroughly and retain it for future reference. Owner’s Record The model and serial numbers are located on the bottom. Record the serial number in the space provided below. Refer to these numbers whenever you call upon your Sony dealer regarding this product. Model No. DPP-FPHD1 Serial No.
WARNING To reduce fire or shock hazard, do not expose the unit to rain or moisture. For Customers in the U.S.A. CAUTION You are cautioned that any changes or modifications not expressly approved in this manual could void your authority to operate this equipment. Note: This equipment has been tested and found to comply with the limits for a Class B digital device, pursuant to Part 15 of the FCC Rules.
Disposal of Old Electrical & Electronic Equipment (Applicable in the European Union and other European countries with separate collection systems) This symbol on the product or on its packaging indicates that this product shall not be treated as household waste. Instead it shall be handed over to the applicable collection point for the recycling of electrical and electronic equipment.
Checking the contents of the package Make sure that the following accessories are supplied with your printer. A/V connecting cable (1) AC adaptor (AC-S2422) (1) Component video cable (1) AC power cord * (1) * The AC power cord illustrated is for 120V only. The plug shape and specifications of the AC power cord differ depending on the region you purchased the printer.
Table of contents Checking the contents of the package ......................................................4 What you can do with this printer ..............................................................6 Identifying the parts...................................................................................8 Preparations ............................................................................................11 Preparing the print pack.................................................................
What you can do with this printer You can enjoy viewing images on a high definition TV and print the desired image instantly using the digital photo printer DPP-FPHD1. Shoot images using the DSC-T20. For details on how to use the DSC-T20, refer to the Instruction Manual supplied with the camera and the Cyber-shot Handbook (PDF). Shooting Setting 6 Place the camera on the camera adaptor.
Playback Charging You can enjoy images on the camera on a high-definition TV using the component video cable (supplied). t page 17 When you turn off the power of the camera, the camera adaptor can charge the battery pack inside the camera. The camera adaptor can charge the battery faster than the battery charger supplied with the camera. t page 20 You can play back a series of recorded images with the desired effect and music (Slide show).
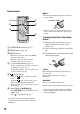
Identifying the parts For details, see the pages indicated in the parentheses. Printer A Stand attachment slit (page 16) F B 1 (on/standby) indicator • Lights in red: The printer is in the standby mode. • Lights in yellow green: The printer is powered on. • Flashes in yellow green: Printing is in process. It flashes also when an error occurs. C ACCESS indicator (page 19) A B C D E • Lights: The camera is being connected to the printer. • Flashes: The image to be printed is damaged.
G H I J G Ventilation holes H DC IN 24V jack (page 15) Insert the AC power adaptor supplied here, and then connect the AC power adaptor and the wall outlet with the supplied AC power cord.
Remote control PNotes • Remove the insulation sheet before using the remote control. A D B E C F Insulation sheet • Point the remote control towards the remote sensor on the camera adaptor to operate your camera. To change the battery of the remote control A SLIDE SHOW button (page 17) B PRINT button (page 18) C MENU button* • Functions operate the same as the MENU buttons on the camera. • However, “Retouch” function of the Viewing menu cannot be used.
Preparations Preparing the print pack To print an image, you need a print pack designed for the printer. The sample color print pack contains a set of 5 sheets of post card size print paper and an ink ribbon for 5 prints. Size of print paper The size of the post card size print paper is as follows: • Post card (4 × 6 inch/10 × 15 cm) size (101.6 × 152.
Loading the ink ribbon Removing the ink ribbon 1 Pull and open the ink ribbon When the ink ribbon runs out, the ERROR indicator will flash slowly. Open the ink ribbon compartment cover, push up the eject lever, and remove the used ink ribbon. compartment cover. Eject lever 2 Insert the ink ribbon in the arrow direction until it clicks into place. PNotes • Use the ink ribbon contained in the same box with the print paper. • Do not touch the ink ribbon or place the ink ribbon in a dusty location.
• Never put your hand into the ink ribbon compartment. The thermal head reaches high temperatures, especially after repeated printing. • Do not rewind the ink ribbon and use the rewound ink ribbon for printing. Otherwise, proper printing result will not be obtained, or even a malfunction may occur. • If the ink ribbon does not click into place, remove it and then re-insert it. If the ink ribbon is too slack to be loaded, wind the ink ribbon in the direction of the arrow to remove the slack.
3 Set the print paper into the tray. 4 Remove the protective sheet. You can set up to 20 sheets of print paper. Riffle the print paper thoroughly. Insert the print paper into the tray, with the protective sheet at the top. If there is no protective sheet: Riffle the print paper thoroughly. Then insert the print paper with its printing surface (the side with no imprint) facing up. 5 Close the paper tray lid.
6 Insert the paper tray into the printer. Insert the paper tray straight in until it reaches the end. Connecting 1 Insert the plug of the AC adaptor (supplied) to the DC IN 24V jack of the printer. 2 Insert one plug of the AC power cord to the supplied AC adaptor and insert the other plug of the AC power cord to the wall outlet (wall socket) close by. The 1 (on/standby) indicator lights in red. PNotes • Do not remove the paper tray during printing.
3 Connect the printer to a TV. Connect the printer to the high definition TV with the component video cable and the A/V connecting cable. To install the printer vertically You can attach the stand attachments to the printer and install the printer vertically. Align v markers on the stand attachment slit and stand attachment.
Viewing images on the TV PNote Check the “USB Connect” setting of the camera is set to “PictBridge” or “Auto”. For details, refer to the Instruction Manual supplied with the camera and the Cyber-shot Handbook. 3 Press 1 on the remote control to turn on the power of the camera. The print menu appears on the screen. You can play back images by connecting to the TV with the A/V connecting cable (supplied) or the component video cable (supplied) together with the A/V connecting cable.
Printing images • You can print images by pressing either the control buttons on the remote control or on the camera. 1 Place the camera on the camera adaptor and turn on the power of the camera. The print menu appears on the screen. 4 Select desired images with the control buttons. 1 Select the images with b/B, and press at the center. 2 Press the MENU button. 3 Select “OK”, and press center. at the 5 Set the print mode.
• The print paper emerges from the rear a few times during printing. Do not touch or pull out the paper that appeared. Make sure to spare enough space behind the printer, such as by using the paper protector, etc., during printing. • If print paper runs out during continuous printing or if you print with no print paper in the paper tray, the printer’s ERROR indicator lights. Feed the print paper without turning off the power and resume printing.
Charging the battery pack Turn off the camera and place the camera with the battery pack inserted on the camera adaptor. Charging starts automatically. The CHARGE indicator of the camera adaptor lights up. • When the camera is turned on, the camera adaptor stops charging the battery pack. • When the charging reaches to Normal charge*, the CHARGE indicator goes off. * Recording and playback time with Normal charge is approximately 90% of Full charge.
Troubleshooting If trouble occurs If you run into any problems using the printer, use the following guidance to solve the problem. If the problem persists, consult your Sony dealer. x Power/Charging Cannot turn on the printer. • Check whether the AC power cord is properly connected to an AC outlet. Unable to charge the battery pack (when the CHARGE indicator fails to light). • Turn the camera off. • Check whether the AC adaptor is properly connected.
x Printing An error is displayed on the camera and you cannot print images. • The ink ribbon does not match the paper type. Insert the correct print paper that matches the ink ribbon loaded to the printer. To change the ink ribbon, stop printing, and replace the ink ribbon, then resume printing. Print paper does not feed. The printer may feed multiple paper. The printer may feed paper diagonally. • If the print paper is not properly loaded to the printer, it may cause a malfunction.
x Printed results The printed pictures are poor in quality. • Dust is on the ink ribbon. Wipe the plastic part of the ink ribbon and remove dust. • Dust or fingerprints are imprinted on the printed surface. Do not touch the printing surface (the glossy side with no imprint). Fingerprints on the printing surface may result in imperfect printing. • Used print paper or ink ribbon is being used again. Do not use a used print paper.
x Others Cannot insert the ink ribbon easily. • Remove the ink ribbon and then re-insert it. Only when the ink ribbon is too slacked to be loaded, wind the ink ribbon in the direction of the arrow to remove the slack. (tpage 13) The ink ribbon cannot be removed. • Keep the paper tray inserted and turn off the 1 (on/standby) button and then turn it on. After the initial motion stops, remove the ink ribbon. If this does not solve the problem, contact Sony service facilities or your Sony dealer.
If paper jams If the print paper jams, the ERROR indicator lights or flashes rapidly and printing stops. When the ERROR indicator lights, remove the print paper and resume printing. When the ERROR indicator flashes rapidly, disconnect the AC power cord (mains lead) from the wall outlet (wall socket), then insert it again. When the printer’s initial loading process ends, remove the paper tray from the printer.
4 Place the cleaning sheet into the paper tray. Insert the cleaning sheet with the no-imprint side facing up. surface without imprints 5 Set the paper tray into the printer. The printer starts cleaning automatically. The 1 (on/standby) indicator flashes slowly in green. After the cleaning is finished, the cleaning sheet is automatically ejected from the paper eject slot. 6 Remove the cleaning cartridge and cleaning sheet from the printer.
Precautions On safety • Be careful not to set or drop any heavy • • • • • • objects on the power cord, or to damage the power cord in any way. Never operate this printer with a damaged power cord. Should any solid object or liquid fall into the cabinet, unplug the printer and have it checked by qualified personnel before operating it any further. Never disassemble the printer. To disconnect the power cord, pull it out by the plug. Never pull the power cord itself.
Notes on storing the print paper and the ink ribbon When you store the print paper or the ink ribbon, pay attention to the following. • Avoid placing the print paper or the ink ribbon in a location subject to high temperatures, high humidity, excessive dust or direct sunlight. • When you are going to store partiallyused print paper or ink ribbon, store it in its original bag.
Specifications x Printer Mass Printing method Dye sublimation printing (Yellow/Magenta/Cyan 3 pass) Resolution 300 (H) × 300 (V) dpi Equivalent to 3 color Ink-Jet 4800 dpi × 4800 dpi *1 6 color Ink-Jet 3810 dpi × 3810 dpi *2 Image processing per dot 256 levels (8 bits for each Yellow/Magenta/Cyan), approx. 16 770 000 colors Printing size Post Card (4 × 6 inch/10 × 15 cm) size: 101.6 × 152.4 mm (maximum, borderless) Printing time (per sheet) PictBridge mode: Approx. 60 sec. : 8 Mega, File size 2.
Display range of images x Display range The full high-definition TV can display 1920 × 1080 pixels fully and its aspect ratio is 16:9. Images on a high definition TV Print paper (3:2) Picture size Normal (4:3) : Displayed in dark color. The top and bottom margins are slightly cut off. : Displayed in dark color. The whole image is printed. 3:2 16:9 Borderless print The left and right margins are slightly cut off. Border print The whole image is slightly scaled down and entirely printed.
Additional information on this product and answers to frequently asked questions can be found at our Customer Support Website. Printed on 70% or more recycled paper using VOC (Volatile Organic Compound)-free vegetable oil based ink.