3-078-153-11 (1) Network Function Operating Instructions Registration code (for a detailed explanation of this cord, see page 27.
On trademarks •ImageStation is the registered trademark of Sony Corporation. •“Memory Stick” and are registered trademarks of Sony Corporation. •The BLUETOOTH trademarks are owned by their proprietor and used by Sony Corporation under license. •America Online, AOL, and the AOL Triangle logo are registered trademarks of America Online, Inc. •NetFront by Access Co., Ltd. is adopted for the Internet function of this product. NetFront is a registered trademark of Access Co., Ltd in Japan.
Table of contents Introduction Preparation Using the NETWORK functions .............. 17 Communicating with Bluetooth devices ................................................................ 18 Before communication ....................... 18 Registering a Bluetooth device ......... 19 Using your Modem Adaptor with Bluetooth Function ...................... 19 Selecting other Bluetooth devices from the list .................................. 25 Deleting a registered Bluetooth device from the list ...........
– Introduction – The network function on the camcorder Congratulations on your purchase of this Sony Handycam.
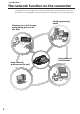
The network function on the camcorder Showing your still images and moving pictures on the Web You can upload still images and moving pictures to your Album on the Web and store them on the Internet, and you can show them to your friends. You can send or receive email anytime, and attach still images and moving pictures to email messages. Easy access to the Internet Introduction Sending/receiving email* You can view a web page via the Internet.
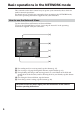
Basic operations in the NETWORK mode This section describes basic control ways to operate your camcorder, those which are used for network operations. For details on how to hold your camcorder when operating in the NETWORK mode, refer to the operating instructions supplied with your camcorder. How to use the Network Menu Tap the desired Network Function on Network Menu. To access the Network Menu, refer to “Accessing the network” in the operating instructions supplied with your camcorder.
Basic operations in the NETWORK mode How to use the stylus Tap the desired button on the screen with the stylus. The selected button turns orange. Introduction The buttons required for operating your camcorder are displayed on the LCD screen. Operate by pressing the buttons on the screen directly but lightly with the stylus provided. In this manual, pressing the buttons in this way using the stylus is referred to as “tapping”. , stylus Notes •Use the stylus supplied to tap the LCD screen.
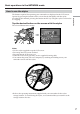
Basic operations in the NETWORK mode How to input characters You have to frequently enter characters, such as email addresses, or web pages addresses (URL), to use the network function. This section describes how to input characters. 1 (1) Open the Network Menu. For details on how to open the Network Menu, refer to “Accessing the network” in the operating instructions supplied with your camcorder. (2) Tap [ Mail]. The Send screen appears. , (3) Tap [To]. , (4) Tap [ New].
Basic operations in the NETWORK mode 2 Selecting the character type Tap [abcy123], then tap the desired character type. Introduction abc: When inputting alphabetical characters. 123: When inputting numerical characters. When you selected abc When you selected 123 3 Inputting characters (1) Tap the character you want to input. , (2) After you input the characters, tap [Enter]. The Send screen appears again.
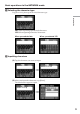
Basic operations in the NETWORK mode Character input screen 1 2 3 4 5 10 9 6 8 7 1 [abcy123] button A list box appears when you tap the [abcy123] button. Tap the desired type of letter from the list box. 2 [a/A] button [a/A] button is displayed when you input alphabetical characters. You can switch between upper case and lower case. 3 Input byte number/maximum byte number 4 Preferences You can change the keyboard type for alphabet input.
Basic operations in the NETWORK mode The available characters list When selecting [abc] (PC Style) (Alphabetical order) a b c d e f g h i j k l n o p q r s t u v w x y z A B C D E F G H I J K L M N O P Q R S T U V W X Y Z Introduction Alphabetical characters The alphabet keyboard has 2 types (PC Style and Alphabetical order). The default setting is PC Style. You can change the keyboard setting in . See page 16 for more information.
Basic operations in the NETWORK mode When selecting [123] Symbol characters (Numerical order) 1 2 3 + ( ) $ 4 5 7 8 * 0 C \ % 6 – [ ] 9 / { } & ˆ | ˜ ` ” ’ # = < > , . : ; _ To switch between upper and lower case alphabet letters Tap [a/A] to change the alphabetical keyboard, then enter characters. To delete a character Move the cursor with the stylus to the right of the character at which you want to delete, tap [Back space].
Basic operations in the NETWORK mode E.g., Enter “Hello” into the Subject item on the Send screen 1 Introduction (1) Open the Network Menu. For details on how to open the Network Menu, refer to “Accessing the network” in the operating instructions supplied with your camcorder. (2) Tap [ Mail]. The Send screen appears. , 2 Entering the subject of a message (1) Tap [Subject]. (2) Tap [ New]. The character input screen appears.
Basic operations in the NETWORK mode 3 (1) Tap [abcy123], then tap [abc]. (2) Tap [a/A] to be able to enter upper-case letters. , (3) Tap [H]. “H” is entered. , (4) Tap [a/A] to enter lower-case letters.
Basic operations in the NETWORK mode (5) Tap [e]. “e” is entered. Introduction , (6) Tap [l], [l] and [o]. “llo” is entered. , (7) Tap [Enter]. “Hello” is entered and the Send screen appears again.
Basic operations in the NETWORK mode Character input setting Keyboard You can change the display of the alphabet, PC arrangement keyboard or ABC arrangement keyboard into a setup you want when you input characters. 1 Tap in the character input screen. , 2 Tap the desired setting. You can set as the following two displays when [abcy123] is set as [abc]. (PC Style is the default setting.
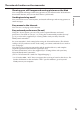
– Preparation – Using the NETWORK functions There are three Network functions, namely Album on the Web, email, and browser. To use the Album on the Web and So-net, you need to complete customer registration. “So-net” is charged service. For more information, refer to the supplied flyer “Getting Online with your Sony Network Handycam® camcorder”. 1 2 3 4 5 Bluetooth device registration (p. 19) DI customer registration (p. 27) Album registration (p. 30) So-net registration* (p. 32) Network Setup (p.
Communicating with Bluetooth devices Before communication What is the Bluetooth wireless technology? The Bluetooth wireless technology allows communication between various Bluetooth devices without using cables. Devices which can use this technology include PCs, computer peripheral devices, PDAs, and mobile phones. This omnidirectional communication system enables communication even if the Bluetooth device is in a bag or having obstacles between the devices.
Communicating with Bluetooth devices Registering a Bluetooth device For more information about Bluetooth devices compatible with your camcorder, access the following URL: “http://www.myimagecam.com/” Preparation To communicate with a Bluetooth device, you need to register it. Here we describe how to register the Sony Modem Adaptor with Bluetooth Function. Once registration is complete, you do not have to reregister the Bluetooth device as long as you do not cancel registration.
Communicating with Bluetooth devices 2 Specifying your Modem Adaptor with Bluetooth Function as the connection device (1) Open the Network Menu. For details on how to open the Network Menu, refer to “Accessing the network” in the operating instructions supplied with your camcorder. (2) Tap [Setup]. The Setup screen appears. , (3) Tap [Bluetooth Setup]. The Bluetooth Setup screen appears.
Communicating with Bluetooth devices (4) Tap [Select]. The Bluetooth devices list appears. When making a registration for the first time, only [ Return] and [ New] are indicated. The list shows up to three Bluetooth devices. You can select one of the latest used three Bluetooth devices from the list. Preparation , Tip The last-used Bluetooth device is listed next to [ Return] and [ New]. (5) Tap [ New]. Your camcorder starts searching for your Bluetooth devices.
Communicating with Bluetooth devices (7) Enter the passkey. For details on how to input characters, see “How to input characters” (p. 8). For example, when using the BTA-NW1/BTA-NW1A Modem Adaptor with Bluetooth Function, the passkey is its serial number which is indicated on the label on the rear panel. ® MODEL NO.
Communicating with Bluetooth devices (10) Tap [Exit]. The Setup screen appears again. For details on how to turn off the Modem Adaptor with Bluetooth Function, refer to the operating instructions supplied with your Modem Adaptor with Bluetooth Function. Preparation (11) Tap [Exit]. The Network Menu appears again. , The registration is complete, and your camcorder can communicate with your Bluetooth device. Displaying information on your camcorder (1) Open the Network Menu.
Communicating with Bluetooth devices (2) Tap [Setup]. The Setup screen appears. , (3) Tap [Bluetooth Setup]. The Bluetooth Setup screen appears. , (4) Tap [Info.]. The Bluetooth Setup: Self information screen appears. The model name This is the unique address assigned to each camcorder at the factory. This address is used when exchanging information between devices. This address cannot be modified. (The number indicated on the illustration is an example number.
Communicating with Bluetooth devices Selecting other Bluetooth devices from the list Tap the Bluetooth device you want to specify in step 4 of 2 on page 21. The device information is indicated. Tap [Exit]. When deleting a Bluetooth device from the list, follow the procedure below. Preparation Deleting a registered Bluetooth device from the list (1) Open the Network Menu.
Communicating with Bluetooth devices (4) Tap [Select]. The Bluetooth devices list appears. , (5) Tap the device you want to delete. The device name and address of the selected device are indicated. , (6) Tap [Delete]. The selected device is deleted from the list.
Customer registration DI customer registration You can make your DI customer registration in one of the following ways: 1 Online registration using your computer (recommended) 2 Online registration using your camcorder When you complete your DI customer registration, your DI customer ID and password are issued immediately. Preparation The camcorder offers network functions in addition to its basic functions.
Customer registration (1) Open the Network Menu. For details on how to open the Network Menu, refer to “Accessing the network” in the operating instructions supplied with your camcorder. (2) Tap [Setup]. The Setup screen menu appears. , (3) Tap [Online Registration]. The screen for verifying the connection appears. Tap [Connect]. To connect to an outside line, for example in a hotel, check the item “Prefix No.” and enter the prefix number. Your camcorder starts connecting to the site.
Customer registration Note When registering online with your camcorder, the connection may be disconnected. However, data entry can be done offline. When your camcorder needs to connect with the site, the screen for verifying the connection appears. Tap [Connect], the connection will be established again. After DI customer registration has been complete, a DI customer ID and password will be displayed. The ID and password are very important, so be sure to write them down in the “Setup memo” on page 117.
Registering your Album on the Web To upload an image recorded with your camcorder to your Album on the Web, you have to complete your album registration. Before registering, be sure to read “Online Privacy Policy” (p. 118) and “Membership Agreement” (p. 123). If you do not agree to the terms, you cannot complete the registration. The Album registration is done by either of the following ways: – Complete the album registration during your DI customer registration step (p.
Setting the Internet connection Internet service provider Notes •A credit card may be required to sign-up with some providers. •The connection fee depends on your provider. Preparation To access the Internet, you have to sign-up with an Internet service provider (ISP). The provider acts as an intermediary between your camcorder and the Internet. After you sign-up with a provider; you can view various web pages through the Internet, you can send and receive email using your email address.
Registering for “So-net” You can complete your online “So-net” registration using your camcorder. You can also sign up with “So-net” in your DI customer registration step. The “So-net” registration is done by either of the following ways: – Register for “So-net” in your DI customer registration step (p. 29) – Register for “So-net” separately after the DI customer registration is completed (See below.
Setting network preferences You have to access the Internet to make your Album on the Web, view web pages, or send or receive your email. This section describes how to set network preferences to access the Internet. Setting your provider preferences for “So-net” (1) Open the Network Menu. For details on how to open the Network Menu, refer to “Accessing the network” in the operating instructions supplied with your camcorder. Preparation 1 Entering your DI customer ID and password (2) Tap [Setup].
Setting network preferences (4) Tap [ID]. The character input screen appears. , (5) Enter your DI customer ID. For details on how to input characters, see “How to input characters” (p. 8). (6) Tap [Enter]. The Network Setup screen appears again. , (7) Tap [Password]. The character input screen appears. , (8) Enter your password. For details on how to input characters, see “How to input characters” (p. 8).
Setting network preferences (9) Tap [Enter]. The Network Setup screen appears again. Preparation , Tip While inputting password characters, they are visible as they are. However, after it has been entered, each character is indicated as “∗”. If you enter your password again, delete all “∗” before entering the password. 2 “So-net” settings (1) Confirm “So-net” is checked. If “So-net” is not checked, tap “So-net” to be checked. a is changed to . , (2) Tap [Setting].
Setting network preferences 3 Entering the telephone numbers of your access points For more information on the telephone numbers of access points (p. 114), refer to the supplied flyer “Getting Online with your Sony Network Handycam® camcorder.” (1) Tap [TEL1]. The character input screen appears. , (2) Enter the telephone number of the access point. For details on how to input characters, see “How to input characters”(p. 8). Note Do not insert hyphens or spaces in the telephone number. (e.g.
Setting network preferences Setting your provider preferences for “AOL” 1 Entering your DI customer ID and password Before setting your provider preferences for “AOL”, go to keyword: Handycam on your computer to learn how to simplify your setup procedure. Preparation This setup is required to use your Album on the Web. If you do not use the Album on the Web, after completing the procedure from step 1 to step 3 of 1 described below, go to “2 “AOL” settings”. (1) Open the Network Menu.
Setting network preferences (4) Tap [ID]. The character input screen appears. , (5) Enter your DI customer ID. For details on how to input characters, see “How to input characters” (p. 8). (6) Tap [Enter]. The Network Setup screen appears again. , (7) Tap [Password]. The character input screen appears. , (8) Enter your password. For details on how to input characters, see “How to input characters” (p. 8).
Setting network preferences (9) Tap [Enter]. The Network Setup screen appears again. Preparation , Tip While inputting password characters, they are visible as they are. However, after it has been entered, each character is indicated as “∗”. If you enter your password again, delete all “∗” before entering the password. 2 “AOL” settings (1) Tap [AOL]. a is changed to . , (2) Tap [Setting]. AOL Network Setup screen appears.
Setting network preferences 3 Setting your “AOL” preference (1) Tap [ScreenName]. The character input screen appears. , (2) Enter your ScreenName. For details on how to input characters, see “How to input characters” (p. 8). (3) Tap [Enter]. AOL Network Setup screen appears again. , (4) Tap [Password]. The character input screen appears. , (5) Enter your password. For details on how to input characters, see “How to input characters” (p. 8).
Setting network preferences (6) Tap [Enter]. The Network Setup screen appears again. Preparation , Tip While inputting password characters, they are visible as they are. However, after it has been entered, each character is indicated as “∗”. If you enter your password again, delete all “∗” before entering the password. (7) Tap [TEL No.]. The telephone number list appears. , (8) Tap [TEL No. 1]. The character input screen appears. , (9) Enter the telephone number of the access point.
Setting network preferences (10) Tap [Enter]. AOL Network Setup screen appears again. , Tip You can also register the telephone numbers of access points into [TEL No. 2] and [TEL No. 3]. If necessary, enter the numbers into [TEL No. 2] and [TEL No. 3]. (11) Tap [Exit]. The setup of “AOL” option is complete, and the Network Setup screen appears again. , (12) Tap [Exit]. The setup is complete, and the Setup screen appears again. For more detailed setup, go to “Setting other preferences” (p. 49).
Setting network preferences Setting your provider preferences for other providers 1 Entering your DI customer ID and password (1) Open the Network Menu. For details on how to open the Network Menu, refer to “Accessing the network” in the operating instructions supplied with your camcorder. Preparation This setup is required to use your Album on the Web. If you do not use the Album on the Web, after completing the procedure from step 1 to step 3 of 1 described below, go to “2 Selecting your provider”.
Setting network preferences (4) Tap [ID]. The character input screen appears. , (5) Enter your DI customer ID. For details on how to input characters, see “How to input characters” (p. 8). (6) Tap [Enter]. The Network Setup screen appears again. , (7) Tap [Password]. The character input screen appears. , (8) Enter your password. For details on how to input characters, see “How to input characters” (p. 8).
Setting network preferences (9) Tap [Enter]. The Network Setup screen appears again. Preparation , Tip While inputting password characters, they are visible as they are. However, after it has been entered, each character is indicated as “∗”. If you enter your password again, delete all “∗” before entering the password. 2 Selecting your provider (1) Tap [Custom]. a is changed to . , (2) Tap [Setting]. The Provider Setup: Custom screen appears.
Setting network preferences 3 Setting your provider manually Set your provider preferences according to the requirements of your provider. When you do not understand the setup items, consult your provider. (1) Tap [PPP]. (2) Set up the following items: ID: Enter the login name you use for accessing your provider using a dial-up connection. Tip This “ID” is also referred to as a “user ID”, “login name”, “PPP login name”, “network ID”, “account name”, “logon name”, “user name”, etc.
Setting network preferences (3) Tap [Mail]. The Mail preference screen appears. Preparation (4) Set up the following items: User ID: Enter the user ID for accessing the POP server. Password: Enter the password of your user ID for accessing the POP server. Your user ID and password are required to use email. Tip This “Password” is also referred to as a “mail password”, “mail server password”, etc. Address: Enter your email address.
Setting network preferences (6) Set up the following items: Proxy: Enter the proxy server address of your provider. Port: Enter the port number of the proxy server of your provider. Tip These entries may be unnecessary, depending on your provider. For details, consult your provider. (7) Tap [Exit]. The setup is completed, and the Network Setup screen appears again. (8) Tap [Exit]. The Setup screen appears again. For more detailed setup, go to “Setting other preferences” (p. 49).
Setting network preferences Setting other preferences You can access the Internet with your camcorder using the default settings. It is not necessary to make the following settings. This example is provided to show you how to make changes, if necessary, in the future. Preparation (1) Display the Setup screen. (2) Tap [Network Options]. The Network Options screen appears.
Setting network preferences Mail Send&Receive: Select whether to check the email inbox after sending email. Save Mail to Server: Select whether to keep copies of the messages on the server. Note If you try to receive email without checking this item, email messages may not be downloaded and may be lost from your server, depending on the type of email you receive. For details, see “Note on “Save Mail to Server”” (p. 51). Signature: Set up this item when you want to attach your signature to email (p. 74).
Setting network preferences Note on “Save Mail to Server” When “Save Mail to Server” is not checked, copies of email messages received will not be stored on your server. However, the following error messages described below depend on the type of email messages. See the table below. Cause and/or Corrective Actions Memory Stick Memory Full You tried to download email when the “Memory Stick” is already full.
– Network Operation – Making your Album on the Web You can upload still or moving images to your “Album on the Web” through the Internet and store the images on your album. The Album on the Web is provided with “ImageStation.” For more information on “ImageStation”, access the “ImageStation” web site (“http://www.imagestation.com/us/PC/”). You can make an Album on the Web and send email with its URL as an invitation card to your friends. You can also access your Album on the Web with your computer.
Making your Album on the Web (2) Tap [ Album]. The Album screen appears. , Network Operation (3) Tap [ Upload]. The Album: Upload screen appears. , (4) Tap [Album No.]. The album list page appears. , (5) Tap the desired album. Selecting the album is complete. , The number of available albums You can use 10 albums (Album 01 to 10).
Making your Album on the Web 2 Selecting images to upload Next, select the images to upload. (1) Tap [Image Sel.]. The image index list appears. , (2) Tap the desired images to upload. Tap the image you want to upload. The selected image is indicated by the checkmark ( ). To page up or down the image index list Tap [<] or [,]. The next or previous page that contains six images appears. (3) Repeat step 2 to select other images.
Making your Album on the Web 3 Sending an invitation card (email) Select the addressee to send the invitation card (email) to. (1) Tap [Invitation]. The Album: Invitation screen appears. Network Operation , (2) Tap [To]. The address list appears. The list shows the destination addresses that are registered in the address book. For details on the address book, see “Using the address book” (p. 76). , When you have selected the address listed in the address book, go to step 6.
Making your Album on the Web (5) Tap [Enter]. The Album: Invitation screen appears again. The new email address is listed and its check box is indicated by the checkmark ( ). , (6) If you want to send the invitation card to other addressees, tap other email addresses. The check box of the selected email address is indicated by the checkmark ( ). (7) Tap [ Return]. The Album: Invitation screen appears again. Note You can register up to 50 addresses in the address book.
Making your Album on the Web 4 Entering the text of a message Enter the text of the message. You can also select one of your six most recently written text from the message list, or edit it to suit your purposes. (1) Tap [Message]. The message list appears. Network Operation , The list shows messages that were written previously. Tap the message to use from the list. When desired text is selected, tap [OK]. After you select the message, go to “5 Uploading images” (p. 58).
Making your Album on the Web (5) Tap [OK]. The Album: Upload screen appears again. “Yes” is indicated next to [Invitation]. , 5 Uploading images Before following the steps below, set your Bluetooth device to connection standby with your camcorder. For details, refer to the operating instructions supplied with your Bluetooth device. (1) Tap [Send]. The screen for verifying the connection appears. , (2) Check the telephone number of the access point. When dialing other telephone numbers Tap [TEL No.].
Making your Album on the Web (4) Tap [OK]. The Album: Upload screen appears again. To cancel uploading During uploading, tap [Cancel]. To send only an invitation card (email) Network Operation You can send an invitation card without uploading images. Carry out the following procedures: “1 Selecting an album” (p. 52) “3 Sending an invitation card” (email) (p. 55) “4 Entering the text of a message” (p. 57) “5 Uploading images” (p.
Making your Album on the Web (3) Tap [ View/Edit]. The screen for verifying the connection appears. Set your Bluetooth device to connection standby with your camcorder beforehand. For details, refer to the operating instructions supplied with your Bluetooth device. , (4) Check the telephone number of the access point. When dialing other telephone numbers Tap [TEL No.]. The list of the registered telephone number(s) appears. Tap the desired telephone number to select it.
Making your Album on the Web 2 Downloading images from the album Before operation •Release the lock of the “Memory Stick.” •Insert a “Memory Stick” into your camcorder, for storing images. (1) Select the images you want to download. You can select the images in the following two ways: Selecting one image displayed on the single-image page: You can select one image displayed on the single-image page and download it. For details, see “To select one image displayed on the single-image page” (p. 63).
Making your Album on the Web To view a downloaded image Exit the NETWORK mode, then view the image following the same procedure as that for viewing an image recorded on a “Memory Stick.” In such cases, the file name of the still image displayed on your camcorder is indicated in the following order: 700-0001, 700-0002, 700-0003 ... Notes •Do not eject the “Memory Stick” during downloading. •After completing downloading in step 4, the check mark(s) remain(s) on selected images.
Making your Album on the Web To select one image displayed on the single-image page You can select one image displayed on the full-screen and download it. (1) When the index page is displayed, tap the image to be enlarged. The image is indicated on the single-image page. Network Operation (2) When you want to view other image, tap or . . (3) Tap The screen for verification appears. , To return to the index page Tap . To return to the album list page Tap .
Making your Album on the Web Deleting images from your Album on the Web You can delete images from your Album on the Web. To delete images displayed on the index page You can select two or more images and delete them at one time. Tap after step 2 in “To select images from the index page” (p. 62). The screen for verification appears. Tap [OK]. The index page appears again. To delete one image displayed on the single-image page Tap after step 2 in “To select one image displayed on the single-image page” (p.
Using email This section describes the basic usage of email. Email is sent and received via the Internet. Email is very convenient; you can send email anytime, and you can also send images stored in a “Memory Stick” by attaching them to email. As of October 2002, “AOL” does not support the receiving of email on this device. For further clarification on this and other “AOL”-specific attributes, go to keyword: Handycam on your computer.
Using email (3) Tap [To]. The address list appears. The list shows the latest used six addresses in the address book. For details on the address book, see “Using the address book” (p. 76). When you have selected an address listed in the address book, go to step 7. , Tips • The most recently used address is listed under [ • Addresses are listed in historical order. Return] and [ New]. (4) Tap [ New]. The character input screen appears. , (5) Enter the email address of an addressee.
Using email (7) If you want to send the email message to other addresses, tap other email addresses. The check box of the tapped email address is indicated by the checkmark ( ). (8) Tap [ Return]. The Send screen appears again. Network Operation Note You can register up to 50 addresses in the address book. If you register the 51st address, the least recently used address is overwritten. The message “Address Book Full Overwrite the Data with Current Address?” appears for verification.
Using email 2 Entering the subject of a message (1) Tap [Subject]. The subject list appears. The list shows the latest used six subjects. , When you want to use a subject shown on the list, tap the subject. After selecting the subject, go to “3 Entering the text of a message” (p. 69). Tip The most recently used subject is listed under [ You cannot edit or delete the subject. Return] and [ New]. (2) Tap [ New]. The character input screen appears. , (3) Enter the subject.
Using email 3 Entering the text of a message Enter the text of the message. You can also select one of your six most recently written text from the message list, or edit it to suit your purposes. (1) Tap [Message]. The message list appears. Network Operation , When you select the message you wrote previously, tap the message from the list. When you do not edit message, tap [OK]. After you select the message, go to “4 Sending email” (p. 70). If you edit the selected text, tap [Edit].
Using email 4 Sending email Tip You can send an email message with your signature. For details, see “Attaching your signature to a message” (p. 74). (1) Select the image to attach to email. For details, see “Attaching images to email” (p. 73). (2) Check the message. For details, see “Checking or editing a message” (p. 71). (3) Tap [Send]. The screen for verifying the connection appears. Set your Bluetooth device to connection standby with your camcorder beforehand.
Using email (6) Tap [OK]. The Send screen appears again. To cancel sending email During sending, tap [Cancel]. Checking or editing a message (1) Display the Send screen. Network Operation Tip You can set to check the email inbox automatically after sending email. For details, see “Setting other preferences” (p. 49). (2) Tap [Message]. The message list appears. , (3) Tap the message you want to check or edit. The following screen appears.
Using email (4) Check or edit the message. When the message is long, tap the message area, then tap the scroll button V to scroll the message. When you only check the message: After checking the message, tap [OK]. The Send screen appears again. When you edit the message: Go to step 5. (5) Tap [Edit]. The character input screen appears. , (6) Edit the message. For details on how to input characters, see “How to input characters” (p. 8). (7) Tap [Enter]. The Send screen appears again.
Using email Attaching images to email You can send images by attaching them to email messages. Before operation Insert the “Memory Stick” that the desired images are stored in into your camcorder. Network Operation (1) Follow these procedures: “1 Specifying the destination address” (p. 65), “2 Entering the subject of a message” (p. 68), and “3 Entering the text of a message” (p. 69). The Send screen appears. (2) Tap [Attach]. The images recorded in the “Memory Stick” appear.
Using email (4) Repeat step 3 to select other images to attach. Notes • The number of images you can attach is up to 99. • The total file size is up to 3MB. (5) Tap [ OK]. The Send screen appears again. The total number of selected images and the total file size are indicated. , (6) Carry out the procedure described in “4 Sending email” (p. 70) from step 3. Note Sending procedure may take long depending on the file size of the image.
Using email (2) Tap [Setup]. The Setup screen appears. , Network Operation (3) Tap [Network Options]. The Network Options screen appears. , (4) Tap [Signature]. The character input screen appears. , (5) Enter your signature. For details on how to input characters, see “How to input characters” (p. 8). Note The maximum number of characters you can enter is 256.
Using email (6) Tap [Enter]. The setup of your signature is complete, and the Network Options screen appears again. “Yes” is indicated next to [Signature]. , (7) Tap [Exit]. The Setup screen appears again. (8) Tap [Exit]. The Network Menu appears again. Using the address book Once you register frequently used email addresses in the address book, you can send email without entering the email address manually.
Using email (2) Tap [ Mail]. If the Address screen is not displayed, tap the Address. The address screen appears. (3) Tap [New]. The Address Book: New screen appears. Network Operation , , (4) Tap [Name]. The character input screen appears. , (5) Enter the destination name. For details on how to input characters, see “How to input characters” (p. 8). Note The maximum number of characters you can enter in the [Name] box is 24.
Using email (6) Tap [Enter]. The Address Book: New screen appears again. , (7) Tap [Address]. The character input screen appears. , (8) Enter the email address. For details on how to input characters, see “How to input characters” (p. 8). When addressing email, including to other “AOL” members, the recipients entire email address must be entered into the “To” field. (e.g. johndoe@aol.com) (9) Tap [Enter]. The Address Book: New screen appears again. , (10) Tap [Return].
Using email (11) Tap [Exit]. The Network Menu appears again. Tips •The addresses are listed in alphabetical order. •When you reply to the address of a previously received email message, the address will be automatically registered on the address book. To edit the address, see “Editing or deleting the address book” below. You can edit or delete the names or email addresses in the address book. (1) Follow steps 1 and 2 in “Registering destination addresses in the address book” (p. 76).
Using email (4) Tap [Name] or [Address]. When editing the registered name, tap [Name], and when editing the registered address, tap [Address]. The character input screen appears. , When you want to delete an address, tap [Delete]. When verification appears, tap [OK]. When you stop deleting, tap [Cancel]. (5) Edit the name or address. For details on how to input characters, see “How to input characters” (p. 8). (6) Tap [Enter]. The Address Book: Edit screen appears again. , (7) Tap [Return].
Using email Selecting the destination address from the address book You can select the destination address from the address book. (1) Follow steps 1 and 2 in “Registering destination addresses in the address book” (p. 76). The Address screen appears. Network Operation (2) Select the address you want to send email by tapping or . (3) Tap [tTo]. The Send screen appears. The selected address is set as the destination address.
Using email Receiving email Once you receive email, you can reply to it or forward it. Before operation •Release the lock of the “Memory Stick.” •Insert a “Memory Stick” into your camcorder, for storing email. Checking your email inbox As of October 2002, “AOL” does not support the receiving of email on this device. For further clarification on this and other “AOL”-specific attributes, go to keyword: Handycam on your computer.
Using email (4) Tap [Receive]. The screen for verifying the connection appears. , When dialing other telephone numbers Tap [TEL No.]. The list of the registered telephone number(s) appears. Tap the desired telephone number to select it. To connect to an outside line, for example in a hotel, check the item “Prefix No.” and enter the prefix number. Network Operation (5) Check the telephone number of the access point. (6) Tap [Connect]. Your camcorder starts dialing the selected telephone number.
Using email To cancel receiving email Tap [Cansel] while downloading. Email you did not download remains on the mail server. When the message is long Tap the scroll button V to scroll the message. When a file is attached to an email message Your camcorder can receive the following extension file: .jpg, .mpg, .jpeg and .mpeg. When you receive files other then these files, the message “Attached Invalid File Deleted” is inserted in the email message.
Using email Sending your answer – Reply You can reply to an email message promptly without entering the address. (1) Display the Receive screen. Network Operation (2) Tap the area where a message is displayed or tap [Message]. The selected message is displayed. , (3) Tap [Reply]. The Send screen appears. , Tip “Re:” is added to the beginning of the subject line. (4) Carry out the procedure described in “3 Entering the text of a message” (p. 69) to enter the text of the message.
Using email Forwarding the message to others – Forward You can forward a received message to others. (1) Display the Receive screen. (2) Display email that you want to forward the message by tapping or . (3) Tap the area where a message is displayed or tap [Message]. The selected message is displayed. , (4) Tap [Forward]. The Send screen appears. , Note An attached file is not automatically forwarded. When you want to send the attached file, see “Attaching images to email” (p. 73).
Using email (6) Carry out the procedure described in “3 Entering the text of a message” (p. 69) to modify the message. Tip The number of characters you can enter for a message is up to 512. The excess characters will be deleted. Deleting unnecessary received email You can receive and store up to 50 email messages in a “Memory Stick.” The 51st email message may not be received and an error message appears. Network Operation (7) Carry out the procedure described in “4 Sending email” (p. 70) from step 3.
Using email (3) Display email you want to delete the message by tapping The selected message is displayed. or , (4) Tap [Delete]. The message “Delete This Mail?” used for verification appears. , (5) Tap [OK]. The selected email message is deleted. To cancel deleting email Tap [Cancel] in step 5. 88 .
Viewing web pages A site that posts information on the Internet is called “web page” or “web site”. You can easily retrieve information by accessing a web site on the Internet. Viewing web pages 1 Entering the URL needed to access the web page Tip on URL A web site has a unique address on the Internet. The address is called a URL. This URL is required to access a web site. Network Operation Enter the address of the web page, and then access the Internet. Be careful to enter the address correctly.
Viewing web pages (4) Enter the URL. For details on how to input characters, see “How to input characters” (p. 8). (5) Set your Bluetooth device to connection standby with your camcorder. For details, refer to the operating instructions supplied with your Bluetooth device. (6) Tap [Enter]. The screen used for verifying the connection appears. , (7) Check the telephone number of the access point. When dialing other telephone numbers Tap [TEL No.]. The registered telephone number list appears.
Viewing web pages How to use the menu bar on the browser When you access the Internet and view a web page, you can carry out various operations using the menu bar. While the browser screen is displayed, tap menu on the upper-right LCD screen to display the menu bar. Network Operation To show the menu bar Tap menu on the upper-right LCD screen. The following menu bar appears. To hide the menu bar Tap menu or in the menu bar again. The menu bar disappears.
Viewing web pages When you fail to load a web page [Loading Error] message appears. Tap [OK], then tap menu on the upper-right LCD screen, and tap END in the menu bar. Network menu appears again. Note The buttons may not function, depending on the accessed web page. Note on connection status indication The connection status is indicated on the top of the screen. This item also shows a connected time and the address of the web page. The connecting time indication should be used as a guide.
Viewing web pages 2 Bookmarking the web page – Bookmark You can bookmark web pages you frequently access. You can bookmark up to 30. (1) Display the web page you want to bookmark. (2) When the menu bar is not displayed, tap The menu bar appears. menu on the upper-right LCD screen. Network Operation (3) Tap (Bookmark). The bookmark list appears. , (4) Tap [ Add]. The bookmark is added, and the display returns to the web page. Notes •The phone line may not be disconnected automatically.
Viewing web pages To edit a bookmark You can edit the title of a bookmark. (1) Tap (Bookmark). The bookmark list appears. , (2) Tap the bookmark you want to edit. The title and URL are indicated. , (3) Tap [Edit]. The character input screen appears. , (4) Edit the name. For details on how to input characters, see “How to input characters” (p. 8). (5) Tap [Enter]. The title of the bookmark is modified. , (6) Tap [ Return]. The Browser screen appears again.
Viewing web pages To delete bookmarks You can delete bookmarks. We recommend that you delete unnecessary bookmarks since you can only store up to 30 bookmarks. (1) Tap (Bookmark). The bookmark list appears. Network Operation , (2) Tap the bookmark you want to delete. , (3) Tap [Delete]. The message “Delete This Bookmark?” used for verification appears. , (4) Tap [OK]. The selected bookmark is deleted. , To cancel deleting the bookmark Tap [Cancel] in step 4.
Viewing web pages 3 Jumping to the web page specified by the bookmark (1) When the menu bar is not displayed, tap The menu bar appears. menu on the upper-right LCD screen. (2) Tap (Bookmark). The bookmark list appears. , (3) Tap the bookmark. , (4) Set your Bluetooth device to connection standby with your camcorder. For details, refer to the operating instructions supplied with your Bluetooth device.
Viewing web pages (5) Tap [Go]. The screen used for verifying the connection appears. , When dialing other telephone numbers Tap [TEL No.]. The registered telephone number list appears. Tap the desired telephone number to select it. To connect to an outside line, for example in a hotel, check the item “Prefix No.” and enter the prefix number. Network Operation (6) Check the telephone number of the access point. (7) Tap [Connect]. Your camcorder starts dialing the selected telephone number.
Viewing web pages (3) Tap (Page Memo). The page memo list appears. , (4) Tap [ Add]. The message “Saving Page Memo Do Not Remove Memory Stick” appears. After the message disappears, storing is complete. , (5) The browser screen appears again. To cancel storing the web page During storing, tap [Cancel]. Note You cannot store the web page while loading it. Editing the title of a page memo You can edit the title of a page memo stored in a “Memory Stick.
Viewing web pages (2) Tap (Page Memo). The page memo list appears. , Network Operation (3) Tap the page memo you want to edit. The title and URL of the selected page memo are indicated. , (4) Tap [Edit]. The character input screen appears. , (5) Edit the name. For details on how to input characters, see “How to input characters” (p. 8). (6) Tap [Enter]. The title of the page memo is edited.
Viewing web pages (7) Tap [ Return]. The browser screen appears again. To delete the page memo You can delete page memos. We recommend that you delete unnecessary page memos since you can only store up to 30 page memos. Before operation •Release the lock of the “Memory Stick.” •Insert a “Memory Stick” that the page memo you want to delete is stored in into your camcorder. (1) When the menu bar is not displayed, tap The menu bar appears. (2) Tap . The page memo list appears.
Viewing web pages (4) Tap [Delete]. The message “Delete This Page Memo Item?” used for verification appears. , Network Operation (5) Tap [OK]. The selected page memo is deleted and the page memo list appears again. (6) Tap [ Return]. The browser screen appears again. To cancel deleting the page memo Tap [Cancel] in step 5. Displaying a web page stored in page memo You can display a page memo stored in a “Memory Stick.
Viewing web pages (3) Tap the page memo you want to display. , (4) Tap [Open]. The web page stored in page memo is displayed. To select other page memo Tap [Return] in step 3. The page memo list appears. Tap other page memo. Shutting down the browser To finish viewing the web page, and to disconnect the phone line (1) Tap menu on the upper-right LCD screen to display the menu bar. (2) Tap END . The browser is closed, then the phone line is disconnected. To only disconnect the line Tap .
– Additional Information – File storage destinations and file names Files are grouped in the following folders. You can only view these folders on a computer. The meanings of the file names are as follows. sssss stands for any number within the range from 00001 to 99999. ssss stands for any number within the range from 0001 to 9999. aaa stands for a portion of an attached file name. Folder containing still image files and MPEG MOVIE AD moving image files Folder containing the text data of email, etc.
Troubleshooting Trouble accessing the Internet The message “...Incomplete” or “Authentication Error...” is indicated and your camcorder cannot access the Internet. c When setting network preferences using the “So-net” option Check your setup according to the procedure described in “Setting your provider preferences for “So-net”” (p. 33). c When setting network preferences using the “AOL” option Check your setup according to the procedure described in “Setting your provider preferences for “AOL”” (p. 37).
Troubleshooting Trouble with email The message “DNS Error The Requested URL Could Not Found” is indicated and your camcorder cannot send or receive email. c When setting network preferences using the custom setup The DNS setup may be wrong. Check the PPP setup. Additional Information Your camcorder cannot send email. c The clock setting of your camcorder is not set. Set up the clock setting.
Troubleshooting You received an email message sent from Mailer Daemon. c Your email has not been sent to its destination address. Check the email address. If you receive an email message from Mailer Daemon and the destination address is correct, the server may be down, or the email address may have changed. Attached files are not saved in the “Memory Stick.” c Compatible file types are .jpg, .mpg, .jpeg and .mpeg only. Check the file type.
Troubleshooting Troubles about the Album on the Web The message “DI Customer ID profile Incomplete” is indicated and your camcorder cannot access the Album on the Web. c The DI customer ID is required to use the Album on the Web. You cannot view or edit your album, send an invitation card, or upload images. (An error code is indicated.) c See “Album error codes” (p. 113). The image cannot be deleted. c There may be no images. Tap . The image cannot be downloaded. c There may be no images. Tap .
Troubleshooting Adjusting the LCD screen (CALIBRATION) The buttons on the touch panel may not work correctly. If this happens, follow the procedure below. (1) Set the POWER switch to (CHG) OFF. (2) Eject the tape from your camcorder, then disconnect any connecting cable from your camcorder. (3) Close the LCD panel with the LCD screen facing out. DISPLAY/TOUCH PANEL (4) Set the POWER switch to VCR while pressing DISPLAY/TOUCH PANEL, then keep pressing DISPLAY/TOUCH PANEL for about five seconds.
Specifications Bluetooth The number of registered devices available 3 Album on the Web Email Sending The maximum number of email destination addresses to which a message can be sent at one time 50 The registrable number of subjects 6 The maximum number of characters of a subject 24 The registrable number of messages 6 The maximum number of characters of a message 512 The maximum number of images attached to email 99 The maximum file size of images attached to email 3 MB Signature The number of characters 2
Messages Various messages appear on the screen. Check the corresponding descriptions in the following list. General Message Cause and/or Corrective Actions Bluetooth Connection Error • The Bluetooth device is too far from your camcorder. • The Bluetooth device is busy. Bluetooth Authentication Error Check the Certified Status Register the Bluetooth device again. Bluetooth Registration Error Check the Passkey • The pass key was wrong. • The pass key transmission failed.
Messages Message Cause and/or Corrective Actions Memory Stick Format Error Format the “Memory Stick” with your camcorder. Incompatible Memory Stick The “Memory Stick” inserted is not compatible with your camcorder. Read-Only Memory Stick A read-only “Memory Stick” is inserted. Enter Password for DI Customer ID For details on “Verify Password,” see “Setting other preferences” (p. 49). Enter PPP Password Enter AOL Password Do not turn off your camcorder while the message is indicated.
Messages Browser Message Cause and/or Corrective Actions You tried to open an SSL (p. 115) page. When you know that the page You are About to View Pages Over a Secure Connection is safe, tap [OK]. Do You Want to Continue? You are About to Leave a Secure Internet Connection Do You Want to Continue? You tried to open a page which is not SSL protected. When you know that the page is safe, tap [OK]. Warrant Date Expired Invalid Data Open Anyway? The warrant of the page is no longer valid.
Album error codes ImageStation Cause Corrective Actions 1000 Authentication error occurred. Please check ID and Password. Login error. ID or password may be incorrect on your camcorder. Check your ID and password, and try to login again. 1001 Upload error occurred. Please try to upload again later. Error in finding album. Check your selection and try again. 1002 Your ID is not registered. Please register. ID is not registered.
Glossary Access point (p. 36, 46) A telephone number used to access the Internet, which is provided by an Internet service provider. Most providers install access points in various areas. We recommend that you select the most convenient access point which allows you to obtain the lowest telephone charges. Address book (p. 76) Used to register email destination addresses. APOP (p. 47) An abbreviation for Authenticated Post Office Protocol. APOP is an authentication protocol for security.
Glossary ID (p. 46) Used to identify the user in combination with a password when accessing the Internet through the Internet service provider. Internet (p. 31) A worldwide network of computers. You can use email, information retrieval services, etc., over this network. Link A related page address listed on a web page as a Web link. Login (p. 52) Connect to a specific service by entering an ID and password. Passkey (p.
Glossary Subject (p. 68) The title of an email message. When replying, “Re:” (Reply) is added to the beginning of the title in order to indicate that the email is a reply. When forwarding an email message, “Fw:” (Forward) is added to the beginning of the title in order to indicate that the email is a forwarded email message. Upload (p. 52) Load data such as still images and moving pictures from your camcorder to the server through the phone line. URL (p. 89) An abbreviation for Uniform Resource Locator.
Setup memo Be careful not to reveal these entries. Network Menu Network Setup Example DI Customer Setup ID Password So-net TEL1 XXXXXXX TEL2 TEL3 AOL Additional Information Provider Setup ScreenName Password TEL No. 1 XXXXXXX TEL No. 2 TEL No. 3 Custom PPP ID abc123@xxx.so-net.com Password hcHZ7yd DNS1 192.168.0.1 DNS2 192.168.0.2 TEL No. 1 XXXXXXX TEL No. 2 TEL No. 3 Mail User ID abc123 Password hcHZ7yd Address abc123@xxx.so-net.com POP Server pop.xxx.so-net.
Online Privacy Policy Sony Electronics Inc. Effective: June 21, 2001 Last Update: June 3, 2002 Your Privacy At Sony we believe our online visitors have a right to know our practices regarding the information we may collect when you visit our Web sites and what type of information is collected. The guidelines contained herein apply only to your visit to the Web sites operated by or for Sony Electronics Inc. and the entities it controls (collectively, “SEL”).
number held in a cookie) which is associated with individually identifiable information, to enable you to participate in contests, chat rooms, on bulletin boards, to fill out a registration, or to order products and services using these sites. SEL may combine the information you provide on our Web sites with information we may collect offline from you or from third parties so that we can more effectively tailor our site, services and offerings to you.
Notice To/Regarding Children Under the Age of 13 SEL believes that children using the Internet require special protection, and we urge parents or guardians to explain Internet safety to their children. Parents are urged to spend time online with their children to become familiar with the types of content available on the SEL sites and the Internet in general. Control tools are available from online services and software manufacturers to help create a safer environment for children.
agree to use personal information of site visitors only for the purposes of carrying out these operations and to keep such information confidential. A parent or guardian has the option of consenting to the collection and use of the child’s personal information without consenting to the disclosure of that information to third parties.
Questions: If you have any questions or comments about our personal information practices or about this Privacy Statement, please feel free to send us an email at PIM@am.sony.com or write us at: Sony Electronics Inc. Personal Information Management Office 1 Sony Drive MD TA3-12 Park Ridge, New Jersey 07656 Please check “http://www.sel.sony.com/SEL/legal/privacy.html” for latest information.
ImageStation Membership Agreement Membership Agreement (paper copy of terms as of July 2002 provided for convenience, please visit online for current terms). This Membership Agreement sets forth the terms and conditions on which ImageStation, a division of Sony Electronics Inc., offers products and services to registered users (each a “Member”) of the website www.imagestation.com.
user ID or another breach of security in relation to the Service. You may use the Service only for your personal, non-commercial use. You may not take the results from your use of the Service and link to them, or mirror pages from the Site on another website, or create links from other websites onto any area of the Site. 4. Member Content; Member Private Area; Community Area You may store, display and publish your “Member Content” on the Site.
hardware sales, are subject to charges and specific terms and conditions, which are explained in connection with such content and services. The Service and certain other content, product, services or information on the Site are presently available free of charge, exclusive of Internet or other telecommunications fees. ImageStation may, at its discretion, elect to modify, delete, reduce, augment, or discontinue the Service or any product, service, feature, functionality on the Site, or institute a fee.
8. Responsibility for Member Content ImageStation does not as a policy review or screen any images, video, text, music, sound, audio files or other Member Content that a Member posts, displays or stores before they appear on the Site. Generally, ImageStation’s automated machinery and computers index the Member Content. ImageStation does not endorse the content or views expressed in any Member Content and is not responsible or liable in any manner for any conduct by any Member or for any Member Content.
10. Illegal Activities It is ImageStation’s policy to report suspected illegal activities to law enforcement agencies and to cooperate fully with their investigations. 11.
(a) the quality, reliability, accuracy, completeness, of the Service; (b) any modification, alteration, publication, display, failure to store, failure to index, loss, deletion, alteration, loss of access, or damages of or to your Member Content, computer equipment, software, data, or any text, image, video, music, sound, audio or other material that result from your use of the Site or the Service; (c) any harm, errors, omissions, cost, losses, or damages arising from the use of, or inability to use (whethe
If you believe that your work has been copied in a way that constitutes copyright infringement, and appears on the Site, please provide ImageStation’s copyright agent, designated below, the following information: Additional Information ImageStation will promptly take down or block access to infringing or allegedly infringing material on its servers if ImageStation becomes aware that such material infringes the copyright rights of a third party, whether ImageStation identifies such infringement in the cour
16.
19. Notices; Questions All notices from a Member to ImageStation shall be in writing, and shall be made or delivered to ImageStation via email or conventional mail. If you have any question about the Service or this Membership Agreement, please feel free to contact us at support@imagestation.com 20. Choice of Law 21.
Printed on 100% recycled paper using VOC (Volatile Organic Compound)-free vegetable oil based ink.