3-043-357-32 (1) CD Radio Cassette-Corder Operating Instructions page 2GB GB Manual de instrucciones página 2ES ES CFD-G30 CFD-G30L CFD-G50 CFD-G50L ©2000 Sony Corporation
Warning About this manual To prevent fire or shock hazard, do not expose the player to rain or moisture. The instructions in this manual are for the CFD-G30, CFD-G30L, CFD-G50 and CFDG50L. Before you start reading, check your model number. The CFD-G50L is the model used for illustration purpose. To avoid electrical shock, do not open the cabinet. Refer servicing to qualified personnel only. Information For customers in Europe This Compact Disc player is classified as a CLASS 1 LASER product.
Table of contents Basic Operations Basic Operations 4 Playing a CD 6 Listening to the radio 8 Playing a tape 10 Recording on a tape The CD Player 12 Using the display 13 Locating a specific point in a track 14 Playing tracks repeatedly (Repeat Play) 15 Playing tracks in random order (Shuffle Play) 16 Creating your own programme (Programme Play) 18 Enjoying sound effects (LOOP/ FLASH) (CFD-G50/G50L only) The Radio The Timer 22 Falling asleep to music GB Setting Up 23 Choosing the power sources 25 Conne
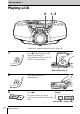
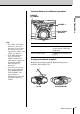
Basic Operations Playing a CD 3 1, 2 Connect the supplied mains lead (see page 23). 1 Press ZPUSH OPEN/CLOSE down to open the CD compartment and place the CD on the CD compartment. With the label side up 2 3 Close the lid of the CD compartment. Display Press u. The player turns on (direct power-on) and plays all the tracks once.
Use these buttons for additional operations OPERATE (or POWER) ZPUSH OPEN/CLOSE u ., > Tip Next time you want to listen to a CD, just press u. The player turns on automatically and starts playing the CD. To Press adjust the volume VOLUME +, – (VOL +, – on the remote, CFD-G50/ G50L only) stop playback x pause playback u (X on the remote, CFD-G50/G50L only) Press the button again to resume play after pause. go to the next track > go back to the previous track .
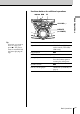
Listening to the radio 1 2 Connect the supplied mains lead (see page 23). 1 Press RADIO BAND•AUTO PRESET until the band you want appears in the display (direct power-on). Display Each time you press the button, the band changes as follows: CFD-G30/G50: “FM1” t “FM2” t “AM” CFD-G30L/G50L: “FM1” t “FM2” t “MW” t “LW” 2 Hold down TUNE + or – until the frequency digits begin to change in the display. The player automatically scans the radio frequencies and stops when it finds a clear station.
Use these buttons for additional operations VOLUME +, – PLAY MODE MONO/ST Tips • The “FM1” and “FM2” bands have the same functions. You can store the stations you want separately in “FM1” and “FM2” (see page 19). • If the FM broadcast is noisy, press PLAY MODE •MONO/ST until “Mono” appears in the display and the radio will play in monaural. • Next time you want to listen to the radio, just press RADIO BAND• AUTO PRESET. The player turns on automatically and starts playing the previous station.
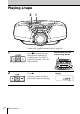
Playing a tape 2 1 Connect the supplied mains lead (see page 23). 1 2 Press xZ to open the tape compartment and insert a recorded tape. Use TYPE I (normal) tape only. Close the compartment. Press N. The player turns on (direct power-on) and starts playing.
Use these buttons for additional operations m, M xZ X OPERATE (or POWER) Tip Next time you want to listen to a tape, just press N. The player turns on automatically and starts playing the tape. To Press adjust the volume VOLUME +, – (VOL +, – on the remote, CFD-G50/ G50L only) stop playback xZ Basic Operations VOLUME +, – fast-forward or rewind the tape M or m pause playback X Press the button again to resume play after pause.
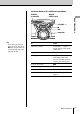
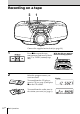
Recording on a tape 3 1 Connect the supplied mains lead (see page 23). 1 2 Press xZ to open the tape compartment and insert a blank tape. Use TYPE I (normal) tape only. Select the program source you want to record. To record from the CD player, insert a CD (see page 4) and press x on the CD section. To record from the radio, tune in the station you want (see page 6).
3 Press z to start recording (N is depressed automatically). OPERATE xZ (or POWER) X Basic Operations Use these buttons for additional operations PLAY MODE MONO/ST ISS Tips • Adjusting the volume or the audio emphasis (see page 21) will not affect the recording level. • CFD-G30L/G50L only: If the MW/LW programme makes a whistling sound after you’ve pressed z in step 3, press PLAY MODE•MONO/ST ISS (Interference suppress switch) repeatedly until the noise is at a minimum.
The CD Player Using the display DISPLAY ENT MEMORY You can check information about the CD using the display. Checking the total track number and playing time Press DISPLAY ENT•MEMORY in stop mode. Total playing time Total track number Checking the remaining time Press DISPLAY ENT•MEMORY while playing a CD.
Locating a specific point in a track ., > The CD Player You can quickly find a specific point in a track while playing a CD. You can also locate any track using the number buttons on the remote (CFDG50/G50L only). Note CFD-G50/G50L only: You cannot locate a specific track if “SHUF” or “PGM” is lit in the display. Turn off the indication by pressing x. Tip CFD-G50/G50L only: When you locate a track numbered over 10, press >10 first, then the corresponding number buttons.
Playing tracks repeatedly PLAY MODE MONO/ST (Repeat Play) u You can play tracks repeatedly in normal, shuffle or programme play modes (see pages 15 - 17). x ., > On the remote (CFD-G50/G50L only) 1 Press x. 2 Press MODE until the repeat mode you want appears in the display. 3 Do either of the following to start repeat play: • When you’ve selected “REP 1”, select the track by pressing the number button. • When you’ve selected “REP ALL” or “SHUF REP”, press N.
Playing tracks in random order PLAY MODE MONO/ST (Shuffle Play) u On the remote (CFD-G50/G50L only) 1 Press x. 2 Press MODE until “SHUF” appears in the display. 3 Press N. 1 x The CD Player You can play tracks in random order. Press x. “Cd” appears in the display. 2 Press PLAY MODE•MONO/ST until “SHUF” appears in the display. 3 Press u to start shuffle play. To cancel Shuffle Play Press PLAY MODE•MONO/ST until “SHUF” disappears from the display.
Creating your own programme DISPLAY ENT MEMORY u (Programme Play) You can arrange the playing order of up to 20 tracks on a CD. x ., > PLAY MODE MONO/ST On the remote (CFD-G50/G50L only) 1 Press x. 2 Press MODE until “PGM” appears in the display. 3 Press the number buttons for the tracks you want to programme in the order you want. 4 Press N. 1 Press x. “Cd” appears in the display. 2 Press PLAY MODE•MONO/ST until “PGM” appears in the display. 3 Press the .
To cancel Programme Play Press PLAY MODE•MONO/ST until “PGM” disappears from the display. To check the order of tracks before play Press DISPLAY ENT•MEMORY. Every time you press the button, the track number appears in the programmed order. To change the current programme Press x once if the CD is stopped and twice if the CD is playing. The current programme will be erased. Then create a new programme following the programming procedure.
Enjoying sound effects (LOOP/FLASH) (CFD-G50/G50L only) You can repeat part of a CD (LOOP) and can “flash” the CD sound (FLASH) during playback. LOOP FLASH 1 2 Play a CD. Press and hold LOOP or FLASH at the point you want to start the function. To Press and hold repeat a selected part of a CD LOOP “flash” the CD sound FLASH To cancel the LOOP or FLASH function Release the button. The player returns to normal play.
The Radio Presetting radio stations DISPLAY ENT RADIO BAND AUTO PRESET MEMORY Tip If you automatically preset the “FM1” or “FM2” band, 10 radio stations are stored in “FM1” band and 10 more radio stations are stored in “FM2” band. PRESET –, + 1 Press RADIO BAND•AUTO PRESET until the band you want appears in the display. 2 Hold down RADIO BAND•AUTO PRESET for 2 seconds until “AUTO” flashes in the display. 3 Press DISPLAY ENT•MEMORY. The Radio You can store radio stations into the player’s memory.
Playing preset radio stations RADIO BAND AUTO PRESET Once you've preset the stations, use PRESET + or – to tune in to your favorite stations. PRESET –, + On the remote (CFD-G50/G50L only) 1 Press BAND to select the band. 2 Press the number buttons to tune in the stored station. 20GB TheRadio 1 Press RADIO BAND•AUTO PRESET to select the band. 2 Press PRESET + or – to tune in the stored station.
The Audio Emphasis Selecting the audio emphasis POWER DRIVE WOOFER (SOUND/POWER DRIVE WOOFER) You can adjust the audio emphasis of the sound you are listening to. SOUND Press SOUND repeatedly to select the audio emphasis you want.
The Timer Falling asleep to music SLEEP You can set the player to turn off automatically after 10, 20, 30, 60, 90, and 120 minutes, allowing you to fall asleep while listening to music. Note When you are playing a tape using this function: If the tape length of one side is longer than the set time, the player will not go off until the tape reaches the end. 1 2 3 Play the music source you want. Press SLEEP to display “SLEEP.” Press SLEEP to select the minutes until the player goes off automatically.
Setting Up Choosing the power sources You can use the mains or batteries as a power source. AC IN 2 Battery compartment 1 Connecting the mains lead Insert one end of the supplied mains lead to the AC IN socket located at the rear of the player, and the other end to the mains. Setting Up 1 to the mains Adjusting the voltage (CFD-G30/G50 only) Be sure to set the VOLTAGE SELECTOR (at the bottom) to your local power supply.
Choosing the power sources (continued) 3 Inserting batteries into the remote (CFD-G50/G50L only) Insert two R6 (size AA) batteries (not supplied) Replacing batteries With normal use, the batteries should last for about six months. When the remote no longer operates the player, replace all the batteries with new ones.
Connecting optional components You can enjoy the sound from a TV or VCR through the speakers of this player. LINE Be sure to turn off the power of each component before making connections. For details, refer to the instructions of the component to be connected. Connecting a TV or a VCR Rear panel of this player Setting Up Note Connect the cords firmly to avoid any malfunction. RK-G129 (not supplied), etc. to LINE IN TV, VCR, etc. to line out jack RK-G136 (not supplied), etc. TV, VCR, etc.
Connecting optional components (continued) Recording the sound from the connected components 1 Insert a blank cassette. 2 Press LINE to display “LInE”. 3 Press z. Recording starts. 4 Play the optional component connected to the LINE IN jack of the player.
Additional Information Precautions On safety • As the laser beam used in the CD player section is harmful to the eyes, do not attempt to disassemble the casing. Refer servicing to qualified personnel only. • Should any solid object or liquid fall into the player, unplug the player, and have it checked by qualified personnel before operating it any further.
Precautions (continued) Notes on CDs • Before playing, clean the CD with a cleaning cloth. Wipe the CD from the center out. Notes on cassettes • Break off the cassette tab from side A or B to prevent accidental recording. If you want to reuse the tape for recording, cover the broken tab with adhesive tape. Side A • Do not use solvents such as benzine, thinner, commercially available cleaners or anti-static spray intended for vinyl LPs.
Troubleshooting Symptom Remedy The power is not on. • Connect the mains lead to a wall outlet securely. • Make sure the batteries are inserted correctly. General • You cannot turn on the player with the remote when you operate the player on batteries (CFD-G50/G50L only). The power is not on, and “bAttErY” • Make sure the batteries are inserted correctly. and “Error” are displayed • Replace all the batteries with new ones if they alternately. are weak. There is no audio.
Troubleshooting (continued) Symptom Remedy The audio is weak or has poor quality. • Replace all the batteries with new ones if they are weak. • Move the player away from the TV. Radio • If you are using the remote while listening to AM or MW/LW radio, noise may be heard. This is unavoidable (CFD-G50/G50L only). The picture of your TV becomes unstable. • If you are listening to an FM programme near the TV with an indoor aerial, move the player away from the TV.
Remote (CFD-G50/G50L only) Symptom Remedy The remote does not function. • Replace all the batteries in the remote with new ones if they are weak. • Make sure that you are pointing the remote at the remote sensor on the player. • Remove any obstacles in the path of the remote and the player. • Make sure the remote sensor is not exposed to strong light such as direct sunlight or fluorescent lamp light. • Move closer to the player when using the remote.
Maintenance Cleaning the lens If the lens becomes dirty, it may cause a skipping of sound during CD operation. Clean with a commercially available blower. Cleaning the tape heads and tape path Wipe the heads, the pinch roller and the capstan with a cleaning swab slightly moistened with cleaning fluid or alcohol after every 10 hours of operation for optimum playback and recording quality.
Specifications CD player section General System Compact disc digital audio system Laser diode properties Material: GaAlAs Wave length: 780 nm Emission duration: Continuous Laser output: Less than 44.6 µW (This output is the value measured at a distance of about 200 mm from the objective lens surface on the optical pick-up block with 7 mm aperture.) Spindle speed 200 r/min (rpm) to 500 r/min (rpm) (CLV) Number of channels 2 Frequency response 20 - 20,000 Hz +0.5/–1.
Specifications (continued) Dimensions Approx. 500 × 206 × 328 mm (w/h/d) (19 3⁄4 × 8 1⁄8 × 13 inches) (incl. projecting parts) Mass Approx. 7 kg (15 lb. 7 oz) (incl. batteries) Supplied accessories Mains lead (1) Remote control (1) (CFD-G50/G50L only) Design and specifications are subject to change without notice.
Index A I, J, K S Audio emphasis 21 Improving broadcast reception 7 Listening to the radio 6 Locating a specific point 13 LOOP 18 Selecting audio emphasis 21 tracks 5 Setting up 23 Shuffle Play 15 Sleep timer 22 SOUND 21 C M, N, O, P, Q T CD player 12 Choosing power sources 23 Cleaning cabinet 32 tape heads and tape path 32 Connecting the mains lead 23 Creating your own programme 16 Playing a CD 4 a tape 8 preset radio stations 20 tracks repeatedly 14 Power sources 23 Presetting radio stations 19
ADVERTENCIA Acerca de este manual Para evitar incendios o el riesgo de electrocución, no exponga el reproductor a la lluvia ni a la humedad. Las instrucciones de este manual hacen referencia a los modelos CFD-G30, CFD-G30L, CFD-G50 y CFD-G50L. Antes de comenzar a leerlas, compruebe el número de modelo. Se ha utilizado el modelo CFD-G50L para las ilustraciones. Para evitar descargas eléctricas, no abra el sistema. En caso de avería, solicite sólo los servicios de personal especializado.
Índice Procedimientos básicos Procedimientos básicos 4 Reproducción de un CD 6 Radiorecepción 8 Reproducción de cintas 10 Grabación en una cinta Reproductor de discos compactos (CD) 12 Utilización del visualizador 13 Localización de un punto específico de una canción 14 Reproducción repetida de las canciones (Reproducción repetida) 15 Reproducción de canciones en orden aleatorio (Reproducción aleatoria) 16 Creación de su propio programa (Reproducción programada) 18 Efectos sonoros (LOOP/FLASH) (sólo
Procedimientos básicos Reproducción de un CD 3 1, 2 Conecte el cable de alimentación de CA suministrado (consulte la página 23). 1 Pulse ZPUSH OPEN/CLOSE para abrir el compartimiento de discos y coloque el CD. Con el lado de la etiqueta hacia arriba 2 3 Cierre la tapa del compartimiento de discos. Pulse u. El reproductor se enciende (activación directa) y el reproductor reproduce todas las canciones una vez.
Utilice estos botones para realizar procedimientos adicionales ZPUSH OPEN/CLOSE VOLUME +, – x u ., > Consejo La próxima vez que desee escuchar un CD, basta con pulsar u. El reproductor se enciende automáticamente e inicia la reproducción del CD.
Radiorecepción 1 2 Conecte el cable de alimentación de CA suministrado (consulte la página 23). 1 Pulse RADIO BAND•AUTO PRESET hasta que la banda que desee aparezca en el visualizador (activación directa). Visualizador Cada vez que pulse el botón, la banda cambiará de la siguiente forma: CFD-G30/G50: “FM1” t “FM2” t “AM” CFD-G30L/G50L: “FM1” t “FM2” t “MW” t “LW” 2 Mantenga pulsado TUNE + o – hasta que los dígitos de frecuencia comiencen a cambiar en el visualizador.
Utilice estos botones para realizar procedimientos adicionales VOLUME +, – PLAY MODE MONO/ST Consejos • Las bandas “FM1” y “FM2” tienen las mismas funciones. Puede almacenar las emisoras que desee por separado en “FM1” y “FM2” (consulte la página 19). • Si la emisión en FM presenta ruido, pulse PLAY MODE•MONO/ ST hasta que aparezca “Mono” en el visualizador; la radio sintonizará la emisión en modo monofónico. • La próxima vez que desee escuchar la radio, basta con pulsar el botón RADIO BAND• AUTO PRESET.
Reproducción de cintas 2 1 Conecte el cable de alimentación de CA suministrado (consulte la página 23). 1 2 Pulse xZ para abrir el compartimiento de la cinta e inserte una cinta grabada. Emplee sólo cintas TYPE I (normal). Cierre el compartimiento. Con la cara que desea reproducir hacia arriba Pulse N. Visualizador El reproductor se enciende (activación directa) e inicia la reproducción.
Utilice estos botones para realizar procedimientos adicionales X VOLUME +, – OPERATE (o POWER) Consejo La próxima vez que desee escuchar una cinta, basta con pulsar N. El reproductor se enciende automáticamente e inicia la reproducción de la cinta.
Grabación en una cinta 3 1 Conecte el cable de alimentación de CA suministrado (consulte la página 23). 1 2 Pulse xZ para abrir el compartimiento de cintas e inserte una cinta virgen. Emplee sólo cintas TYPE I (normal). Seleccione la fuente de programa que desee grabar. Para grabar desde el reproductor de discos compactos, inserte un CD (consulte la página 4) y pulse x de la sección de CD. Para grabar desde la radio, sintonice la emisora deseada (consulte la página 6).
3 Pulse z para iniciar la grabación (N se pulsa automáticamente). OPERATE xZ (o POWER) Consejos • Los ajustes del volumen o del énfasis de sonido no afectarán al nivel de grabación (consulte la página 21). • Sólo CFD-G30L/G50L: Si durante la recepción de un programa de MW/LW se percibe un sonido silbante después de pulsar z en el paso 3, pulse PLAY MODE• MONO/ST ISS (interruptor de supresión de interferencias) varias veces hasta que el ruido sea mínimo.
Reproductor de discos compactos (CD) Utilización del visualizador DISPLAY ENT MEMORY Puede comprobar la información sobre el disco en el visualizador. Comprobación del número total de canciones y del tiempo de reproducción Pulse DISPLAY ENT•MEMORY en modo de parada. Tiempo total de reproducción Número total de canciones Comprobación del tiempo restante Pulse DISPLAY ENT•MEMORY mientras reproduce un disco.
Localización de un punto específico de una canción ., > Nota Sólo CFD-G50/G50L: No es posible localizar una canción específica si el indicador “SHUF” o “PGM” del visualizador se encuentra encendido. Apague la indicación pulsando x. Consejo Sólo CFD-G50/G50L: Cuando localice una canción con un número superior a 10, pulse en primer lugar >10 y, a continuación, los botones numéricos correspondientes. Ejemplo: Para reproducir la canción número 23, pulse en primer lugar >10 y, a continuación, 2 y 3.
Reproducción repetida de las canciones PLAY MODE MONO/ST u (Reproducción repetida) x Puede reproducir las canciones repetidamente en los modos de reproducción normal, aleatoria o programada (consulte la páginas 15 - 17). En el mando a distancia (sólo CFD-G50/G50L) 1 Pulse x. 2 Pulse MODE hasta que el modo de repetición deseado aparezca en el visualizador.
Reproducción de canciones en orden aleatorio PLAY MODE MONO/ST u (Reproducción aleatoria) Es posible reproducir las canciones en orden aleatorio. En el mando a distancia (sólo CFD-G50/G50L) 1 Pulse x. 2 Pulse MODE varias veces hasta que aparezca “SHUF” en el visualizador. 3 Pulse N. 1 Pulse x. “Cd” aparece en el visualizador. 2 Pulse PLAY MODE•MONO/ST hasta que aparezca “SHUF” en el visualizador. 3 Pulse u para iniciar la reproducción aleatoria.
Creación de su propio programa DISPLAY ENT MEMORY u (Reproducción programada) Puede crear un programa compuesto por un máximo de 20 canciones en el orden que desee reproducirlas. x ., > PLAY MODE MONO/ST En el mando a distancia (sólo CFD-G50/G50L) 1 Pulse x. 2 Pulse MODE hasta que aparezca “PGM” en el visualizador. 3 Pulse los botones numéricos para las canciones que desee programar en el orden que desee. 4 Pulse N. 1 2 3 Pulse x. “Cd” aparece en el visualizador.
Para cancelar la reproducción programada Pulse PLAY MODE•MONO/ST hasta que “PGM” desaparezca del visualizador. Para comprobar el orden de las canciones antes de la reproducción Pulse DISPLAY ENT•MEMORY. Cada vez que pulse el botón, el número de canción aparece en el orden programado. Para cambiar el programa actual Pulse x una vez si el CD está parado y dos veces si está reproduciéndose. El programa actual se borrará. A continuación, cree un nuevo programa siguiendo el procedimiento de programación.
Efectos sonoros (LOOP/FLASH) (sólo CFD-G50/G50L) Puede repetir parte de un CD (LOOP) y reproducir el sonido de forma intermitente (FLASH) durante la reproducción. LOOP FLASH 1 2 Reproduzca un CD. Pulse y mantenga pulsado LOOP o FLASH en el punto donde desee iniciar la función. Para Pulse y mantenga pulsado repetir una parte seleccionada de un CD LOOP reproducir el sonido con intermitencia FLASH Para cancelar la función LOOP o FLASH Suelte el botón. El reproductor vuelve a la reproducción normal.
Radio Memorización de emisoras de radiodifusión DISPLAY ENT MEMORY RADIO BAND AUTO PRESET Consejo Si memoriza automáticamente la banda “FM1” o “FM2”, se almacenarán 10 emisoras en la banda “FM1” y 10 más en la banda “FM2”. PRESET –, + 1 Pulse RADIO BAND•AUTO PRESET hasta que la banda que desea predefinir aparezca en el visualizador. 2 Mantenga pulsado RADIO BAND•AUTO PRESET durante 2 segundos hasta que “AUTO” aparezca en el visualizador. 3 Pulse DISPLAY ENT•MEMORY.
Sintonía de emisoras almacenadas RADIO BAND AUTO PRESET Una vez programadas las emisoras, utilice PRESET + o – para sintonizar sus emisoras favoritas. En el mando a distancia (sólo CFD-G50/G50L) 1 Pulse BAND para seleccionar la banda. 2 Pulse los botones numéricos para sintonizar una emisora almacenada. 20ES Radio PRESET –, + 1 Pulse RADIO BAND•AUTO PRESET para seleccionar la banda. 2 Pulse PRESET + o – para sintonizar una emisora almacenada.
Énfasis de sonido Selección del énfasis de audio POWER DRIVE WOOFER (SOUND/POWER DRIVE WOOFER) Puede ajustar el énfasis de audio del sonido que esté escuchando. SOUND Pulse SOUND varias veces para seleccionar el énfasis de audio que desee.
Temporizador Desactivación automática de la unidad SLEEP Es posible ajustar el reproductor para que se desactive automáticamente transcurridos 10, 20, 30, 60, 90 y 120 minutos, de forma que pueda dormirse mientras escucha música. Nota Cuando reproduzca una cinta utilizando esta función: Si la duración de una cara de la cinta es superior al tiempo establecido, el reproductor no se detendrá hasta que la cinta llegue al final. 1 2 3 Reproduzca la fuente musical que desee.
Preparativos Selección de la fuente de alimentación Puede utilizar la alimentación de CA o las pilas como fuente de alimentación. AC IN 2 Compartimiento de las pilas 1 a una toma mural Inserte un extremo del cable de alimentación de CA suministrado en la clavija AC IN situada en la parte posterior del reproductor, y el otro extremo en la toma mural.
Selección de la fuente de alimentación (continuación) 3 Inserte las pilas en el mando a distancia (sólo CFD-G50/G50L) Inserte dos pilas R6 (tamaño AA) (no suministradas) Sustitución de las pilas En condiciones de uso normal, la duración de las pilas es de seis meses aproximadamente. Si no consigue controlar el reproductor con el mando a distancia, sustituya todas las pilas por otras nuevas.
Conexión de componentes opcionales Podrá disfrutar del sonido del TV o de la videograbadora a través de los altavoces de este reproductor. LINE Nota Conecte los cables firmemente con el fin de evitar fallos de funcionamiento. Conexión de un TV o una videograbadora TV, videograbadora, etc. RK-G129 (no suministrado), etc. Panel posterior de este reproductor Preparativos Asegúrese de desactivar la alimentación de todos los componentes antes de realizar las conexiones.
Conexión de componentes opcionales (continuación) Grabación del sonido procedente de los componentes conectados 1 Inserte un cassette virgen. 2 Pulse LINE para que aparezca “LInE”. 3 Pulse z. La grabación se inicia. 4 Inicie la reproducción en el componente opcional conectado a la toma LINE IN del reproductor.
Información complementaria Precauciones Seguridad • No desmonte el aparato, ya que el haz láser utilizado en la sección del reproductor de discos compactos es perjudicial para los ojos. Solicite asistencia técnica sólo a personal especializado. Colocación • No deje el reproductor en un lugar cercano a fuentes térmicas ni expuesto a la luz solar directa, al polvo excesivo ni a golpes mecánicos.
Precauciones (continuación) Funcionamiento • Si desplaza el reproductor directamente de un lugar frío a otro cálido, o si lo coloca en una sala muy húmeda, puede condensarse humedad en la lente del interior de la sección del reproductor de discos compactos. Si esto ocurre, el reproductor no funcionará adecuadamente. En este caso, extraiga el CD y espere durante una hora aproximadamente hasta que se evapore la humedad.
Solución de problemas Síntoma Solución La alimentación no se activa. • Conecte el cable de alimentación de CA a una toma mural con firmeza. • Asegúrese de que ha insertado las pilas correctamente. General • No es posible activar el reproductor con el mando a distancia si lo está utilizando con pilas (sólo CFD-G50/G50L). La alimentación no se activa, y “bAttErY” y “Error” aparecen alternativamente. • Asegúrese de que las pilas están insertadas correctamente. Carencia de sonido.
Solución de problemas (continuación) Síntoma Solución El sonido es demasiado bajo o presenta mala calidad. • Sustituya todas las pilas por otras nuevas si están débiles. • Aleje el reproductor del televisor. Reproductor de cintas Radio • Si utiliza el mando a distancia mientras escucha la recepción de AM o MW/LW, es posible que se oiga ruido. Esto es inevitable (sólo CFD-G50/ G50L). La imagen del televisor no es estable.
Mando a distancia (sólo CFD-G50/G50L) Síntoma Solución El mando a distancia no funciona. • Sustituya todas las pilas del mando a distancia por otras nuevas si están débiles. • Asegúrese de orientar el mando a distancia hacia el sensor remoto del reproductor. • Elimine todos los obstáculos entre el mando a distancia y el reproductor. • Asegúrese de que el sensor remoto no está expuesto a iluminaciones intensas, como la luz solar directa o la luz de una lámpara fluorescente.
Mantenimiento Limpieza de la lente Si la lente se ensucia, pueden producirse pérdidas de sonido durante la reproducción de discos compactos. Límpiela con un soplador disponible en las tiendas del ramo. Limpieza de las cabezas y la trayectoria de la cinta Para obtener una calidad de reproducción y grabación óptima, limpie las cabezas, el rodillo compresor y el eje de arrastre con una escobilla de limpieza ligeramente humedecida en un líquido limpiador o alcohol cada 10 horas de funcionamiento.
Especificaciones Sección del reproductor de discos compactos Sistema Sistema audiodigital de discos compactos Prodiedades del diodo láser Material: GaAlAs Longitud de onda: 780 nm Duración de emisión: Continua Salida de láser: Menos de 44,6 µW (Esta salida es el valor medido a una distancia de unos 200 mm de la superficie del objetivo del bloque fonocaptor óptico con una apertura de 7 mm) Velocidad del eje 200 rev./min. (rpm) a 500 rev./min. (rpm) (CLV) Número de canales 2 Respuesta de frecuencia 20 - 20.
Especificaciones (continuación) Dimensiones 500 × 206 × 328 mm. aprox. (an/al/f) (incluyendo partes salientes) Peso 7 kg. aprox. (incluyendo las pilas) Accesorios suministrados Cable de alimentación de CA (1) Mando a distancia (1) (sólo CFD-G50/G50L) El diseño y las especificaciones están sujetos a cambio sin previo aviso.
Indice alfabético A, B L S, T Altavoz de graves 21 Apagado automático de la unidad 22 Limpieza cabezas y recorrido de cinta 32 exterior 32 Localización de un punto específico 13 LOOP 18 Selección canciones 5 énfasis de audio 21 Selección de la fuente de alimentación 23 Solución de problemas 29 SOUND 21 M, N, O U Utilización del visualizador 12 Desmagnetización de las cabezas de cinta 32 Mejora de la recepción de emisoras 7 Memorización de emisoras de radiodifusión 19 E P, Q Emisoras de radio mem
36ES Información complementaria
Información complementaria 37ES
ES Corporation 38Sony Información complementaria