3-865-709-13 (1) CD Radio Cassette-Corder Operating Instructions CFD-Z500 CFD-Z501 CFD-Z550 1999 by Sony Corporation
Warning Information To prevent fire or shock hazard, do not expose the player to rain or moisture. For customers in the United States This equipment has been tested and found to comply with the limits for a Class B digital device, pursuant to Part 15 of the FCC Rules. These limits are designed to provide reasonable protection against harmful interference in a residential installation.
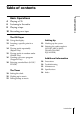
Table of contents 4 Playing a CD 6 Listening to the radio 8 Playing a tape Basic Operations Basic Operations 10 Recording on a tape The CD Player 12 Using the display 13 Locating a specific point in a track 14 Playing tracks repeatedly (Repeat Play) 15 Playing tracks in random order (Shuffle Play) 16 Creating your own program (Program Play) 18 Enjoying sound effects (LOOP/ FLASH) The Timer 19 Setting the clock 20 Waking up to music 22 Falling asleep to music Setting Up 23 Hooking up the system
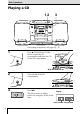
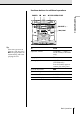
Basic Operations Playing a CD 1,2 3 For hookup instructions, see pages 23 – 25. 1 Push 6 PUSH OPEN/CLOSE down to open the CD compartment and place the CD on the CD compartment. With the label side up 2 3 Close the lid of the CD compartment. Press ^. Display The player turns on (direct power-on) and plays all the tracks once.
Use these buttons for additional operations POWER p ^ 6 PUSH OPEN/CLOSE =, + Tip Next time you want to listen to a CD, just press ^. The player turns on automatically and starts playing the CD. To Press adjust the volume VOLUME +, – (VOL +, – on the remote, CFD-Z550 only) stop playback p pause playback ^ ( P on the remote, CFD-Z550 only). Press the button again to resume play after pause.
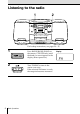
Listening to the radio 1 2 For hookup instructions, see pages 23 – 25. 1 2 6 Basic Operations Press RADIO BAND (BAND on the remote, CFD-Z550 only) until the band you want appears in the display (direct power-on). Turn TUNING to tune in the station you want. If the received FM stereo is weak, the reception becomes monaural.
Use these buttons for additional operations POWER VOLUME +, – Basic Operations Tip Next time you want to listen to the radio, just press RADIO BAND (BAND on the remote, CFD-Z550 only). The player turns on automatically and starts playing the previous station. To Press adjust the volume VOLUME +, – (VOL +, – on the remote, CFD-Z550 only) turn on/off the radio POWER To improve broadcast reception Reorient the antenna for FM. Reorient the player itself for AM.
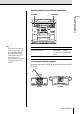
Playing a tape 2 1 For hookup instructions, see pages 23 – 25. 1 Press p6 to open the tape compartment and insert a recorded tape. Use TYPE I (normal) tape only. Close the compartment. With the side you want to play facing you 2 Press (. The player turns on (direct power-on) and starts playing.
Use these buttons for additional operations POWER VOLUME p6 Basic Operations 0, ) P Tip Next time you want to listen to a tape, just press (. The player turns on automatically and starts playing the tape. To Press adjust the volume VOLUME +, – (VOL +, – on the remote, CFD-Z550 only) stop playback p6 fast-forward or rewind the tape ) or 0 pause playback P Press the button again to resume play after pause.
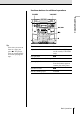
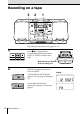
Recording on a tape 3 2 1 For hookup instructions, see pages 23 – 25. 1 Press p6 to open the tape compartment and insert a blank tape. Use TYPE I (normal) tape only. With the side you want to record on facing you 2 Select the program source you want to record. To record from the CD player: insert a CD (see page 4) and press CD. To record from the radio: tune in the station you want (see page 6).
3 Start recording. Tips • Adjusting the volume or the audio emphasis (see pages 26 and 27) will not affect the recording level. • For the best results, use the AC power as a power source. Use these buttons for additional operations POWER Basic Operations Press r (( is depressed automatically). p6 P To Press stop recording p6 pause recording P Press the button again to resume recording.
The CD Player Using the display You can check information about the CD using the display. DISPLAY ENTER Checking the total track numbers and playing time Press DISPLAY ENTER in stop mode. Total playing time Total track number Checking the remaining time Press DISPLAY ENTER while playing a CD.
Locating a specific point in a track =, + Note CFD-Z550 only: You cannot locate a specific track if “SHUF” or “PGM” is lit in the display. Turn off the indication by pressing p. The CD Player You can quickly find a specific point in a track while playing a CD. You can also locate any track using the number buttons on the remote (CFD-Z550 only).
Playing tracks repeatedly PLAY MODE (Repeat Play) p ^ =, + You can play tracks repeatedly in normal, shuffle or program play modes (see pages 15 and 16). 1 Press p. “Cd” appears in the display. On the remote (CFDZ550 only) • Use MODE instead of PLAY MODE and ( instead of ^. • When you have selected “REP 1”, select the track by pressing the number buttons. 2 Proceed as follows. To repeat Do this a single track 1 Press PLAY MODE until “REP 1” appears.
Playing tracks in random order PLAY MODE (Shuffle Play) p ^ The CD Player You can play tracks in random order. 1 Press p. “Cd” appears in the display. On the remote (CFDZ550 only) Use MODE instead of PLAY MODE and ( instead of ^. 2 Press PLAY MODE until “SHUF” appears in the display. 3 Press ^ to start shuffle play. To cancel Shuffle Play Press PLAY MODE until “SHUF” disappears from the display.
Creating your own program PLAY MODE p (Program Play) ^ =, + You can make a program of up to 20 tracks in the order you want them to be played. DISPLAY ENTER On the remote (CFD-Z550 only) 1 Press p. 2 Press MODE until “PGM” appears in the display. 3 Press the number buttons for the tracks you want to program in the order you want. 4 Press (. 1 Press p. “Cd” appears in the display. 2 Press PLAY MODE until “PGM” appears in the display.
To cancel Program Play Press PLAY MODE until “PGM” disappears from the display. To check the order of tracks before play Press DISPLAY ENTER. Every time you press the button, the track number appears in the programed order. To change the current program Press p once if the CD is stopped and twice if the CD is playing. The current program will be erased. Then create a new program following the programing procedure.
Enjoying sound effects (LOOP/FLASH) LOOP FLASH You can repeat part of a CD (LOOP) and can “flash” the CD sound (FLASH) during playback. 1 2 Play a CD. Press and hold LOOP or FLASH at the point you want to start the function. To Press and hold repeat a selected part of a CD LOOP “flash” the CD sound FLASH To cancel the LOOP or FLASH function Release the button. The player returns to normal play.
The Timer Setting the clock “--:--” indication appears in the display until you set the clock. CLOCK TIME SET –, + Tip The time display system of this player is the 12-hour system: AM12:00 = midnight PM12:00 = noon The Timer DISPLAY ENTER Before you set the clock, connect the power source (pages 23 - 25). 1 Press and hold CLOCK for 2 seconds until the hour digits flash. 2 Press TIME SET + or – until you set the current hour. Then press DISPLAY ENTER. The minute digits flash.
Waking up to music STANDBY TIMER You can wake up to music or a radio program at a preset time. Make sure you have set the clock (“Setting the clock” on page 19). TIME SET –, + DISPLAY ENTER Before you begin, make sure the t (clock) indication is not lit in the display. If it is lit, press STANDBY. 1 Prepare the music source you want to play. To play 2 Do this a CD Insert a CD. the radio Tune in a station Press TIMER. The t (clock) and the music source (“Cd” or “RAdIO”) flash.
Set the volume by pressing TIME SET + or –, then DISPLAY ENTER. 7 Press STANDBY. The t indication lights up; the player enters the standby mode. At the preset time, the power will go on, and the music will play. Then the power will go off at the preset time, and the player will enter into the standby mode. The Timer Tips • To exit the standby mode, press STANDBY to make the t indication disappear from the display. • The preset settings remain until you reset them.
Falling asleep to music SLEEP You can set the player to turn off automatically after 10, 20, 30, 60, 90, and 120 minutes, allowing you to fall asleep while listening to music. Tips • When you are playing radio or CD, make sure that ( of the tape player is not depressed. • You can fall asleep and wake up to different music. Set the waking up timer first (see page 20), turn on the power, and then set the sleeping timer. However, you cannot store different radio stations.
Setting Up Hooking up the system 2 Speaker terminals Speaker cords Make sure you turn off the power before making any connections. Left speaker 15 Battery compartment Setting Up Right speaker 3 to a wall outlet 1 Inserting the back-up batteries Insert three size AA (R6) batteries (not supplied) into the battery compartment. These batteries work to save the memory data. To remove the batteries, push the ] side.
Hooking up the system (continued) 2 Connect the black wires to (–) minus and the red wires to (+) plus terminals; the right speaker wires to the R and the left speaker wires to the L terminals. 3 Connecting the AC power cord Insert one end of the supplied AC power cord to the AC IN socket located at the rear of the player, and the other end to the wall outlet.
Note CFD-Z550 only: When you operate the player on batteries, you cannot turn on the player using the remote. 5 Using the player on batteries Insert six size D (R20) batteries (not supplied) into the battery compartment. To use the player on batteries, disconnect the AC power cord from the player. Setting Up Tip Replace the batteries when the OPR/BATT indicator dims or when the player stops operating. Replace all the batteries with new ones.
Selecting the audio emphasis (SOUND/MEGA BASS/5 BAND GRAPHIC EQUALIZER) MEGA BASS 5 BAND GRAPHIC EQUALIZER You can adjust the audio emphasis of the sound you are listening to. SOUND Selecting the sound characteristic Press the SOUND button repeatedly to select the sound characteristic you want. 26 Setting Up Choose For MANUAL adjusting the audio emphasis with 5 BAND GRAPHIC EQUALIZER (see page 27).
Note When adjusting the 5 BAND GRAPHIC EQUALIZER, be sure to select MANUAL. The graphic equalizer will not work in any other position. If you have selected MANUAL on page 26, slide 5 BAND GRAPHIC EQUALIZER to select the audio emphasis you want.
Additional Information Precautions On safety • As the laser beam used in the CD player section is harmful to the eyes, do not attempt to disassemble the casing. Refer servicing to qualified personnel only. • Should any solid object or liquid fall into the player, unplug the player, and have it checked by qualified personnel before operating it any further. On power sources • For AC operation use the supplied AC power cord; do not use any other type.
Notes on CDs • Before playing, clean the CD with a cleaning cloth. Wipe the CD from the center out. Notes on cassettes • Break off the cassette tab from side A or B to prevent accidental recording. If you want to reuse the tape for recording, cover the broken tab with adhesive tape. Side A • Do not use solvents such as benzine, thinner, commercially available cleaners or anti-static spray intended for vinyl LPs.
Symptom Remedy The power is not on. • Connect the AC power cord to a wall outlet securely. • You cannot turn on the player with the remote when you operate the player on batteries (CFDZ550 only). The power is not on, and "bAttErY" and "CHECK" are displayed alternately. • Make sure the batteries are inserted correctly. • Replace all the batteries with new ones if they are weak. There is no audio. • Make sure the function you want to use appears in the display window. • Adjust the volume.
Remedy The tape does not move when you press an operation button. • Close the cassette compartment securely. The r button does not function/ The tape does not play. • Make sure the safety tab on the cassette is in place. • Make sure “TAPE” appears in the display. The tape does not erase completely. • Clean the erasing head (see page 32.) • Replace all the batteries with new ones if they are weak.
Maintenance Cleaning the lens If the lens becomes dirty, it may cause a skipping of sound during CD operation. Clean with a commercially available blower. Cleaning the tape heads and tape path Wipe the heads, the pinch rollers and the capstans with a cleaning swab slightly moistened with cleaning fluid or alcohol after every 10 hours of operation for optimum playback and recording quality.
Specifications AUDIO POWER SPECIFICATIONS POWER OUTPUT AND TOTAL HARMONIC DISTORTION With 3.2-ohm loads, both channel driven from 150 - 10,000 Hz; rated 1.6 W per channel-minimum RMS power, with no more than 10 % total harmonic distortion in AC operation. Other Specifications CD player section System Compact disc digital audio system Laser diode properties Material: GaAlAs Wave length: 780 nm Emission duration: Continuous Laser output: Less than 44.
Index A G, H R Audio emphasis 26 GRAPHIC EQUALIZER 27 Recording B Batteries for memory 23 for player 25 for remote 24 C I, J, K Improving broadcast reception 7 Repeat Play 14 S Selecting L audio emphasis 26 Listening to the radio 6 tracks 13 Locating a specific track 13 Setting the clock 19 CD player 12 Cleaning LOOP 18 Shuffle play 15 cabinet 32 lens 32 M, N, O tape heads and tape path 32 MEGA BASS 27 Connecting AC power cord 24 Creating your own program 16 D, E Demagnetizing the t
Additional Information 35
Sony Corporation Printed in China 36 Additional Information