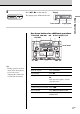
3-260-754-11 (1) CD Radio Cassette-Corder Operating Instructions page 2GB CFD-CD777S MK2 © 2003 Sony Corporation GB
Warning To prevent fire or shock hazard, do not expose the player to rain or moisture. To avoid electrical shock, do not open the cabinet. Refer servicing to qualified personnel only. Warning Do not install the appliance in a confined space, such as a bookcase or built-in cabinet. To prevent fire or shock hazard, do not place objects filled with liquids, such as vases, on the appliance. The FUNCTION selector is located at the front. When you turn on the player, the OPR/BATT indicator lights up.
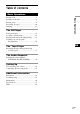
Table of contents Basic Operations The CD Player Using the display .......................................... 14 Locating a specific track ............................... 14 Playing tracks repeatedly (Repeat Play) ....... 15 Creating your own program (Program Play) ......................................... 16 The Tape Player Basic Operations Playing a CD .................................................. 4 Listening to the radio ...................................... 6 Playing a tape ...................
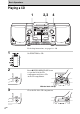
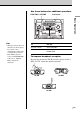
Basic Operations Playing a CD 1 2,3 4 For hookup instructions, see pages 19 – 20. 1 2 Set FUNCTION to CD. Press Z PUSH OPEN/CLOSE down to open the lid of the CD compartment and place a CD on the CD compartment. With the label side up 3 4GB Close the lid of the CD compartment.
4 Display Press u (N on the remote). The player plays all the tracks once. Playing time Use these buttons for additional operations FUNCTION ., > VOLUME u Basic Operations Track number Z PUSH OPEN/CLOSE x Level meter Tip During operation, the level meter shows the frequency level of the sound. Adjusting the volume will not affect the level meter. To Do this adjust the volume Turn VOLUME. stop playback Press x. pause playback Press u. (On the remote, press X.
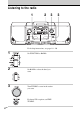
Listening to the radio 1 2 3 For hookup instructions, see pages 19 – 20. 1 2 3 Set FUNCTION to RADIO. Set BAND to select the band you want. Turn TUNING to tune in the station you want. For better SW reception, use FINE TUNING.
Use these buttons for additional operations FUNCTION VOLUME Level meter Basic Operations Tips • During operation, the level meter shows the frequency level of the sound. Adjusting the volume will not affect the level meter. • If the FM broadcast is noisy, set ISS•FM MODE at the rear to “MONO”. Radio will play in monaural. To Do this adjust the volume Turn VOLUME . turn off the radio Set FUNCTION to TAPE• CD/ RADIO OFF. To improve broadcast reception Reorient the antenna for FM.
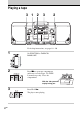
Playing a tape 3 1 2 3 2 For hookup instructions, see pages 19 – 20. 1 2 Set FUNCTION to TAPE•CD/ RADIO OFF. Press xZ to open tape compartment and insert a recorded tape. Use TYPE I (normal) tape only. Close the compartment. With the side you want to play facing you 3 Press PLAY N. The player starts playing.
Use these buttons for additional operations Level meter m, M xZ X Basic Operations DIRECTION DIR MODE hH VOLUME m, M X xZ Note During playback, do not press M, m or N on the other deck as this causes excessive wow and flutter. Tips • During operation, the level meter shows the frequency level of the sound. Adjusting the volume will not affect the level meter. • To play tapes in both decks successively, press N on deck B and then press PLAY and X on deck A as the same time.
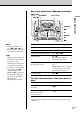
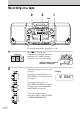
Recording on a tape 2 3 1 MIC For hookup instructions, see pages 19 – 20. 1 Press xZ to open the tape compartment on deck B and insert a blank tape. Use TYPE I (normal) tape only. Close the compartment. With the side you want to record on facing you 2 Select the program source you want to record. To record from the CD player, set FUNCTION to CD and insert a CD (see page 4). To record from the radio, set FUNCTION to RADIO, and tune in the station you want using BAND and TUNING (see page 6).
3Deck B Press z on deck B (N is depressed automatically). Use these buttons for additional operations xZ Basic Operations Notes • During recording, do not press M, m or PLAY on deck A as this causes excessive wow and flutter. • While recording from the built-in microphone (MIC), no sound comes from the speakers or the headphones. • When you connect the microphone to the MIX MIC jack, you cannot record from the built-in microphone.
Dubbing 4 3 2 1 4 5 1 For hookup instructions, see pages 19 – 20. 1 Insert a recorded tape into deck A and a blank tape into deck B. Use TYPE I (normal) tape only. Close the compartment. With the side you want to record on facing you 2 3 Set FUNCTION to DUBBING. To dub at high speed, press HIGH SPEED DUBBING to ON. To dub at normal speed, press HIGH SPEED DUBBING to OFF.
4Deck A Note During dubbing, do not set FUNCTION or press HIGH SPEED DUBBING as this causes excessive wow and flutter. Tips • Adjusting the volume or selecting the audio emphasis (see page 18) will not affect the recording level. • For the best results, use the AC power as a power source. • When the tape in deck A ends first, deck B will continue recording till the tape end. When the tape in deck B ends first, deck A plays on according to the setting of the DIR MODE switch. Start dubbing.
The CD Player Using the display You can check information about the CD using the display. Locating a specific track You can quickly locate any track using the number buttons. You can also find a specific point in a track while playing a CD. Number buttons DISPLAY ., > Checking the total track number and playing time Press DISPLAY (DISPLAY/ENTER on the player) in stop mode. Total playing time Total track number Checking the remaining time Press DISPLAY (DISPLAY/ENTER on the player) while playing a CD.
Playing tracks repeatedly (Repeat Play) On the player Use PLAY MODE instead of MODE, . or > to select the track instead of the number button, and u instead of N. You can play tracks repeatedly in normal, shuffle or program play modes (see page 16). To cancel Repeat Play Press MODE until “REP” disappears from the display. Number buttons The CD Player Tip Press and hold LOOP on the remote during play to repeat a selected part of a CD. When you release LOOP, the player returns to normal play.
Creating your own program (Program Play) You can arrange the playing order of up to 20 tracks on a CD. On the player 1 Set FUNCTION to CD. 2 Press PLAY MODE until “PGM” appears in the display. 3 Press . or > then press DISPLAY/ ENTER for the tracks you want to program in the order you want. 4 Press u. To cancel Program Play Press MODE until “PGM” disappears from the display. Number buttons MODE To check the order of tracks before play Press DISPLAY.
The Tape Player Recording through a microphone/Using as a PA system You can record sound using a microphone (not supplied) or use the player as a public address system. MIX MIC FUNCTION z Using as a PA system 1 Plug the microphone into the MIX MIC jack and turn on the microphone if it has a power switch. 2 Set FUNCTION to TV/LINE IN. 3 Sing or speak into the microphone and adjust the volume.
The Audio Emphasis Using the PRESET MODE Set the PRESET MODE selector to the sound mode you want. Selecting the audio emphasis (DYNAMIC SOUND SYSTEM) Use MANUAL You can select the audio emphasis of the sound you are listening to. DISCO BALANCE PARTY 5 BAND GRAPHIC EQUALIZER PRESET MODE LIVE To select the sound using the 5 BAND GRAPHIC EQUALIZER. get powerful, clear sounds emphasizing low and high range audio. get light, bright sounds emphasizing high and middle range audio.
Setting Up Choosing the power sources You can use the AC power or batteries as a power source. 1 Speaker terminals 4 Battery compartment Right speaker AC IN Setting Up Left speaker Speaker cord 2 to a wall outlet 1 Hooking up the speakers 1 Align the grooves and slide the speaker box down until it snaps into place A. A Tips • To detach the speakers, unlock speaker (see B on the diagram) and slide the speaker box all the way up and away from the player. • Connect the supplied speakers to this player.
2 Connecting the AC power cord Insert one end of the supplied AC power cord to the AC IN socket located at the rear of the player, and the other end to the wall outlet. 4 Using the player on batteries Insert eight R20 (size D) batteries (not supplied) into the battery compartment. To use the player on batteries, disconnect the AC power cord from the player. Adjusting the voltage Be sure to set the VOLTAGE SELECTOR (at the rear) to your local power supply.
Connecting optional components You can enjoy the sound from a TV or VCR through the speakers of this player. Be sure to turn off the power of each equipment before making connections, and set FUNCTION to TAPE•CD/RADIO OFF. For details, refer to the instruction manual of the component to be connected. FUNCTION Note Connect the cables firmly to avoid any malfunction. Tip You can record the sound of the connected component.
Additional Information Precautions On safety • As the laser beam used in the CD player section is harmful to the eyes, do not attempt to disassemble the casing. Refer servicing to qualified personnel only. • Should any solid object or liquid fall into the player, unplug the player, and have it checked by qualified personnel before operating it any further. • Discs with non-standard shapes (e.g., heart, square, star) cannot be played on this player. Attempting to do so may damage the player.
Notes on cassettes • Break off the cassette tab from side A or B to prevent accidental recording. If you want to reuse the tape for recording, cover the broken tab with adhesive tape. Side A Tab for side B Tab for side A • The use of a cassette with more than 90 minutes of play time is not recommended except for long, continuous recording or playback. Music discs encoded with copyright protection technologies This product is designed to play back discs that conform to the Compact Disc (CD) standard.
Troubleshooting General The power is not on. • Connect the AC power cord to a wall outlet securely. • Make sure the batteries are inserted correctly. • Replace all the batteries with new ones if they are weak. • You cannot turn on the player with the remote when you operate the player on batteries. There is no audio. • Set FUNCTION to the position you want to operate. • Adjust the volume. • Unplug the headphones when listening through speakers.
Remote The remote does not function. • Replace all the batteries in the remote with new ones if they are weak. • Make sure that you are pointing the remote at the remote sensor on the player. • Remove any obstacles in the path of the remote and the player. • Make sure the remote sensor is not exposed to strong light such as direct sunlight or fluorescent lamp light. • Move closer to the player when using the remote.
Maintenance Cleaning the lens If the lens becomes dirty, it may cause a skipping of sound during CD operation. Clean with a commercially available blower. Cleaning the tape heads and tape path Wipe the heads, the pinch roller and the capstans with a cleaning swab slightly moistened with cleaning fluid or alcohol after every 10 hours of operation for optimum playback and recording quality.
Specifications CD player section System Compact disc digital audio system Laser diode properties Material: GaAlAs Wave length: 780 nm Emission duration: Continuous Laser output: Less than 44.6 µW (This output is the value measured at a distance of about 200 mm from the objective lens surface on the optical pick-up block with 7 mm aperture.) Spindle speed 200 r/min (rpm) to 500 r/min (rpm) (CLV) Number of channels 2 Frequency response 20 - 20 000 Hz +0/–1.
Index A Audio emphasis 18 B BALANCE 18 Batteries for player 20 for remote 20 C CD player 14 Choosing power sources 19 Cleaning cabinet 26 lens 26 tape heads and tape path 26 Connecting AC power cord 19 optional components 21 Creating your own program 16 D, E, F Demagnetizing the tape heads 26 Display 14 Dubbing 12 G, H GRAPHIC EQUALIZER 18 I, J, K Improving broadcast reception 7 L Listening to the radio 6 Locating a specific track 14 Selecting audio emphasis 18 tracks 5 Setting up 19 T Troubleshooti
g ,] ,: , ,h , q vE i ,H ,j q MEGA BASS E *+ < 8 , ,U ,4 ,k ,l ,? ,m q q B > < 3 C + 1 = ^ 1 r VOLTAGE SELECTOR GRAPHIC ") q EQUALIZER q < Ei 3 ,e ,f ,J , q 4 u@ 3 @% ; 4 2 f $ E q J E0 J
7 1 ; C Q N U `-E A ,\-! - % ,a qr E % : o 1& >>E *[ ,(a E % : >>E *[ E& nP % NE .
]B^ =7 # _' ` :a &5($ - : C V 2 ,\ 5 L C }r : r P >>E " %1 P *'C ' ` ' 'H $ E ,/ T {- b 'C ( [C .
F!L 1K B 9 2 YB K ; =7 F!L 1K B T W IE=YP P LC a0H J b- @ O QD 3 @ ; • ( 1 g * 'H t X ; J D f E 7 _ P P LC a0H J b- h D 2 L XY2 • ( H H.
5 ( 9 M5 N E BC O ( 1 g t X ; J D IE=YP @ O QD 3 @ ; (" 1 LC ) *+ P! s 'i P LC a0H J b- \ 'C 2 A Q L0M L0M 5 E ! 89 ( MW > E D A Q 5 (h > 12 • • • 91(0 ( G PL ? *P (I- "#$ 9D #$ : T Q # K 7 &5($ U(L 5 (\ 0b~P $ E JE [b 1B! • 9&5($ "6 5 XN 2 YB REC z " V : T W5 (h 0 A g $ E ) @ Y s D "! L XY2
0 1(2$ 0 * , * 3 * 4 0 5 6 O | 2 5 e ' 89 a Q<2 z | 2 z ,x T b ((CD) [ 5 B , %b Qb '%2 O JE1 J> % Ad`5 :DE ( [ XE P @B L ' 5 | 2 5 5 789 P " ( 5 789 : C ( ' 89 P * C L0M 5 B- CD B O , 8*P % X -! 1 ; ! / t X ; (/ Sony [ ' A) jEB! J :DE %&' ($ ) * ! + S + -! A S [ d [ m O' " E 0P aB • t@K ;- ($ E : C 1 d [ I> 1 B J
! " 0 -! ,J Ec > < S EB " 0 lE 2 5 @ gE LX -! ,JE @ nQ ! h " 02 ( 0 0 < gE] LX -! , E K LX ! : C -! ? m ! : C Oo2 5 (JE% ,- '.
L M KD' " 5 :;Z f 7q4 YZ r $ %& 4 / # / 0 1 ,y ; a h $1 $KD 8E $%& - S@ &% $ l#' ! B S@ :; &U& z ? aK9. /0 N : OP & ) $KDE k& ?) & 4 j g ! $KD " LE Q % " ,L - S@ L" W < . LE c' , Z %& > U. $ 89 = " FUNCTION _b u& - a 9 6 4 TAPE•CD/ & n B & g W < .
4 $KD f ` mC ID /l[ C R20 j& LE 4 k 0 $1 R l7 :; IR ?E M $ ; , 4 $KD f ` g $KD LE $ %&' :; , M ? ^4 W X 7 $1 _ `4 &U& AC IN $1 ^ &9 p E " .
! ! ") AC IN - *+, #$ %& ' ( " # / 0 1 = " B >?@ AB C " # DE F 4 / , " # $ ) • J 4 = "* H&D $E 4 " # + % , -. /0 ,I$ D $KD L" " N O $KD PQ 8E R M ? " # $ %& 4 / • - S@ PQ 8E T 1 R?SU " $ %& 4 V 6. KD' ( # ( < W X = .
$ % &' ( )*+ PRESET MODE ; L PRESET MODE )K 6 =@ L# .HC M J3H !"34 .
' !"# , % MIX MIC /01. 2 G%. 3 56 7% 89 : %+ ; ,- <= >)? @(0= #$6%( ,- <= >)? FUNCTION AB%C DE F0= #TV/LINE IN FQ O"H G 8) T F0= . 2 R S P% , % 56 #U V ) !"# $ % & ' * + !" MIX MIC FUNCTION #$ %& '( ) %* + ,-. z - !.
) */ N 0 CD 0 %. 789 LF FUNCTION P'o%6 W;8 @ + ;=6 dj& L K PLAY MODE 3'45 6 789 W482 A Q =6 : : LF “PGM” DISPLAY/ W482 >B [ .> C6 9 . C6 W482 L u%t ( q'& 6 9 d 1 ; qt & ) 6 I F6 ENTER u C6 W482 M H I J4 &,< G *& >K ,7/ ! ? LF aZ L6 ? U q'& & +, 29 >'j & ! 0 %.
) */ F < ,MODE C6 [ U # PLAY MODE C6 _ = > u C6 9 , ( ' fU ' 6 [ U # > 9 .9 N C6 [ U # , / ! G = [ “REP” + ;=6 )P & L K MODE 78%6 W482 Q =6 : : : ';< % = > , / = ? : , 78%6 )* + + %J I F6 ? @ ! D l -PJ6 j0 G m ;( 9 )n %5=6 , , =6 9 % + K9 LF LOOP )/Fh 3'45 6 W4" OP K29 W482 0 %.
! $% & ' ( )* +, - ./0 , 1 2 # " ! 3'45 6 789 )* 0 %. $ % & '( ! ) * +, - . : : 0 %. I %F= [ ]/- 6 ! Q =6 - 2 9 #3 DISPLAY ., > ( > #+ : ; <= . C6 9 DE / F6G > C6 ? @ A B )* I%JF6 D7'H F6G 6%JK > L K M%4" N OP K 9 ./ 6 LF ? @ A B ./0 . C6 9 DE / F6G > C6 789 )* Q =6 : : D7'H F6G M%4" N OP K 9 R S( T % 6 ./ F6 6%JK > L K ; A B .
A ! $ PLAY 9 /I -. /"0 EZ D X -? /"0 A mt ;+ N H GU # @,C 5N #0 E A B mt # N H z -? /"0 Bj l K b N -? /" - ./ 0 *+ 1 12 345 678 9 xZ xZ B ! U QR0" -. !db P , G1 # 8 UZ@ /db <@ FUNCTION Tl # # GC G1 -.
S T $ ' # $ U % − ! " , # A mt ;+ p # &6G 2 i 9WN@ B mt ;+ '- + 2 i< TYPE I O U D 2 i J,e 30 I 5 67 9 =0 K+ B]N A $"< # FUNCTION Tl -. !"0 DUBBING G1 G1 -. /" , # # GC GU # # GC $"< 0 ,HIGH SPEED DUBBING ON 9 /I # ' % G1 -.
B ! % 9 6G 8,C 5N #0 E A B mt # N H z -? /"0 j l K b N -? /" - ./ 0 *+ 1 12 345 678 9 X xZ QR0" -? # /db P ,9 6G 8 UZ@ • PLAY 9 /I -. <@ M ,m !G w \ h4 A mt ;+ N H K!z ;+ { < b < | b-0 BMICA h + F H !# 9 6G 8 UZ@ • ~ Ua ,9/IH ;+ H # 3 <@ # G D -, @ !KH ;+ h + F w ~ b ,U# • !# 9 6G wUF P ,MIX MIC 9/IH C ?m h + F H n xZ X @7 A" B19 AR J*.
J + I ' % # MIC − , I 5 67 * xZ -? /"0 '- + 2 i 9WN@< B p # TYPE I O U D 2 i J,e 30 I 5 67 9 =0 K+ B]N A ! " B + J K N b ][ } 1 ! -, - WxC E= p 6G C ' -. !"0 ,CD 1 234 9/I D 9 6G 1 234 $"< 0 FUNCTION Tl B `1@A 1 234 $" EZ D CD Tl -. !"0 , N D 9 6G D ,RADIO N $"< 0 FUNCTION H - -.
- ./ 0 *+ 1 12 345 678 9 D C DIRECTION DIR MODE hH VOLUME m, M xZ X m, M X xZ ;,< => : VOLUME L G M = -N@ L G !" xZ -? /"0 O 3P Q K 0 M -? <@ m -? /"0 $ <@ $ G s,K I $ G X -? /" O 3& R=SH T= Q UV 3( L W@ 5 -? /"0 R=SH T = K# 9 /I DIRECTION n o( -. /"0 5,7 < 5 9 3: n o( -.
J + I ? ) % # ' − % , ' $"< # FUNCTION Tl -. !" TAPE•CD/ N ) 1 234 Q K 0• I RADIO OFF 9 ? ) ! " I 5 67 * xZ -? /"0 5 6_ ;+ p # &6G 2 i $"< TYPE I O U D 2 i J,e 30 I 5 67 9 =0 K+ B]N A PLAY N 9 /I -.
- ./ 0 *+ 1 12 345 678 9 D C FUNCTION VOLUME ;,< => : VOLUME L G M = -N@ L G !" 0 FUNCTION Tl -.
? / # − ' , % $" # FUNCTION !" RADIO ; ?_ - W( BAND ?_ J `1 !"0 a, b TUNING 2c M = -N@ C ' H 2c # % # ' % 5 K X !K 30 9d+@ # X Y =, 2c !" M = J,e 30 ,SW FINE TUNING AR ^
5,7< # N -? <@A u -? /"0 B, C D EF B + $ 5,7 < 5 - GH $ 9 /I C 9/IH J K 1 =>1 ? ) @7" - ./ 0 *+ 1 12 345 678 9 FUNCTION ., > VOLUME u Z PUSH OPEN/CLOSE x D C AR > ;,< => : VOLUME M = -N@ L G !" x -? /"0 O 3P Q K 0 5,7< #A u -? /"0 BX -? /"0 ,, C D# EF Q UV 3( L W@ 5 -? /"0 R=SH T= , C 9 /I O 3& R=SH T= > -? /"0 ; - GH X K 1P .
( ) *+, # %&' $ − , CD $" # FUNCTION !" %&'( )* $+, -.
< = : ; (&5 59 & ! (&5 59 & ! N """"""""""""""""""""""""""""""""""""""""""""" 2ME > J7 Q """""""""""""""""""""""""""""""""""""""""""""" 49 !; O MP S """"""""""""""""""""""""""""""""""""""""" R4!7 O M UV """"""""""""""""""""""""""""""""""""""" R4!7 ;< > T? U """"""""""""""""""""""""""""""""""""""""""""""" % W X? (!%= 2< 59 >? UN """"""""""""""""""""""""""""""""""""" Y! - - Z [ MC UN """""""""""""""""""""""""""""""""""""""""""" \ B ? 4 ] U` """"" ^B!
, ! " #$ %&# ' ,(&) * #% + ,-. / 01 (2 & & !3 45 678 ! "#$ % & ' ( ) * + , - .
CD Radio Cassette-Corder AR AR CFD-CD777S MK2 © 2003 Sony Corporation