Congratulations on your purchase of the Sony Ericsson K850a. Capture and share quality moments. For additional phone content, go to www.sonyericsson.com/fun. Register now to get a suite of tools, free online storage, special offers, news and competitions at www.sonyericsson.com/myphone. For product support, go to www.sonyericsson.com/support.
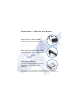
Accessories – More for your phone Camera Phone Kit IPK-100 Premium protection for your phone. Bluetooth™ Headset HBH-IV835 Stylish discretion with excellent sound. Desk Stand CDS-65 Your phone’s best assistant: connect a USB cable, charger and portable handsfree. These accessories can be purchased separately but may not be available in every market. To view the full range go to www.sonyericsson.com/accessories.
Contents Getting started ................... 5 Messaging ....................... 27 Assembly ........................................ 5 Turning on the phone ..................... 5 Help in your phone ........................ 6 Charging the battery ....................... 7 Text and multimedia messaging ... Voice messages ............................ Mobile Email ................................. Instant Messaging (IM) ................. Phone overview ............................. 8 Imaging ............
Ringtones and melodies ............... MusicDJ™ .................................... Sound recorder ............................. Games .......................................... Applications .................................. 44 45 45 45 46 Connectivity ...................... 47 Phone name .................................. Using MEdia Net .......................... Bluetooth™ wireless technology . Using the USB cable .................... 47 47 48 50 More features ................... 51 Alarms ........
Sony Ericsson K850a UMTS 850/1900/2100 GSM 850/900/1800/1900 This User guide is published by Sony Ericsson Mobile Communications AB or its local affiliated company, without any warranty. Improvements and changes to this User guide necessitated by typographical errors, inaccuracies of current information, or improvements to programs and/or equipment, may be made by Sony Ericsson Mobile Communications AB at any time and without notice.
Input is licensed under one or more of the following: U.S. Pat. Nos. 5,818,437, 5,953,541, 5,187,480, 5,945,928, and 6,011,554; Canadian Pat. No. 1,331,057, United Kingdom Pat. No. 2238414B; Hong Kong Standard Pat. No. HK0940329; Republic of Singapore Pat. No. 51383; Euro.Pat. No. 0 842 463(96927260.8) DE/DK, FI, FR, IT, NL, PT, ES, SE, GB; and additional patents are pending worldwide. Java and all Java based trademarks and logos are trademarks or registered trademarks of Sun Microsystems, Inc. in the U.S.
Getting started Assembly To insert the battery Before you start using your phone, you need to insert a SmartChip and the battery. To insert the SmartChip 1 Remove the battery cover. 2 Slide the SmartChip into its holder with the gold-colored contacts facing down. 1 Insert the battery with the label side down and the connectors facing each other. 2 Close and slide the battery cover into place. Turning on the phone To turn on the phone 1 Press and hold down .
2 Enter your SmartChip PIN, if requested and select OK. 3 Select a language. If you want to correct a mistake when you enter your PIN, press . SmartChip The SmartChip, which you get from AT&T, contains information about your subscription. Always turn off your phone and detach the charger before you insert or remove the SmartChip. You can save contacts on the SmartChip before you remove it from your phone. See To copy names and numbers to the SmartChip on page 19.
Charging the battery The phone battery is partly charged when you buy it. To charge the battery 2.5 h. 1 Connect the charger to the phone. It takes approximately 2.5 hours to fully charge the battery. Press a key to view the screen. 2 Remove the charger by tilting the plug upwards. You can use your phone while it is charging. You can charge the battery at any time and for more or less than 2.5 hours. You can interrupt the charging without damaging the battery.
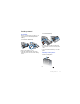
Phone overview 1 Ear speaker 2 Screen 3 Touch options 4 Activity menu key 5 Send key 6 Navigation key 7 Volume, digital zoom keys 8 C key (Clear) 9 End key 10 Camera switch mode key 11 Camera key 12 Camera on/off key 13 Silent key 14 Connector for charger 1 7 2 3 8 9 4 5 10 6 12 11 13 14 8 Getting started
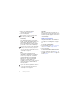
15 16 On/off key 17 Camera lens cover 18 Flash 16 17 Getting started 9
Menu overview AT&T Music* Media player Shop Music MusicID XM Radio Music Videos The Buzz Community Music Apps Messaging Write new Inbox Mobile Email IM* Call voicemail Outbox Drafts Sent messages Saved messages Templates Manage messages Settings Recent Calls** All Answered Dialed Missed AT&T Mall MEdia Net* Cellular Video Shop Tones Shop Games Shop Graphics Shop Multimedia Shop Applications MEdia Net Home My Stuff Address Book Camera album Music Pictures Videos Themes Web pages Games Applications Other
Cyber-shot™ Organizer Alarms** Applications Calendar Tasks Notes Timer Stopwatch Light Calculator Password Saver Settings** General Profiles Time & date Language Voice control New events Shortcuts Flight mode Security Setup wizard Accessibility Phone status Master reset Sounds & alerts Ring volume Ringtone Silent mode Increasing ring Vibrating alert Message alert Key sound Display Wallpaper Themes Screen saver Clock size Brightness Calls Speed dial Smart search Forward calls Manage calls Time & cost* S
Navigation The main menus are shown as icons. Some submenus include tabs. To use the touch options Touch options To navigate the phone menus • Select an action shown at the bottom of the screen by pressing the left, center or right touch option. To view options for an item • Select Options to, for example, edit. 1 From standby select Menu. 2 Use the navigation key to move through the menus. To scroll between the tabs • Scroll to a tab by pressing the navigation key left or right.
starts from the top left icon and moves across and then down row by row. To go directly to a main menu • From standby select Menu and press – , , or . To use navigation key shortcuts • From standby press , , or go directly to a function. to To edit a navigation key shortcut 1 From standby select Menu > Settings > the General tab > Shortcuts. 2 Scroll to an option and select Edit. 3 Scroll to a menu option and select Shortc.. Activity menu The activity menu gives you quick access to certain functions.
To insert a memory card • Open the battery cover and insert the memory card with the gold-colored contacts facing up. To remove a memory card Handling files You can move and copy files between your phone, a computer and a memory card. Files are saved on the memory card first and then in the phone memory. Unrecognized files are saved in the Other folder. You can create subfolders to move or copy files to.
To move a file in My Stuff 1 From standby select Menu > My Stuff. 2 Find a file and select Options > Manage file > Move. 3 Select an option. 1 2 3 4 To select more than one file in a folder From standby select Menu > My Stuff. Scroll to a folder and select Open. Select Options > Mark > Mark several. For each file you want to mark, scroll to the file and select Mark. To delete a file from My Stuff 1 From standby select Menu > My Stuff. 2 Find the file and press .
To enter text using multitap 1 From standby select, for example, Menu > Messaging > Write new > Message. 2 If is displayed, press and hold down to change to multitap text input. 3 Press – repeatedly until the desired letter appears. 4 When a word is written, press to add a space. To add words to the built-in dictionary 1 When you enter text using T9 Text Input, select Options > Spell word. 2 Write the word using multitap input and select Insert.
To answer a call • Press . To reject a call • Press . To change the ear speaker volume during a call • Press the volume key up or down. To mute the microphone during a call 1 Press and hold down . 2 Press and hold down again to resume. To turn the loudspeaker on during a call • Select SpkrOn. Do not hold your phone to your ear when using the loudspeaker. This could damage your hearing. To view missed calls from standby • Press Calls or press and scroll to the New events tab and select a number.
2 Scroll to New contact and select Options > Special numbers > Emergency nos.. Address book You can save names, phone numbers and personal information in Address Book. Information can be saved in the phone memory or on the SmartChip. Default contact You can choose which contact information is shown as default. If Phone contacts is selected as default, your contacts show all the information saved in Address Book.