
User Manual
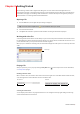
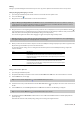
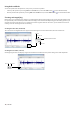

Table Of Contents
- Introduction
- Learning the Sound Forge Audio Studio Workspace
- Getting Started
- Changing File Properties and Formats
- Using Markers and Regions
- Applying Processes and Effects
- Recording, Extracting, and Burning
- Index

Scrubbing
Scrubbing is a type of timeline playback that gives you precise control over the speed and direction of playback.
Scrubbing with the scrub control slider
The scrub control slider (
), which is located at the bottom of the data window, can be dragged back and forth. The farther from
the center that the slider is dragged, the faster the playback, both forward and in reverse.
Note:
You can also drag the Normal Rate indicator ( ), which is located below the scrub control, to adjust playback speed or
double-click Rate and type a playback rate.
Scrubbing with the keyboard
Three letters (JKL) are used as a keyboard scrub control.
Keyboard scrub letters
J K
L
Reverse Pause Forward
• Press J for reverse playback. Press again to accelerate the playback rate.
• Press L for forward playback. Press again to accelerate the playback rate.
• Press K to pause playback.
There are several ways to adjust the playback speed:
• Hold K while pressing J or L to emulate a shuttle knob mode.
• Press K+J to turn the knob to the left or K+L to turn the knob to the right.
• Press K again or Spacebar to return to normal mode.
Creating data windows
1.
From the File menu, choose New. The New Window dialog is displayed.
2.
Complete the New Window dialog:
a.
From the Sample rate drop-down list, choose a sample rate.
b.
From the Bit-depth drop-down list, choose a bit depth.
c.
Choose a setting from the Channels drop-down list to select the number of channels stored in the file.
For more information, see Editing file properties on page 17.
3.
Click OK. A new data window with the specified properties is displayed.
Saving files
You can save a file in a variety of formats, including popular audio formats such as WAV and AIFF, and streaming media formats such
as Windows Media® Audio.
1.
From the File menu, choose Save.
Note:
When saving a new file, the Save As dialog is displayed. If the file was previously saved, choosing Save automatically saves
the file without your input.
2.
From the Save as type drop-down list, choose a file format.
3.
In the File name box, type a name for the file.
4.
Select other options in the Save As dialog as needed and click Save.
10
| CHAPTER 3