Revised February 10, 2010 After Sound Forge® Audio Studio™ software is installed and you start it for the first time, the registration wizard is displayed. This wizard offers easy steps that allow you to register the software online with Sony Creative Software Inc. Alternatively, you can register online at https://www.sonycreativesoftware.com/reg/software at any time. Registration assistance Registration assistance is available online at http://www.sonycreativesoftware.
Gracenote and CDDB are registered trademarks of Gracenote. The Gracenote logo and logotype, MusicID, and the “Powered by Gracenote” logo are trademarks of Gracenote. LPEC “LPEC” is a trademark of Sony Corporation. Microsoft DirectX programming interface Portions utilize the Microsoft® DirectX® programming interface. Copyright © 1999 – 2004 Microsoft Corporation. All rights reserved. Microsoft Windows Media Portions utilize Microsoft Windows Media® technologies. Copyright © 1999 – 2007 Microsoft Corporation.
Table of Contents Introduction . . . . . . . . . . . . . . . . . . . . . . . . . . . . . . . . . . . . . . . . . . . . . . . . . . . . . . . . . . . . . . . . . . . . . . . . 3 Introducing Sound Forge Audio Studio software . . . . . . . . . . . . . . . . . . . . . . . . . . . . . . . . . . . . . . . 3 System requirements. . . . . . . . . . . . . . . . . . . . . . . . . . . . . . . . . . . . . . . . . . . . . . . . . . . . . . . . . . . . . . . . . . 3 Installing Sound Forge Audio Studio software . . . . .
Converting mono/stereo channels . . . . . . . . . . . . . . . . . . . . . . . . . . . . . . . . . . . . . . . . . . . . . . . . . . . 19 Converting from mono to stereo . . . . . . . . . . . . . . . . . . . . . . . . . . . . . . . . . . . . . . . . . . . . . . . . . . . . . . . . . . . 19 Converting from stereo to mono . . . . . . . . . . . . . . . . . . . . . . . . . . . . . . . . . . . . . . . . . . . . . . . . . . . . . . . . . . . 19 Converting file formats. . . . . . . . . . . . . . . . . . . . . . . .
Chapter 1 Introduction Introducing Sound Forge Audio Studio software Thank you for purchasing Sound Forge® Audio Studio™ software and for your continued support of the Sony Creative Software Inc. family of products. The software provides you with the powerful features you have come to expect, as well as a number of new features designed to make digital audio editing quick and easy.
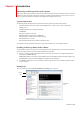
The following table describes the four tabs of the online help window. Tab Contents Description Provides a list of available help topics. Click a closed book then click on a topic page to open the pages, and . Index Provides a complete listing of the help topics available. Scroll through the list of available topics or type a word in the Type in the keyword to find box to quickly locate topics related to that word. Select the topic and click the Display button.
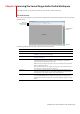
Chapter 2 Learning the Sound Forge Audio Studio Workspace This chapter provides an overview of Sound Forge® Audio Studio™ toolbars and controls. The main window When you start the application, the main window is displayed. The main window’s workspace is where you perform all audio editing. Menu bar Standard toolbar Transport bar Channel Meters (docked) Workspace Status bar The following table describes the major components of the main window.
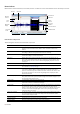
Data windows Data windows contain audio data (as a waveform) as well as a number of controls and commands used to edit and process audio. Title bar Time ruler Overview bar Marker bar Edit Tool Selector Position scroll bar Level ruler Time zoom resolution Waveform display Time zoom in/out Level zoom in/out Maximize width Playbar Scrub control Selection status boxes Data window components The following table describes the data window components.
Playbar The playbar is located in the bottom-left corner of a data window. You can use the playbar to navigate and play audio files in a variety of ways. Go to Start Moves the cursor to the start of the file. Stop Stops playback and returns the cursor to its position prior to playback. Go to End Moves the cursor to the end of the file. Play Normal Plays from the cursor to the end of the file. If there is a selection, plays from the beginning of the selection to the end of the selection.
Standard toolbar The Standard toolbar displays by default when you start the application. The buttons on this toolbar provide quick access to many common commands. New Creates a new data window. Play Clipboard Plays the audio on the clipboard. Open Displays the Open dialog. Trim/Crop Removes all data from the file that is not currently selected. Save Saves the current audio data. Undo Reverses the last edit operation. Save As Saves the current file with a new name or format.
Chapter 3 Getting Started The Sound Forge® Audio Studio™ digital audio editing tool is for users from all musical backgrounds. It is an extremely deep program, containing features that may only be required by the most advanced or specialized users. Nonetheless, a firm grasp of Sound Forge Audio Studio basics is essential. This chapter is designed to provide you with information on Sound Forge Audio Studio fundamentals. Opening a file 1. From the File menu, choose Open. The Open dialog is displayed.
Scrubbing Scrubbing is a type of timeline playback that gives you precise control over the speed and direction of playback. Scrubbing with the scrub control slider The scrub control slider ( ), which is located at the bottom of the data window, can be dragged back and forth. The farther from the center that the slider is dragged, the faster the playback, both forward and in reverse.
Editing audio New Sound Forge Audio Studio users should remember that even the most complex editing is derived from a few simple operations: copy, paste, cut, delete (clear), trim/crop, and mix. The following sections contain a mini-tutorial to familiarize you with basic editing operations. These procedures use Sony Creative Software Inc. Perfect Clarity Audio (PCA) files that are located in the same folder as the application.
3. To confirm that the data has been pasted into the file, click the Play All button ( ). “Wow. Wow. Sound editing just gets easier and easier” plays back. Pasting by dragging and dropping a selection 1. Choose the Edit tool ( ). 2. Drag the mouse in the data window to create a selection anywhere in Voiceover.pca.
Mixing Mixing is a powerful editing function that allows you to mix a copy of the clipboard contents at the current cursor position. Mixing by dragging and dropping a selection 1. Open and play the Drumhit.pca file. The file contains a snare drum and crash cymbal sound. 2. Choose the Edit tool ( ). 3. Drag the mouse over the data window to select the entire waveform.
Using Undo and Redo You can easily undo/redo edit operations, even prior to your last save operation. • Undo any edit operation by choosing Undo from the Edit menu (or click the Undo button ( • Redo any undone edit operation by choosing Redo from the Edit menu (or click the Redo button ( ) on the Standard toolbar). ) on the Standard toolbar.
Using the Magnify tool The Magnify tool provides an additional way to magnify a section of an audio file. You can access the Magnify tool in three ways: • From the Edit menu, choose Tool, and choose Magnify from the submenu. • Click the Magnify Tool button ( • Click the Edit Tool Selector in the upper-left corner of the data window until the Magnify tool ( ) on the Standard toolbar. ) is displayed.
16 | CHAPTER 3
Chapter 4 Changing File Properties and Formats This chapter deals with the supported file properties and formats in Sound Forge® Audio Studio™ software. Editing file properties When you open or create a file, its properties in the first four boxes of the status bar at the bottom of the Sound Forge Audio Studio workspace. The file properties are sample rate, bit depth, channels, and length.
Changing the bit depth Bit depth refers to the number of bits used to represent a sound. You can increase or decrease a file’s bit depth. Increasing the bit depth does not change the quality of the audio, but it allows subsequent processing to be performed with increased precision. However, representing a file with less bit depth results in audible distortion, referred to as quantization error. 1. If you want to increase a file’s bit depth, open a file with a small (8-bit) bit depth.
Converting mono/stereo channels You can convert mono files to stereo or stereo files to mono. Converting from mono to stereo 1. Open the Voiceover.pca file. This file is located in the same folder as the application. 2. Right-click the Channels status box and choose Stereo from the shortcut menu. The Mono To Stereo dialog is displayed. 3. Select the Both Channels radio button and click OK. The mono data is placed in both channels. Converting from stereo to mono 1. Open the Saxriff.pca file.
20 | CHAPTER 4
Chapter 5 Using Markers and Regions This chapter describes the use of markers, regions, and the Regions List. These tools allow you to tag and organize audio data and make audio editing more efficient. Using markers A marker is a tag placed in an audio file that is used as a reference point. Markers make navigating a file easier and more efficient. Inserting markers 1. Click to position the cursor in the waveform. 2. From the Insert menu, choose Marker (or press M during playback).
Previewing a marker Click a marker’s Play button ( ) in the Regions List. —or— 1. Right-click the marker tag ( ) and choose Edit from the shortcut menu. The Edit Marker/Region dialog is displayed. 2. Click the Play button. Using regions Regions identify ranges of time and provide a way to subdivide an audio file. A region is defined as the area between two region tags. Regions can be used to indicate sections of projects such as choruses or verses, or they can be used to make notes in the project.
Deleting a region Right-click the region tag ( ) and choose Delete from the shortcut menu. Deleting all markers and regions Right-click in the marker bar, choose Markers/Regions, and choose Delete All from the submenu. All markers and regions are removed. Deleting all markers and regions within the selected area Right-click in the marker bar, choose Markers/Regions, and choose Delete All in Selection from the submenu. All markers and regions in the selected area are removed.
24 | CHAPTER 5
Chapter 6 Applying Processes and Effects Sound Forge® Audio Studio™ software includes many processes and effects that you can use to manipulate the audio in your media files. The included audio plug-ins can improve the quality of your audio or create unique sounds. Sound Forge Audio Studio software also supports additional DirectX® and VST effects from Sony or other third parties. Note: When you’re working with stereo files, only the selected region in the selected channel is processed.
26 | CHAPTER 6
Chapter 7 Recording, Extracting, and Burning This chapter describes the processes for recording audio, extracting audio from a CD, and writing audio to a CD in Sound Forge® Audio Studio™ software. Note: This chapter assumes you have already set up and connected your audio source to your sound card’s inputs. For more information on connecting audio sources, please refer to your sound card’s user documentation.
Mode Description Punch-In (record a specific length) Punch-In mode is used to record over a specific selection in an existing data window. Specifying Punch-In activates the Start, End, and Length boxes. Recording begins at the position displayed in the Start box when you click the Record button ( ) and continues until one of the following occurs: • You click the Stop button ( ). • The cursor in the data window reaches the position displayed in the End box.
Extracting audio from CDs You can extract data from CD and open tracks in the Sound Forge Audio Studio workspace. Important: Sound Forge Audio Studio software is not intended, and should not be used, for illegal or infringing purposes, such as the illegal copying or sharing of copyrighted materials.
Burning CDs You can write your own audio to CD if your system is configured with a supported CD-R/RW drive and the necessary drivers. You can burn either single tracks (track-at-once) or the entire disc (disc-at-once). Track-at-once writing records individual tracks to the disc and results in a partially recorded disc. Additional tracks can be added to the CD over a period of time. Once all desired tracks are added, you must close the CD before it can be played in a consumer CD player.
Closing a CD Closing the CD allows you to listen to it in an audio CD player. However, you cannot add tracks to a CD once it is closed. 1. From the Tools menu, choose Burn Track-at-Once Audio CD. The Burn Track-at-Once Audio CD dialog is displayed. 2. From the Action drop-down list, choose Close Disc. 3. If desired, select the Eject disc when done check box to eject the CD automatically when the disc has been closed. 4. Click the Start button.
6. Select the Render temporary image before burning check box if you want to render your CD project to a temporary file before recording. Prerendering can prevent buffer underruns if you have a complex project that cannot be rendered and burned in real time. Note: The rendered temporary file will remain until you modify your project or exit the application. If an image file exists when you open the Burn Disc-at-Once Audio CD dialog, the check box is displayed as Use existing rendered temporary image. 7.
Index A extracting regions, 23 arming for recording, 28 audio event locator, 6 Automatic retake recording mode, 27 F files channels, 19 converting, 19 creating from regions, 23 opening, 9 playing, 9 properties, 17 sample rate, 17 saving, 10 format conversion, 19 B bit depth, changing, 18 Burn Disc-at-Once Audio CD dialog, 31 burning CDs disc-at-once (Red Book), 31 single tracks (track-at-once), 30 C CDs burning disc-at-once (Red Book), 31 burning single tracks (track-at-once), 30 closing discs, 31 extra
playbar, 7 playing files, 9 See also scrubbing Plug-In Manager, 25 previewing markers, 22 regions, 23 processes applying, 25 saving settings as presets, 25 properties, 17 Punch-In recording mode, 28 track-at-once CD burning, 30 Transport bar, 8 trimming audio, 12 tutorials, 4 U undoing edits, 14 V video files, 9 viewing audio input levels, 27 W writing to CD.