
User Manual

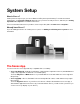

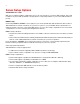
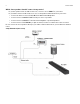
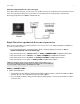
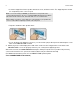
Table Of Contents

Sonos Setup
7
Alternate setup illustration (no open router port)
If you don’t have an open port on your router, you can disconnect your computer from the router and connect
it to a Sonos product instead. Then connect the Sonos product into the router port the computer was
previously plugged into (see BOOST example below).
Step 2: Place Sonos products in the rooms of your choice
Place the Sonos products you purchased in the rooms of your choice. You will be prompted to add them to
your Sonos system in step 3.
• If you purchased an all-in-one player (PLAY:1, PLAY:3, PLAY:5), apply power and go to Step 3:
Download and install a Sonos Controller app.
• If you purchased a Sonos CONNECT:AMP, see Adding a CONNECT:AMP for additional information.
• If you purchased a Sonos CONNECT, see Adding a CONNECT for additional information.
• If you purchased a Sonos PLAYBAR, see Adding a PLAYBAR for additional information.
• If you purchased a Sonos SUB, see Adding a SUB for additional information.
Adding a CONNECT:AMP
1. Attach desired speakers.
• Your speaker’s power rating should be at least 75W for 8 Ohm speakers, and at least 150W for 4 Ohm
speakers. Do not connect speakers rated at less than 4 Ohms.
• Use your thumb or finger to firmly push the spring-loaded speaker connector post inward to reveal the
connection hole.
Note: If you prefer to wire your Sonos products, simply connect them to your
router or to the Ethernet port on another Sonos product (or a live network wall plate
if you have built-in wiring) using a standard Ethernet cable.