
User Guide


8
Chapter 5 – Verification and Configuration Steps
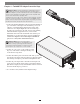
Figure 5
Confirm the Twin10G T3E and Its Ethernet
Controllers Are Recognized—Windows Users
This section describes how to confirm the Twin10G T3E
adapter is recognized by your Windows computer.
1. With the Twin10G T3E adapter connected to a power
source and to the computer, turn on the computer.
2. When the computer boots for the first time after
connecting the Twin10G T3E, a New Thunderbolt™
Devices Attached… window appears (Figure 5). Select
Always Connect from the drop-down menu.
3. From the Windows Start menu, select the Windows
Settings (gear) icon; the Windows Settings window will
appear.
4. In the Windows Settings window, click on the Network
& Internet Link; the Network Status window will appear.
Click the Ethernet link on the left; the Ethernet window
will appear.
5. In the Ethernet window, the various Ethernet ports
recognized by the system are listed to the right. For
most users, the Twin10G T3E adapter’s will be the
only other Ethernet ports listed, with the computer’s
onboard Ethernet port listed as “Network”. Click on one
of the other ports; an Ethernet port Properties window
will appear. Each of the Sonnet adapter’s ports will have
the description “Intel Ethernet Controller X550” with
either #1 or #2 listed next to it.
6. Skip to the next section, Basic Configuration Steps—
Windows Users