FUSION RX1600RAID ™ Rackmount 16-Drive SATA Storage System with Internal SAS Expanders Drive Enclosure User’s Guide
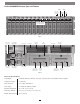
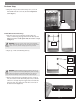
Fusion RX1600RAID Enclosure Specs and Features Mute Button SAS Cable Connection Indicators Power Switch SES Status Indicator Power Indicator Drive Activity (Blue) and Identification/Fault (Red) Indicator LEDs Figure 1 Power Cable Connector Power Supply Fault Indicator Power Cable Connector Power Supply Fault Indicator Power Supply SAS Expander Fan Fault Indicator Fan Module Power Supply Fan Module Fan Fault Indicator SCSI Enclosure Services Indicator Secondary/ Expansion Link Mini-SAS Port
Safety Precautions and Disclaimers SAFETY PRECAUTIONS DISCLAIMERS Please read this section carefully before proceeding. These precautions explain the correct and safe use of this device, thereby helping to prevent injury to you or others, and also help you to minimize the risk of damaging the device. Drive Usage: Sonnet Technologies has qualified the hard drives listed below for use in Fusion RX1600RAID storage systems.
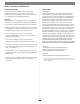
Enclosure Setup Assemble Rail Assemblies and Install Them Into Rack 1. Adjusting for the depth of the rack you will install the Fusion storage system, secure an extension bracket to a main rail using two each of the supplied screws, lock washers, flat washers, and nuts (Figure 3); do not overtighten the nuts. Secure the other extension bracket to the other main rail.
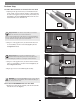
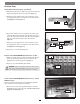
Enclosure Setup 2. Using four of the provided rack mounting screws, secure the RX1600RAID enclosure to the rack; do not overtighten the screws (Figure 7). screw Figure 7 Install Drives Into Drive Trays 1. Pull a drive tray out of its packaging, and then using wire cutters, cut off the shipping support between the drive tray rails (Figure 8). Be sure to cut the plastic flush; do not leave a rough cut (Figure 9).
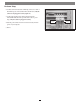
Enclosure Setup Install Drives Into Drive Trays (continued) 4. With the lever facing the left, slide a drive tray over the drive and align its holes with the screw holes in the drive (Figure 11). drive 5. Using three of the supplied screws, secure the drive tray to the drive; tighten each screw to secure the tray to the drive; do not overtighten the screws (Figure 11). drive tray screw Figure 11 6. Flip the drive and drive tray over so that they are resting on the other side.
Enclosure Setup 2. Connect each of the data cables’ remaining connectors to either of the mini-SAS ports on the Sonnet RAID controller card; verify the connectors are plugged in securely (Figure 15). 3. Connect the supplied power cables between the Fusion RX1600RAID enclosure and a grounded wall outlet or power strip; verify the cables are plugged in securely. mini-SAS connector 4. Push the power switch on the front of the enclosure, and then power on your computer. mini-SAS connector 5.
Tips and Additional Information Tips This section covers some common sense tips for using the Fusion RX1600RAID enclosure. Connecting Fusion RX1600RAID enclosures to a Sonnet RAID controller other than the one with which it shipped: Fusion RX1600RAID enclosures are matched with their included Sonnet RAID controller. When you connect a Fusion RX1600RAID enclosure to a different card, you may have to force them to pair up if the card has not been updated with the latest firmware. 1.