Configuration Tool and Utilities Operation Manual for Fusion RAID Storage Systems
Contents 1.0 ATTO Configuration Tool Overview............................................................................................. 1 About the Configuration Tool Configuration Tool Launch Configuration Tool Navigation Select the Local Host Select the Controller Select a Channel Select a Device 1.1 RAID Controller NVRAM Settings...............................................................................................
Contents 1.5 RAID Event Notifications........................................................................................................ 25 Basic Alerts Logging Email Alerts 1.6 RAID Group Media Maintenance............................................................................................... 27 Media Scan Options Start a Manual Media Scan Schedule a Media Scan Cancel, Pause, or Resume a Media Scan Manage Scheduled Media Scans Automatic Media Scan Cancellation View a Scan Report 1.
Contents 1.9 SNMP Configuration................................................................................................................
Contents Appendix A - CLI ASCII-Based Interface........................................................................................... i CLI Error Messages CLI Summary CLI Command Explanations Appendix B - Drive Reformat Instructions.....................................................................................
1.0 ATTO Configuration Tool Overview About the Configuration Tool Configuration Tool Launch 1. Locate the application icon in the folder created during installation. The ATTO Configuration Tool is the utility program that displays information about installed controllers, drivers and drives in your Fusion storage system, and provides the means to configure and manage them. 2. Double-click the ATTO Configuration icon to start the application.
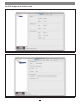
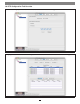
1.0 ATTO Configuration Tool Overview Select the Local Host The following tabs display in the Configuration Options window when you select the local host in the Device Listing window: • The Tasks tab provides information about user-scheduled hard drive health maintenance. In this tab, you can reschedule or delete tasks. See Figure 6 on page 5. • The Basic Info tab displays information about the booted operating system. See Figure 1 on page 3.
1.
1.
1.
1.
1.1 RAID Controller NVRAM Settings NCQ (Native Command Queueing) Choices: enabled, scan only, disabled Default: disabled The settings in the NVRAM tab vary depending upon the RAID controller and operating system. Sonnet’s RAID controllers are designed to operate properly using factory settings. Entering invalid or incorrect settings when using an NVRAM configuration utility such as the ATTO Configuration Tool may cause your controller to function incorrectly.
1.
1.2 RAID Group Setup and Management Preliminary Configuration Steps Support Note: In Fusion RAID storage systems shipped from Sonnet with hard drives installed, the drives are formatted Mac OS Extended (Journaled), configured as a single RAID 5 or RAID 6 RAID group, and ready for use with Mac OS X-based systems.
1.2 RAID Group Setup and Management Custom RAID Group Setup Steps (continued) 5. If you want the RAID group to be presented as one virtual disk (partition), click Finish. If you want more than one virtual disk (partition), click Next (see Figure 14 on page 16), and then select one of the following options: • Initialize: select Advanced or Express; Sonnet recommends choosing Advanced (which is the default).
1.2 RAID Group Setup and Management Hot Spares Setup and Usage Windows 7/Server 2008/Vista Drive Formatting 1. Click Start, then right-click Computer and select Manage. If a drive in a parity RAID group becomes degraded or faulted, the RAID group will lose some redundancy until a new member (drive) is rebuilt into it. You can automate this procedure by designating one or more drives as Hot Spares. You may set up a pool of Hot Spare drives of different sizes appropriate for your RAID groups. 2.
1.2 RAID Group Setup and Management Windows XP/Server 2003 Drive Formatting 15. Depending on how you configured the RAID groups, the volumes may already be available to use. If you created a DVRAID, RAID Level 4, or RAID Level 5 group, configuration will take much longer. You may check on the progress by double-clicking the RAID group name in the lower pane of the ATTO Configuration Tool window. 1. Select Start > Control Panel from the Windows Start menu.
1.2 RAID Group Setup and Management RAID Group RAID Level Migration 2. Select RAID Management > Properties from the application menu, and then view or change the current properties: Changing a RAID group from one RAID level to another is called migration. The following migration levels are supported: • Speed Read specifies the cache policy to be used during read operations.
1.
1.
1.
1.3 Drive and RAID Group Monitoring The ATTO Configuration Tool provides useful information on individual drives and associated RAID groups. • Index: Displays the drive’s RAID group index number. This number is used in CLI commands Use the ATTO Configuration Tool to gather basic or detailed information about the drives connected to the Sonnet RAID controller, and operational status on the RAID groups created with them.
1.3 Drive and RAID Group Monitoring Drive Identification (continued) 3. The S.M.A.R.T. Status box displays. 5. Double-click a drive in the top pane to display detailed information, and note the index number for the drive. Close the detailed drive information window. If there has been a change from a previous S.M.A.R.T. status record, an arrow indicates the change direction, either higher or lower. See Figure 18 on page 21. 6.
1.3 Drive and RAID Group Monitoring S.M.A.R.T. Notifications When S.M.A.R.T. monitoring is enabled, status is collected from each SATA drive at 60 minute intervals. If the data is different than the previous status, a S.M.A.R.T. status record is added to the S.M.A.R.T. status file for that drive. A notification of the S.M.A.R.T. status difference is generated based upon the current settings in the Notifications pane. Refer to RAID Event Notifications on page 25. The S.M.A.R.T.
1.
1.3 Drive and RAID Group Monitoring S.M.A.R.T.
22
1.4 Enclosure (SES) Health Monitoring Support Note: This feature does not work with Fusion D400RAID, Fusion D800RAID, nor Fusion R800RAID storage systems. Many Fusion drive enclosures contain a SCSI enclosure processor which tracks enclosure health status, drive identification and drive fault identification. The ATTO Configuration Tool recognizes drive enclosures that provide SCSI Enclosure Services (SES).
1.
1.5 RAID Event Notifications Logging The ATTO Configuration Tool may be configured to issue notifications via audible and visual alerts when a RAID event occurs. Logging notification records the type of event as text in a log file you specify. RAID events are divided into three categories: • The ATTO Configuration Tool provides a default location for event log files which you can change in the Location field found under Logging on the Notifications tab.
1.
1.6 RAID Group Media Maintenance Support Note: Media Scan operations significantly The Media Scan feature scans disk drives for media errors and parity errors. All media errors are counted and fixed. All parity errors are reported in the event log. The two options are described below. impact your Fusion storage system’s performance, and may take several hours to complete. We suggest that you schedule Media Scan operations for times when the system in not in use.
1.6 RAID Group Media Maintenance Cancel, Pause, or Resume a Media Scan View a Scan Report 1. Select the Sonnet RAID controller from the Device Listing pane. Media Scan functions for a parity RAID group may be paused, resumed and cancelled. The Configuration Tool provides menu items to pause and resume, and CLI provides a command to cancel the Media Scan. The results of the Media Scan up to the time of the pause or cancel are saved persistently. 2. Select the RAID tab in the right pane. 3.
1.
1.
1.
32
1.7 Identify and Replace a Faulted Drive 6. Click the RAID CLI tab, and then type “Blockdevidentify x”, where x is the index number. Look at the Fusion enclosure; the drive activity LED for the specific drive will be lit. If a drive in a RAID group fails, the RAID group’s status becomes degraded. This section will help you to identify and replace the bad drive. Automatic Faulted Drive Identification Note: Type “Blockdevidstop” to turn off the LED.
1.
1.8 Recover Data from Offline RAID Groups Sonnet RAID controllers use ATTO Technologies’ DriveAssure™ technology to maintain error-free operation of RAID group member drives. This includes features like Drive Initialization, Media Scan, Parity Verify, Performance Monitoring, and algorithms for latency and response management. Occasionally, a drive will suffer a mechanical or fatal media error that makes it unusable.
1.8 Recover Data from Offline RAID Groups RAID Group Failure Scenarios RAID groups cannot be accessed normally when their member disks fail, and the RAID group is marked offline.
1.8 Recover Data from Offline RAID Groups Recovery from a Failed Rebuild Barring major problems, the RAID group will be put back online at the end of the rebuild recovery. However, at the location corresponding to the media error, the data may be invalid! Anytime a RAID group goes offline, data integrity has been compromised! It is imperative that data consistency checks and file system repair tools are used to validate the data before trying to use it.
1.8 Recover Data from Offline RAID Groups Recovery from a Failed Rebuild with a Second Unrecoverable Drive Failure (continued) Basic Recovery Mode Use the ATTO Configuration Tool or CLI commands to put the compromised RAID group into basic recovery mode. This allows you to read data to a backup location, replace all failed or marginal drives, and then restore the data to the new drives.
1.8 Recover Data from Offline RAID Groups Recovery from Replacement of the Wrong Drive File System Repair Tools When a drive fails, but the wrong drive is replaced, a rebuild will not initiate and the RAID group will be taken offline. You should follow the procedure described in the previous chapter, Identify and Replace a Faulted Drive, and ensure the correct drive is replaced.
1.8 Recover Data from Offline RAID Groups Using the CLI to Identify a Failed Drive In addition to the ATTO Configuration Tool’s graphical user interface, you may enter commands in the RAID CLI tab to identify failed drives. BlockDevScan The BlockDevScan command displays a list of all attached drives and their usage. Use this command to update the list of drive IDs, which are needed by other CLI commands.
1.8 Recover Data from Offline RAID Groups SESIdentify Drive (only valid if enclosure supports SES) The drive’s fault LED should already be blinking. Use this CLI command to also blink the drive’s activity LED. The ID from the BlockDevScan command must be used, and not the member ID displayed with the RMStatus command. Match the S/N of the faulted drive (9SF076NJ) from RMSstatus to the BlockDevScan drive IDs, and use that number to select the correct drive to identify. sesidentify drive 1 Ready.
1.8 Recover Data from Offline RAID Groups Using the CLI to Enable/Disable Recovery Mode (continued) 2. Put the RAID group into Basic or Extreme recovery mode with read and write access:: Set rgrecover r5 basic (or extreme or rebuild) Ready. 3. Display the RAID group to see the results: rgdisplay 3 ;GroupName Type Interleave Capacity Partitions Members Status ;---------------------------------------------------------------------------r5 RAID5 64 KB 447.0GB 1 4 RECOVER Ready. 4.
1.
1.
1.9 SNMP Configuration SubAgent Mode This mode of operation relies on the operating system’s SNMP service being installed as a Master Agent and running. All Management Station requests must be directed to this Master Agent, not the ATTO agent. It is expected that only experienced SNMP administrators will use this mode, as installing and configuring the operating system services are beyond the scope of this document. Examples are Windows SNMP services, or the open-source Net-SNMP package.
1.9 SNMP Configuration Communities This is a list of community strings accepted by the agent when it receives an incoming request. If a Management Station makes a request and provides a community string that is not in this list, the request is dropped by the agent. If authentication traps are enabled, one will be sent to each configured destination. The list can be manipulated through the Add, Edit and Remove buttons below it. An existing community must be selected to edit or remove it.
1.9 SNMP Configuration Test This button will validate the settings displayed on screen, and then send a warm Start trap to each of the displayed trap destinations as if the displayed settings had been committed. Selecting disabled mode, unchecking the enable traps option or removing all trap destinations will prevent the test trap from being sent. Once an acceptable configuration is entered, a commit is needed for it to take effect.
1.9 SNMP Configuration Troubleshooting Requests from an MIB browser time out: • Ensure the agent is not disabled • Ensure the Management Station is using the port for the system service if the agent is in subagent mode or the port displayed on the SNMP pane if the agent is enabled. • Ensure the community string used by the Management Station is accepted by the system service when in subagent mode or is displayed in the communities list on the SNMP pane if the agent is enabled.
1.
1.
1.10 Configuration Tool Troubleshooting Messages from Flash Tab Actions You may see an error message informing you about an unexpected event or incorrect information discovered by the application. Using the help text presented with the error message, correct the issue before proceeding. • This is not a flash file, or it is corrupt. The ATTO-created flash file is corrupt or the Configuration Tool does not recognize the file as a flash file.
52
2.0 Drive Performance Testing 9. Stop the I/O any time after you have stopped the performance test. The ATTO Configuration Tool’s drive performance testing feature records the performance level of a drive in a RAID group under an I/O (input/output) load generated by a host application on your computer. The information can be used to compare the performance of each drive relative to others.
2.
2.1 Windows Only - ATTO Disk Benchmark Support Note: Additional information on using Disk The ATTO Utilities for Windows are installed from the CD that was included with your Sonnet RAID controller. Only one utility, Disk Benchmark, may be used with your Sonnet RAID storage system. Benchmark is available by accessing the Help menu in the application. Benchmark Fields Disk Benchmark measures peak and sustained throughput for disk reads and writes. See Figure 36 on page 56.
2.1 Windows Only - ATTO Disk Benchmark Multiple Benchmark Testing • /p testfile: Same as testfile, only the test is printed to the default system printer instead of being executed. Disk Benchmark supports four command line parameters for uninterrupted testing: • /p textfile: Same as textfile, only the tests in the list are printed to the default system printer instead of being executed. • testfile opens and executes the test named testfile with the extension .bmk.
2.2 ATTO Disk Benchmark Troubleshooting The following suggestions may help if you encounter problems with Disk Benchmark. • Use Windows Device Manager to check and verify that all drives are visible to the operating system. • If drives are not listed, check the connections between the drive enclosure and the RAID controller card, and verify that all drives are fully seated in their bays. • Make sure that the enclosure is powered up and has completed its self check before booting your computer.
58
Appendix A - CLI ASCII-Based Interface • The get form returns the value of a parameter or setting and is an informational command. The RAID CLI tab enables experienced users to send Command Line Interface (CLI) commands to the Sonnet RAID controller to configure, test, and otherwise interact with attached storage. • Responses to get commands are followed by Ready.
Appendix A - CLI ASCII-Based Interface CLI Error Messages ERROR Cannot perform operation. RAID Group has mapped Partitions The following error messages may be returned by the Command line Interface ERROR Cannot perform operation. RAID Group has Outstanding Commands ERROR Invalid Command. Type “Help“ for command list.
Appendix A - CLI ASCII-Based Interface CLI Summary The following chart summarizes the Command Line Interface commands, their defaults, and an example of how to enter the commands. Please note that commands which have no default values have a blank entry in that column of the table. WARNING: Do not use the CLI unless you are directed to by a Sonnet technician, as changing parameters may cause loss of data and/or disruption to performance and reliability of the Fusion storage system.
Appendix A - CLI ASCII-Based Interface Command Default Example HSDisplay hsdisplay HSRemove hsremove 3 Info info IsReserved isreserved Metrics metrics display all OEMConfigFile get oemconfigfile Partition partition alpha1 6 4 GB PartitionDisplay partitiondisplay alpha1 PartitionMerge partitionmerge all PartitionSplit partitionsplit alpha1 22 2 PartitionWriteCache set partitionwritecache enabled RAIDRebuildPriority same set raidrebuildpriority low RAIDSpeedWriteLimit 8 set raids
Appendix A - CLI ASCII-Based Interface Command Default Example RGRecover rgrecover raidgroup1 rebuild RGRecoverWithWrites rgrecoverwithwrites raidgroup1 basic RGResumeConversion rgresumeconversion raidgroup1 RGResumeErase rgresumeerase raidgroup1 RGResumeInitialization rgresumeinitialization raidgroup1 RGResumeMediaScan rgresumemediascan raidgroup1 RGResumeRebuild rgresumerebuild raidgroup1 RGSectorSize 512 setrgsectorsize raidgroup1 8192 RGSpanDepth 1 set rgspandepth raidgroup1 22 RG
Appendix A - CLI ASCII-Based Interface CLI Command Explanations • BlockDevIdentify (Immediate, Disabled on Error) Turns on a drive activity LED on the Fusion drive enclosure for a specified drive until a BlockDevIDStop command is given. Use either the RAID group name and member index, or BlockDevId. BlockDevId is the index of a block device provided by the BlockDevScan CLI command.
Appendix A - CLI ASCII-Based Interface • DisplayScheduledTasks (Immediate, Disabled on Error) Displays all outstanding scheduled tasks. • DriveTestConfig (Disabled on Error) Configures the drive test to perform one of the following operations: initialize (destructive write-only), read (nondestructive read-only), verify (destructive verify), mediascan (destructive for sectors with medium errors), or initverify (destructive write-read-verify).
Appendix A - CLI ASCII-Based Interface • EventLogFilter (Enabled, Disabled on Error) Filters data from specific unit subsystems and levels when event logging is enabled. The specific entries supported are platformdependent. For set commands, the final parameter indicates whether or not events from the specified subsystem and level are displayed. • Metrics (Immediate) Controls the collection of standard data metrics within a product based on the command parameters.
Appendix A - CLI ASCII-Based Interface • RGAddStorage (Immediate) Adds additional storage to an existing RAID group. GroupName is an ASCII name for the RAID group. MIRROR | STRIPE | SPAN specifies the method used to expand the storage. Optional parameter list BlockDeviceID specifies up to 10 indices of available block devices, provided by the BlockDevScan CLI command, to be added to the RAID group. If this list is omitted, the CLI command RGMemberAdd must be used.
Appendix A - CLI ASCII-Based Interface • RGHaltRebuild (Immediate) Halts the rebuild(s) on the specified existing RAID group. Optional parameter MemberIndex specifies the RAID member whose rebuild will be halted. For RAID 6 RAID groups, if a MemberIndex is specified, all rebuilding RAID members on the span with that MemberIndex will halt as well. If no MemberIndex is specified, all rebuilds on that RAID group will be halted. • RGCreate (Immediate) Creates a new empty RAID group.
Appendix A - CLI ASCII-Based Interface • RGPrefetch Sets the prefetch for all or for the specified RAID group. This command will fail if the RAID group does not exist. GroupName is the ASCII name of the RAID group for which the parameter will apply. • RGResumeInitialization (Immediate) Continues the initialization on the specified existing RAID group. RGResumeInitialization [GroupName] • RGResumeMediaScan (Immediate, Disabled on Error) Resumes a media scan on the specified existing RAID group.
Appendix A - CLI ASCII-Based Interface • SASTargets (Immediate, Disabled on Error) Lists the physical devices that are connected to all SAS ports. • RGUnmap (Immediate) Removes all mapped partitions of the specified RAID group from the routing table. The partitions themselves will be unaffected, though they will now be inaccessible to any initiators. SASTargets • SaveConfiguration (Immediate, Disabled on Error) Saves configuration changes.
Appendix A - CLI ASCII-Based Interface • SESStatus (Immediate, Disabled on Error) Displays the last polled status of the specified element type in the specified enclosure. SupportLevel indicates the SES features supported by the specified enclosure: fan, power, temp, alarm, drive LEDs. If no element type is specified, all status is displayed. Note that SESEnclosures must be executed prior to executing SESStatus.
Appendix B - Drive Reformat Instructions 11. Click Erase; a window will appear asking you to approve your choice. If your Sonnet Fusion RAID storage system shipped with pre-installed hard disk drives, the following information will assist you to reformat the drives per your needs. 12. Click Erase. In Fusion RAID systems shipped from Sonnet with hard disk drives installed, the drives are formatted Mac OS Extended (Journaled), and configured as a single RAID 5 or RAID 6 RAID group.
Appendix B - Drive Reformat Instructions Windows 7/Server 2008/Vista Users’ Instructions (continued) Windows XP/Server 2003 Users’ Instructions 1. Follow all the steps in the included documentation to install the software and the Sonnet RAID controller, and to set up and connect the Fusion RAID enclosure. 10. Click Start, then right-click Computer and select Manage. 11. In the Computer Management window, click Storage in the left pane to expand the list (if necessary), and then click Disk Management. 2.
Appendix B - Drive Reformat Instructions Windows XP/Server 2003 Users’ Instructions (continued) 16. Right-click where the word “unallocated” appears, and then select New Partition. 17. When the New Partition Wizard window appears, click Next. 18. When the Select Partition Type window appears, select Primary Partition, and then click Next. 19. When the Specify Partition Size window appears, click Next if you want all of the Fusion system’s capacity to remain as one block (volume).
xvii
, Remember to register your product online at http://registration.sonnettech.com to be informed of future upgrades and product releases. Software updates and links are available from the Sonnet web site at www.sonnettech.com. • Online support form available at http://supportform.sonnettech.com. Sonnet Technologies Customer Service hours are Mon.-Fri., 7 a.m.–4 p.m. Pacific Time • Customer Service Phone: 1-949-472-2772 • Email: support@sonnettech.com Sonnet Technologies, Inc.