FUSION R400QR5 ™ 4-Drive Serial ATA Rackmount Disk Enclosure with Quad Interface User’s Guide For Windows
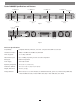
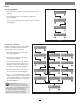
Fusion R400QR5 Specifications and Features Drive Presence LED (Bay 2) Drive Presence LED (Bay 1) Power LED Drive Presence LED (Bay 4) Ready Indicator LED Drive Presence LED (Bay 3) Drive Module Drive Module Drive Module Drive Module (Bay 1) (Bay 2) (Bay 3) (Bay 4) Drive Activity LED (Bay 3) Drive Activity LED (Bay 4) Power switch Drive Activity LED (Bay 1) Drive Activity LED (Bay 2) Figure 1 Mini-USB Connector FireWire 800 Connector Locking eSATA Connector Display and Controls Power Cable
Safety Precautions and Disclaimers SAFETY PRECAUTIONS DISCLAIMERS Please read this section carefully before proceeding. These precautions explain the correct and safe use of this device, thereby helping to prevent injury to you or others, and also help you to minimize the risk of damaging the device. Drive Usage: Sonnet Technologies has qualified the hard drives listed below for use in Fusion R400QR5 storage systems.
Drive Installation and Enclosure Setup 1. Remove the Fusion R400QR5 from its packaging, and place it on a flat, level surface. foot 2. If you intend to use the Fusion enclosure on a desktop or other flat surface, attach the included adhesive-backed feet to the bottom of the enclosure (Figure 3). 3. If you intend to use the Fusion enclosure in a rack, install the Sonnet rack slide set (or equivalent), sold separately: • FUS-RSS-P for 17–21.5" deep racks • FUS-RSS-S for 23–26.
Drive Installation and Enclosure Setup Change Drive Configuration The drives included with Fusion R400QR5 are configured as a RAID 5 group and Mac OS Extended-formatted. If you need to change the configuration or set it up for use with an operating system other than Mac OS X, change the configuration of the R400QR5 drives following these steps. Detecting Disks –Re—Init? Detecting Disks waiting WARNING: Reconfiguring the drives in your Fusion R400QR5 enclosure requires you to reformat them.
Operating System Drive Formatting Instructions Mac OS Users’ Instructions 10. Depending on how you configured the RAID group, it may already be available to the system. Once the RAID group has been formatted and finishes building, it is ready to use. 1. Assuming your computer is on, after the Fusion R400QR5 configures the drives a Disk Insertion window will appear stating that there is an unreadable volume; click Initialize, and then Disk Utility will open.
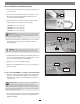
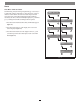
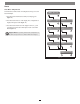
Menus View the RAID Mode Fusion QR5 v1.0 –Menu 1. Press the button under Menu on the display; RAID Mode appears (Figure 8). 2. Press the button under Go on the display; the RAID mode appears (Figure 8). RAID Mode –Next 3. Press the button under Quit on the display to return to the main menu (Figure 8). Go– RAID5 4D – Q uit Fusion QR5 v1.
Menus View Drive S.M.A.R.T. Status Self-Monitoring, Analysis and Reporting Technology, or S.M.A.R.T., is a monitoring system for SATA drives to detect and report on various indicators of drive health. The S.M.A.R.T. feature keeps track and reports the status of SATA drive health using certain parameters recorded by the drives. The Fusion R400QR5 displays two possibilities: good, or failing. Drives marked as Failing should be replaced. Fusion QR5 v1.
Menus View Drive Temperatures SATA hard drives monitor their own temperature and report it to the Fusion R400QR5. Fusion QR5 v1.0 –Menu 1. Press the button under Menu four times; Disk Temp appears (Figure 11). Go– Drive:1: 37 –Next Error Statistics –Next Go– Drive:2: 36 –Next SMART Status –Next Go– Drive:3: 36 –Next Disk Temp – Q uit Drive:4: 35 – Q uit RAID Mode –Next 2. Press the button under Go on the display; Drive:1 temperature is displayed in degrees celsius (Figure 11). 3.
Tips and Additional Information This section covers some common sense tips for using the Fusion R400QR5 enclosure. Tips This section covers some tips for using the Fusion R400QR5 enclosure. Hot-swapping: When connected via eSATA data cable to a Mac running Mac OS X, Fusion R400QR5 supports hot-swapping*, enabling you to exchange a set of drives without having to shut down your computer.