FUSION QR ™ 4-Drive Hardware RAID 5 SATA Storage System with Quad Interface User’s Guide For Windows
Contents 1 Fusion QR Features 1 2 Enclosure Setup; Access Drives and Mode Switch 2 Connect the Fusion QR to Computer and Power Outlet Access Drives and Mode Switch 3 Drive Mode Configuration Instructions 3 General Information Change Drive Mode 4 Drive Formatting Instructions 4 OS X Users’ Instructions Windows Users’ Instructions 5 Status LED Indications 5 System Powered, No Drive Activity Drive Activity Drive Not Recognized RAID 5 or RAID 10 Rebuild Bad Dr
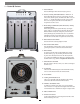
1 – Fusion QR Features ❶❷❷ ❷❸ ❻ ❻ 1–P ower Indicator This blue LED lights when the Fusion QR is powered. ❹ ❺ ❻ 2–P resence, Activity, and Fault Indicators — Drives A – C These LEDs indicate the ready state (solid green), read and write activity (flashes green), and fault status (OFF or red) for drives A – C. An LED will remain off if the corresponding drive is not recognized, and will turn red if the drive is recognized but can’t be used.
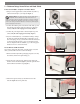
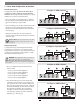
2 – Enclosure Setup; Access Drives and Mode Switch Connect Fusion QR to Computer and Power Outlet 1. Using one of the supplied cables (eSATA, FireWire 800, USB 3.0), connect the Fusion QR to your computer (Figure 1). Support Note: The supplied Sonnet locking eSATA cable is compatible with all eSATA ports and provides a far more secure connection when used with Sonnet drive enclosures and host controller cards with the matching connector.
3 – Drive Mode Configuration Instructions General Information Configure as RAID 0 Volume ❷ press and hold, and then turn on the power • OS X® users wishing to use the Fusion QR as configured may start using the product immediately; the drives will appear on the desktop as a single volume. 23 ❸ LEDs stay off ❶ turn to 0 4 0 1 As shipped from Sonnet, the drives in the Fusion QR are configured as a RAID 5 volume, and Mac OS Extendedformatted.
4 – Drive Formatting Instructions OS X Users’ Instructions Windows 8/7/Vista and Server 2012/2008 Users’ Instructions 1. After changing the drive mode, a Disk Insertion window will appear stating that there is an unreadable volume; click Initialize, and then Disk Utility will open. Note that if you configured the drives as JBOD, multiple Disk Insertion windows will open; clicking Initialize on the first window will cause Disk Utility to launch. 1.
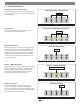
5 – Status LED Indications System Powered, No Drive Activity System Powered, No Drive Activity When the Fusion QR is powered on, and no data is being written to or read from the drives, the Power and Drive LEDs stay on (Figure 10). LEDs stay on Figure 10 Drive Activity (Data Reads and Writes) Drive Activity When data is being read from or written to a drive, its corresponding LED will flash (Figure 11).
6 – Drive Mode Descriptions The following two pages describe the drive modes supported by the QR. To configure the Fusion QR’s drives, refer to Drive Mode Configuration Instructions on page 3. RAID 0: Striping, No Redundancy RAID 0: Striping, No Redundancy RAID 0 (striping) is based on the concept that increased performance can be achieved by simultaneously accessing data across multiple drives, increasing data transfer rates while reducing average access time by overlapping drive seeks.
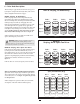
6 – Drive Mode Descriptions RAID 5: Striping, Parity Distributed Among Drives RAID 5 configuration increases reliability while using fewer drives than RAID 10 mirroring by using parity redundancy: parity is distributed across multiple drives. Any one of the four drives can fail, and the volume will continue to function. See Figure 18. When the failed drive is replaced, the parity data on the three other drives is used to rebuild the RAID volume with data spread across all four drives.
Specifications, Warnings, and Additional Information Specifications External Connectors USB 3.