
Installation Sheet

June 10, 2019
©2019 SONNEMAN - A WAY OF LIGHT
18 of 26
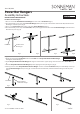
Luminaires and Luminaire Hangers
Assembly Instructions
INSTRUCTIONS D’INSTALLATION
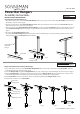
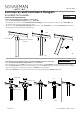
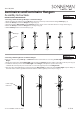
Connecting a Light Bar onto a Power Bar:
1. Place the Light Bar on the Power Bar.
2. Press down rmly on the top of both ends of the Light Bar,
while pressing up on the bottom of the Power Bar, until
the Light Bar clicks into place (Fig. 1).
Fig. 1
CLICK!
CLICK!
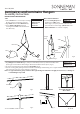
Removing a Light Bar from a Power Bar:
1. Place the Light Bar Removal Tool underneath the end of
the Light Bar (Fig. 2).
2. Press down rmly on the edge of the Tool to separate one
side of the Light Bar from the Power Bar (Fig. 3).
3. Repeat steps 1-2 to separate other side of the Light Bar.
4. Lift the Light Bar o the Power Bar (Fig. 4).
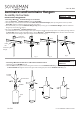
1XDXXLB12x
1XDXXLB24x
1XDXXLB36x
1XZ990005x
Applies to Components:
Light Bar
Power Bar
Removal Tool
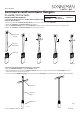
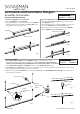
Suspended Light Bars:
1. Align Hanger Subassemblies with the Light Bar. Make sure the screw holes of the
Hanger Subassembly align with the Light Bar (Fig. 1). Note: One hanger subassembly has
conductors (live) that will engage with light bar once attached; the other does not (dead).
2. Insert Hanger Subassembly into Light Bar and secure with Flat Head Screws (Fig 2).
3. Align Hanger with Power Bar (Fig. 3) and press down rmly on the top of the Power Bar, while pressing up on the bottom
of the Hanger, until the Power Bar clicks into place (Fig. 4).
4. Adjust the leveling of the Luminaire by loosening the Set Screw on the Dead Hanger Subassembly and lengthening or
Shortening the cord (Fig. 5).
Fig. 1
Fig. 2
Fig. 3
Fig. 4
Light Bar
Hanger
Power Bar
Hanger
Subassembly
(Dead)
Set Screw
Hanger
Subassembly
(Live)
Flat Head Screw
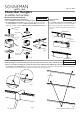
Fig. 2
Fig. 3
Fig. 4
1XB04LB06x
1XB04LB12x
1XB04LB18x
1XDXXLBxxx-S
Applies to Components:
Fig. 5