
Installation Sheet

June 10, 2019
©2019 SONNEMAN - A WAY OF LIGHT
12 of 26
Power Bar Hangers
Assembly Instructions
INSTRUCTIONS D’INSTALLATION
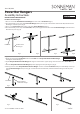
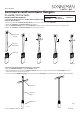
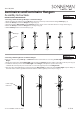
Flush Perpendicular Power Bar Hanger:
1. Remove Flat Head Screws and both Hanger Caps (Fig. 1).
2. Align Power Bars with Hanger (Fig. 2). Press down rmly on the top of
the Top Power Bar and bottom of Bottom Power Bar until the Power
Bars clicks into place. Reattach Hanger Cap with Flat Head Screw (Fig. 3).
Fig. 1
Fig. 2
Fig. 3
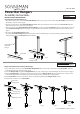
1XB03PR00x
Applies to Components:
Flat Head
Screw
Top Power
Bar
Hanger
Cap
Hanger
Bottom
Power Bar
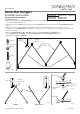
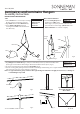
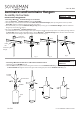
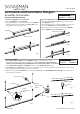
Double Cord Power Bar Hanger:
NOTE: Each Single Cord Power Feed Hanger only carries half of the electrical circuit, and must be used
in pairs. To avoid short-circuiting the system, the spring contacts must point in different directions (Fig 1).
1. Align Hanger with Power Bars (Fig. 2) and press down rmly on the top (or bottom) of the Power Bar, while pressing up (or
down) on the bottom of the Hanger, until the Power Bar clicks into place (Fig. 3).
Fig. 2
Fig. 3
Hanger
Power Bar
Fig. 1
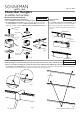
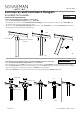
In-Line Power Bar
Connector:
1. Align In-Line Connector with Power Bar (Fig. 1)
and press down rmly on the top of the Power
Bars, while pressing up on the bottom of the
Connector until the Power Bars clicks into place
(Fig. 2).
1XB03IB00x
Applies to Components:
Fig. 1
Fig. 2
In-Line
Connector
Power Bar
1XB03DC16x
Applies to Components: