
Installation Sheet


June 10, 2019
©2019 SONNEMAN - A WAY OF LIGHT
8 of 26
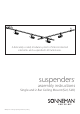
Ceiling Mount System
Assembly Instructions
INSTRUCTIONS D’INSTALLATION
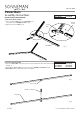
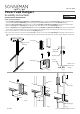
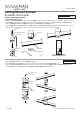
Flush Rotational Power Bar Hanger:
1. Remove Flat Head Screw and both Hanger Caps (Fig. 1).
2. Align Power Bars with Hanger (Fig. 2). Press down rmly on the top of the Top Power Bar and
bottom of Bottom Power Bar until the Power Bars clicks into place. Reattach Hanger Cap with Flat Head Screw (Fig. 3).
3. Insert Power Bar, into Support. Reattach Support Cap with Flat Head Screw (Fig. 3).
1XB03RD00x
Applies to Components:
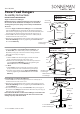
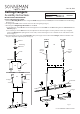
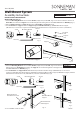
Ceiling Flush Mount Support:
1. Install the Mounting Bracket to the ceiling with Anchor (if applicable) and Screw, align set screw holes with the direction
of Power Bar, then attach the Support onto the Mounting Bracket and tighten two Set Screws with the Allen Key (Fig. 1).
2. Remove Flat Head Screw and Support Cap and align Power Bar with Support (Fig. 2).
3. Insert Power Bar into Support. Reattach Support Cap with Flat Head Screw (Fig. 3). Note: Ceiling Flush Mount Support
(1XB02CE00x) is to be used in conjunction with Ceiling Mount Standard Power Feed (1XA08CE01x).
Fig. 2
Fig. 3
Fig. 1
1XB02CE00x 1XB02CE01x
Applies to Components:
Anchor
Mounting Bracket
Flat Head
Screw
Support Cap
Screw
Support
Set Screw
Power Bar
Applies to Ceiling Flush
Mount Offset Support
Allen Key
Fig. 1
Fig. 2
Fig. 3
Flat Head
Screw
Hanger
Cap
Hanger