
Installation & Assembly


November 24, 2015
©2015 SONNEMAN - A WAY OF LIGHT
2 of 2
Assembly Instructions
INSTRUCTIONS D’INSTALLATION
Shear Series - Small Sconce
Important
• Always disconnect the power before installing or replacing bulbs and before cleaning or other maintenance.
• Consult a qualified, licensed electrician to ensure correct branch circuit conductor.
Consulter un électricien qualifié pour vous assurer que les conducteurs de la dérivation sont adéquats.
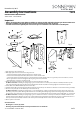
7222
A
B
E
F
C
D
G
H
1. Shut off power to the outlet box (A).
2. Make appropriate electrical connections using wire nuts:
a. Connect the fixture's (B) live wire (black) to the live outlet box wire.
b. Connect the fixture's (B) neutral wire (white) to the neutral outlet box wire.
c. Connect the fixture's ground wire (green or uncoated) to the ground outlet box wire. If no ground is present in outlet box, connect
fixture's ground wire to the mounting plate (C) using the green screw (included).
d. Carefully place connections in outlet box (A).
3. Attach the mounting plate (C) to the outlet box (A), secure with outlet box screws (D).
For Wet Location Use: If installing for uplight (Fig. 1), place a bead of silicone or water proof caulk (not included) around the top and
sides of the mounting plate (Fig. 2) between the mounting plate and the wall, with a mounting height at least 4' from the ground.
4. Install a GU10 base MR16 LED bulb (E) into the fixture (B).
5. Install the fixture (B) to the mounting plate (C) by hooking the two bends (F) onto the tabs in the fixture. Secure with mounting screws (G).
6. Place the cover plate (H) onto the fixture (B), secure with screws (I).
For Wet Location Use: If installing for uplight (Fig. 1), or for downlight (Fig. 3) with a mounting height less than 4' from the ground, use
the sealing cover plate (J) with rubber gasket and clear lens. If installing for downlight (Fig. 3) with a mounting height at least 4' from the
ground, either cover plate may be used. If sealing cover plate (J) is used, bulb (E) must be a thermally protected LED bulb, e.g. Soraa brand.
7. For Wet Location Use: If installing for uplight (Fig. 1), place a small bead of silicone or water proof caulk (not included) around the sides
and bottom of the fixture (B) where it comes into contact with the wall. If installing for downlight (Fig. 3), place a small bead of silicone or
water proof caulk (not included) around the sides and top of the fixture (B) where it comes into contact with the wall.
8. Restore power to the fixture.
Fig. 2
Fig. 1
I
Care Instructions
• Dusting: Use a clean, dry cloth.
• Cleaning: To protect the nish, avoid any harsh abrasives or chemicals.
J
Fig. 3