
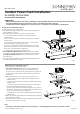
Installation Sheet

March 09, 2016
©2016 SONNEMAN - A Way of Light
25 of 29
Power Feed Hanger Assembly
Assembly Instructions
INSTRUCTIONS D’INSTALLATION
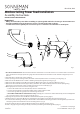
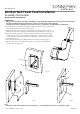
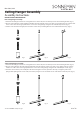
Single Cord Power Feed Hanger:
NOTE: Each Single Cord Power Feed Hanger only carries half of the
electrical circuit, and must be used in pairs. To avoid short-circuiting
the system, the spring contacts must point in dierent directions.
1. Install the Single Cord Power Feed Hanger onto the Power Bar the
same was as the Perpendicular Power Bar Hanger (page 28): pass the
cord through the Power Bar, tip the Hanger 45 degrees and insert the
copper springs into the center of the Power Bar, then push the Hanger
up while tipping it back up 45 degrees. (Fig. 1)
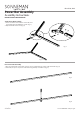
2. Cut the cord to the desired length, and remove 10mm (3/8") of
insulation from the end of each cord.
3. Twist the wire strands tightly, then insert the exposed wires into the
Power Feed bushings. Secure by tightening the set screws with the
included Allen key.
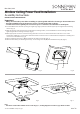
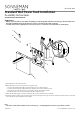
Double Cord Power Feed Hanger:
1. Install the Double Cord Power Feed Hanger onto the Power Bar the
same was as the Parallel Power Bar Hanger (page 28): press down
rmly on the top of the Power Bar, while pressing up on the bottom of
the Hanger, until the Power Bar clicks into place. (Fig. 2)
2. Cut the cords to the desired length, and remove 10mm (3/8") of
insulation from the end of each cord.
3. Twist the wire strands tightly, then insert the exposed wires into the
Power Feed bushings. Secure by tightening the set screws with the
included Allen key.
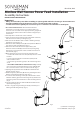
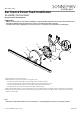
Double Rod Power Feed Hanger:
1. Install the Double Rod Power Feed Hanger onto the Power Bar the
same was as the Parallel Power Bar Hanger (page 28): press down
rmly on the top of the Power Bar, while pressing up on the bottom of
the Hanger, until the Power Bar clicks into place. (Fig. 3)
2. Cut the rods to the desired length, and use the included sandpaper
tool to remove 10mm (3/8") of the paint from the end of each rod.
3. Insert the rods into the Power Feed bushings. Secure by tightening
the set screws with the included Allen key.
Fig. 1
Fig. 2
Fig. 3