
Installation & Assembly

December 29, 2017
©2018 SONNEMAN - A WAY OF LIGHT
2 of 2
Assembly Instructions
INSTRUCTIONS D’INSTALLATION
ALC Series - 2" Small LED Surface Mount, 2" Tall LED Surface Mount, 3" Small LED Surface Mount, 3" Medium LED Surface
Mount, 3" Tall LED Surface Mount
Important
• Always disconnect the power before installing or replacing bulbs and before cleaning or other maintenance.
• Consult a qualied, licensed electrician to ensure correct branch circuit conductor.
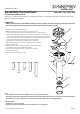
1. Shut o power to the outlet box (A).
2. Make appropriate electrical connections using wire nuts:
a. Connect the LED driver’s (B) live wire (black) to the live outlet box wire.
b. Connect the LED driver’s neutral wire (white) to the neutral outlet box wire.
c. Connect the xtures (C) ground wire (green or uncoated) to the ground outlet
box wire. If no ground is present in outlet box, connect xture’s ground wire to
the mounting plate (D) using the green screw (included).
d. Carefully place connections and LED driver in outlet box.
3. Attach the mounting plate (D) to the outlet box (A), secure with
outlet box screws (E).
4. Install the xture (C) to the mounting plate (D) and secure with
set screws (F) using the included Allen key (G).
5. Install lens (H) into the xture (C) and secure by screwing
trim (J) into the xture.
6. Restore power to the outlet box (A).
Note
• The outlet box must be at least 4” DIA and 1.5” deep to t the LED driver.
• This xture is dimmable with Electronic Low Voltage (Trailing-Edge) type dimmers and Incandescent (Leading-Edge)
type dimmers. For best performance, we recommend using an Electronic Low Voltage Dimmer.
Care Instructions
• Dusting: Use a clean, dry cloth.
• Cleaning: To protect the nish, avoid any harsh abrasives or chemicals.
3060, 3061, 3062, 3063, 3064
3060
3061
3062
3063
3064
A
B
D
E
F
G
C
H
J