
Installation Sheet

January 3, 2018
©2018 SONNEMAN - A WAY OF LIGHT
2 of 3
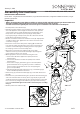
1. Shut o power to the outlet box (A).
2. Determine heights at which each pendant is to be hung. Adjust the
steel cable (B) to the desired height. To shorten the cable, push the
cable up and it will be locked automatically. To lengthen the cable,
lift up on the cable and push up on the plunger lock (C). While
keeping the plunger lock depressed, lower the cable to the desired
length. Release the plunger lock to set.
3. Use the screwdriver to loosen the slotted set screw (D). Adjust power
cord (E) to remove slack. Tighten the set screw to set. Reserve extra
cord in the canopy (F).
4. Loosen the screws on the safety cable coupling (G) and undo the
loop. Pass the safety cable through a hole on the cross bar (H) and
insert the end back through the coupling to form a loop. Tighten
the coupling screws to secure the safety cable.
5. Attach the cross bar (H) to the outlet box (A), secure with
outlet box screws (J). Screw the threaded nipple (K) through the
nut (L) and then into the cross bar (H).
6. Make appropriate electrical connections using wire nuts:
a. Connect the LED driver’s (M) live wire (black) to the live
outlet box wire.
b. Connect the LED driver’s neutral wire (white) to the neutral
outlet box wire.
c. Connect the canopy's ground wire (green or uncoated) to the
ground outlet box wire. If no ground is present in outlet box,
connect canopy's ground wire to the cross bar (H) using the
green screw (included).
d. Follow wiring diagram and instructions in Fig. 1 on following page
to wire individual pendants to the driver.
7. Install canopy (F) onto the threaded nipple (K), secure with washer and
nial (R).
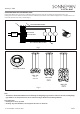
8. Install the lens (S) included with the glass (T) into the desired housing (U)
and secure with two small screws (V). Then, align rib (W) on glass with
arrow (X) inside housing (U) and insert glass into the housing. Secure with
three set screws (Y) using provided Allen key (Z). Repeat for remaining
housings. Caution: Each glass must use the correct lens part, according
to Fig. 2.
9. Restore power to the outlet box (A).
Assembly Instructions
INSTRUCTIONS D’INSTALLATION
Facets Series - 3-Light Round Assorted Pendant, 3-Light Round Small Pendant, 3-Light Round Medium Pendant, 3-Light
Round Large Pendant
Important
• Always disconnect the power before installing or replacing bulbs and before cleaning or other maintenance.
• Consult a qualied, licensed electrician to ensure correct branch circuit conductor.
Consulter un électricien qualié pour vous assurer que les conducteurs de la dérivation sont adéquats.
3003-AST, 3003-SML,3003-MED, 3003-LRG
A
M
R
K
S
T
C
U
X
V
3003-AST
U
Z
S
V
H
L
J
G
F
W
E
Y
Y
B
D