
Installation Sheet

2 of 2
©2018 SONNEMAN - A WAY OF LIGHT
January 4, 2018
Assembly Instructions
INSTRUCTIONS D’INSTALLATION
Votives Series - 6' LED Bar Pendant
Important
• Always disconnect the power before installing or replacing bulbs and before cleaning or other maintenance.
• Consult a qualied, licensed electrician to ensure correct branch circuit conductor.
Consulter un électricien qualifié pour vous assurer que les conducteurs de la dérivation sont adéquats.
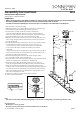
1. Shut o power to the outlet box (A).
2. Adjust height of the cable splitter (B) by loosening set screw (C) using
provided Allen key (D) and sliding up or down as desired.
3. Feed the power cord (E) and the steel cable (F) through the
cord/cable bushing (G) and adjust steel cable to desired height. To
shorten the cable, push the cable up; to lengthen, push in the plunger
while pulling down on the cable, release the plunger to lock.
4. Adjust the cord lock (H) to remove slack in the cord. Reserve extra cord
in the canopy. Hang the xture (J) from the steel cable only as shown
in the Detailed View.
5. The LED driver (K) must be installed in a remote and accessible location
near the xture in accordance with local electrical code. (Fig. 1)
a. Connect the LED driver’s live wire (black) to the live supply wire.
b. Connect the LED driver’s neutral wire (white) to the neutral
supply wire.
c. Connect the LED driver's output wires (red) to the necessary length of
red wires (not included) to reach the outlet box. Carefully pull the low
voltage wires (red) into the outlet box.
6. Attach the mounting plate (L) to the outlet box using the outlet
box screws (M) as shown in the Detailed View.
7. Using wire nuts, connect the low voltage wires to each of the two xture
input wires. Carefully place connections in outlet box (A).
8. Attach the canopy (N) to the mounting plate (L), secure with set
screws (P) using provided Allen key (Q) as shown in the Detailed View.
9. Install the mounting bracket (R) to the ceiling with anchor (S) and
screw (T), then screw the post (U) onto the mounting bracket. Adjust the
steel cable (V) to the level the xture (J). To shorten the cable, push the
cable up; to lengthen, push in the plunger while pulling down on the
cable, release the plunger to lock.
10. Install lenses (W) by screwing into the xture (J) body.
11. Restore power to the xture.
Note:
• This xture is dimmable with ELV (Trailing-Edge), Incandescent (Leading-Edge), and 0-10V type dimmers only.
Care Instructions
• Dusting: Use a clean, dry cloth.
• Cleaning: To protect the nish, avoid any harsh abrasives or chemicals.
2859
F
L
E
W
J
R
S
B
C
D
Q
P
N
H
A
M
K
G
T
U
V
Detailed View
Fig.1