
Manual
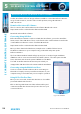
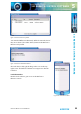
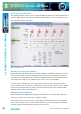

Table Of Contents
- Fig A: Packing List
- Fig B: Power Connections
- Fig C: Mains Lead Table
- Fig 1-1: RB-2S4 Reference Monitor Front Panel
- Fig 1-2: RB-2S10 Reference Monitor Front Panel
- Fig 1-3: Reference Monitor Block Diagram
- Fig 1-4: RM-2S4 Front Panel Controls
- Fig 1-5: RM-2S10 Front Panel Controls
- Fig 1-6: RM-2S4 Source Selector
- Fig 1-7: RM-2S10 Source Selector
- Fig 1-8: RM-2S4 & RM-2S10 Meters
- Fig 1-9: RM-2S4 & RM-2S10 DIPSwitch Settings
- Fig 1-10: Meter Labelling Options
- Fig 1-11: Brightness Control
- Fig 1-13: Balance Control
- Fig 1-12: Phase Meter Display
- Fig 1-14: Status LEDs
- Fig 1-15: RB-2S4 & RB-2S10 Modifier Switches
- Fig 1-16: Reference Monitor RM-2S4 Rear
- Fig 1-17: Reference Monitor RM-2S10 Rear
- Fig 1-18: RM-2S4 & RM-2S10 DIPswitch Settings
- Fig 2-1: RB-4C8 Reference Monitor Front Panel
- Fig 2-2: Reference Monitor Block Diagram
- Fig 2-3: RM-4C8 Front Panel Controls
- Fig 2-4: RM-4C8 Rotary Source Selectors
- Fig 2-5: RM-4C8 Meters
- Fig 2-6: RM-4C8 DIPSwitch Settings
- Fig 2-7: Meter Labelling Options
- Fig 2-8: Brightness Control
- Fig 2-9: Phase Meter Display
- Fig 2-10: Balance Control
- Fig 2-11: Status LEDs
- Fig 2-12: RB-4C8 Modifier Switches
- Fig 2-13: Reference Monitor RM-4C8 Rear
- Fig 3-1: RM-HD1 Expansion Card
- Fig 3-2: RM-HDE1 Expansion Card
- Fig 3-3: Reference Monitor RM-HD(E)1 Block Diagram
- Warranty
- Safety Information
- Installation Information
- Reference Monitors Introduction
- RM-2S4 Reference Monitor, 2 LED meters & 4 stereo
- channel inputs
- RM-2S10 Reference Monitor, 2 LED meters & 10 stereo
- channel inputs
- Technical Specification RM-2S4 & RM-2S10
- RB-4C8 Reference Monitor, 4 LED meters, 8 channel inputs &
- dual selectors
- Technical Specification RM-4C8
- RM-HD1 Reference Monitor HD-SDI Expansion Card &
- RM-HDE1 Reference Monitor HD-SDI & Dolby E Expansion Card
- Technical Specification RM-HD1 & RM-HDE1
- Serial Interface Commands & Responses Protocol

Reference Monitors User Handbook
57
SCI REMOTE CONTROL SOFTWARE
SCI REMOTE CONTROL SOFTWARE
5
To create a new EQ preset, click the ‘New’ Icon on the top toolbar. You will now be in EQ
edit mode. Click the Enable button for the EQ band that you wish to adjust, e.g. Band 1.
This will activate the EQ for that selected band.
By clicking in the Frequency, Bandwidth and Gain edit boxes for Band 1, the 3 EQ faders
respectively are enabled for that band and can be adjusted to your taste. The values are
updated as you drag the faders, but are only sent to the Reference Monitor once you have
released the mouse click. Please note that the sound output of the Reference Monitor takes
a few seconds to stabilise once a new set of EQ parameters has been loaded.
You can navigate through the rest of the Band edit boxes by either clicking in them
with your mouse, or by using Tab on your keyboard. The values in the edit boxes can
also be adjusted manually by typing in values. A bevel appears around the band that you
are editing.
Once you are happy with the EQ preset that you are dening, click the Save Button on
the top toolbar. A text edit box appears for you to type in the name of your new preset.
Press the ‘Enter’ key to Save the preset name. The name now appears in the ‘EQ Preset’ box,
available for selection. You can also edit and save over existing Custom EQ Settings.
When SCi rst connects to a Reference Monitor, it reads its current EQ settings. If these EQ
parameters match up with a known EQ Preset, then that preset is loaded in. If not, then the
EQ settings are shown as a ‘Recalled Preset’. This can be saved as a New Preset if you wish.
To Delete an EQ Preset, select the Preset and then press the Delete button at the top
of the screen.
Front Panel Modiers
These are a replication of the front panel Reference Monitor functions which oer ‘Dim,
Mono, Left Cut, Right Cut, Phase Invert, and M+S (Middle + Side)’ selection. The status of
these are automatically recalled from the Reference Monitor and changes on the Reference
Monitor are reected in SCi and vice-versa.
A Front Panel Lock button is also included and when active disables the functionality of the
Reference Monitor front panel. However you will still have full control from within SCi.