
User's Manual
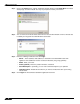


Table Of Contents
- Using This Guide
- Virtual Office Overview
- Using Virtual Office Features
- Importing Certificates
- Using Two-Factor Authentication
- Using One-Time Passwords
- Using NetExtender
- User Prerequisites
- User Configuration Tasks
- Installing NetExtender Using the Mozilla Firefox Browser
- Installing NetExtender Using the Internet Explorer Browser
- Launching NetExtender Directly from Your Computer
- Configuring NetExtender Properties
- Configuring NetExtender Connection Scripts
- Configuring Proxy Settings
- Configuring NetExtender Log Properties
- Configuring NetExtender Advanced Properties
- Viewing the NetExtender Log
- Disconnecting NetExtender
- Upgrading NetExtender
- Changing Passwords
- Authentication Methods
- Uninstalling NetExtender
- Verifying NetExtender Operation from the System Tray
- Using the NetExtender Command Line Interface
- Installing NetExtender on MacOS
- Using NetExtender on MacOS
- Installing and Using NetExtender on Linux
- Installing and Using NetExtender for Windows Mobile
- Passwords in NetExtender Mobile
- Installing NetExtender on Android Smartphones
- Using NetExtender on Android Smartphones
- Related Documents
- Using Virtual Assist
- Understanding Virtual Assist
- Installing and Launching Virtual Assist
- Configuring Virtual Assist Settings
- Selecting a Virtual Assist Mode
- Launching a Virtual Assist Technician Session
- Performing Virtual Assist Technician Tasks
- Using Virtual Assist from the Customer View
- Using Virtual Assist in Unattended Mode
- Enabling a System for Virtual Access
- Using the Request Assistance Feature
- Using File Shares
- Managing Bookmarks
- Using Bookmarks
- Logging Out of the Virtual Office

Using Virtual Assist
96
SonicWALL SSL VPN 5.0 User Guide
Note Running the file directly from this dialog box may not work on some systems. Save the file
to the system and then run the application.
Step 3 Fill in the necessary information in the provided fields to set-up the system in Virtual Access
mode and click OK.
• Server: This should be the name or IP address of the appliance the technician normally
accesses the Virtual Office from outside the management interface (Do not include
“https://”).
• Portal: The name of the portal the technician would normally login to.
• Computer Name: This is an identifier for the system to help differentiate between other
systems that may be waiting for support in the queue.
• Password: This is a password the technician must enter prior to accessing the system
through the support queue.
Step 4 After installation, the VASAC client should be left running in the desktop tray.
This system’s identifier name should now appear in the technician’s support queue displayed
on the Virtual Assist > Status page within the management interface.Upon double-clicking the
system listing, the technician will be prompted to provide the password established during
system set-up to gain Virtual Access to the system.
Ending Virtual Access Mode
Disconnecting from a Virtual Access session will place the system back in the support queue
for later access by the technician. From the personal system-side, the user/technician may
uninstall or terminate the application from the tray option icons.
An administrator can forcibly remove a system from the queue. If this occurs, the Virtual Access
system should no longer attempt to connect to the support queue and should display an error
message.