
User's Manual


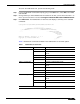


Table Of Contents
- Using This Guide
- Virtual Office Overview
- Using Virtual Office Features
- Importing Certificates
- Using Two-Factor Authentication
- Using One-Time Passwords
- Using NetExtender
- User Prerequisites
- User Configuration Tasks
- Installing NetExtender Using the Mozilla Firefox Browser
- Installing NetExtender Using the Internet Explorer Browser
- Launching NetExtender Directly from Your Computer
- Configuring NetExtender Properties
- Configuring NetExtender Connection Scripts
- Configuring Proxy Settings
- Configuring NetExtender Log Properties
- Configuring NetExtender Advanced Properties
- Viewing the NetExtender Log
- Disconnecting NetExtender
- Upgrading NetExtender
- Changing Passwords
- Authentication Methods
- Uninstalling NetExtender
- Verifying NetExtender Operation from the System Tray
- Using the NetExtender Command Line Interface
- Installing NetExtender on MacOS
- Using NetExtender on MacOS
- Installing and Using NetExtender on Linux
- Installing and Using NetExtender for Windows Mobile
- Passwords in NetExtender Mobile
- Installing NetExtender on Android Smartphones
- Using NetExtender on Android Smartphones
- Related Documents
- Using Virtual Assist
- Understanding Virtual Assist
- Installing and Launching Virtual Assist
- Configuring Virtual Assist Settings
- Selecting a Virtual Assist Mode
- Launching a Virtual Assist Technician Session
- Performing Virtual Assist Technician Tasks
- Using Virtual Assist from the Customer View
- Using Virtual Assist in Unattended Mode
- Enabling a System for Virtual Access
- Using the Request Assistance Feature
- Using File Shares
- Managing Bookmarks
- Using Bookmarks
- Logging Out of the Virtual Office

Using NetExtender
47
SonicWALL SSL VPN 5.0 User Guide
To launch the NetExtender CLI, perform the following tasks:
Step 1 Launch the Windows Command Prompt by going to the Start menu, select Run, enter cmd,
and click OK.
Step 2 Change directory to where NetExtender is installed. To do this, you first must enter cd ../.. to
move up to the root drive. The enter cd Program Files\SonicWALL\SSL-VPN\NetExtender.
Step 3 Enter NECLI.exe. The NetExtender CLI launches and displays a summary of the available
commands.
C:\Program Files\SonicWALL\SSL-VPN\NetExtender>NECLI.exe
,,,,,,,,,,,,,,,
,,,mmbbbbbb11111111111111111111111bbbbbmm,,,
,,,b||PPPPPPP||````````````````|PPPPPPPPP111111111111bbm,,
`````` `````PPPP111111111bm,
```PP1111111bm,
`PP111111b,
|111111:
NECLI for Windows - Version 3. 5. 0. 1 .1111P|.
Copyright (C) 2008 SonicWALL Inc. ,b1PP|`
,,||```
Table 1 describes the commands available in the NetExtender CLI and their options.
Table 1 NetExtender CLI Commands
Command Options Description
NECLI connect Initiates a NetExtender session.
-s server The IP address or hostname of the SSL VPN
server.
-u user-name The username for the account.
-p password The password for the account.
-d domain-name The domain to connect to.
NECLI createprofile Creates a NetExtender profile
-s server The IP address or hostname of the SSL VPN
server.
-u user-name The username for the account.
-p password The password for the account.
-d domain-name The domain to connect to.
NECLI deleteprofile Deletes a saved NetExtender profile.
-s server The IP address or hostname of the SSL VPN
server.
-u user-name The username for the account.
-d domain-name The domain to connect to.
NECLI disconnect Disconnects