
User's Manual

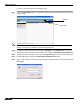
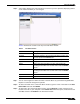
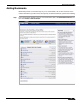

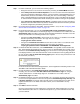


Table Of Contents
- Using This Guide
- Virtual Office Overview
- Using Virtual Office Features
- Importing Certificates
- Using Two-Factor Authentication
- Using One-Time Passwords
- Using NetExtender
- User Prerequisites
- User Configuration Tasks
- Installing NetExtender Using the Mozilla Firefox Browser
- Installing NetExtender Using the Internet Explorer Browser
- Launching NetExtender Directly from Your Computer
- Configuring NetExtender Properties
- Configuring NetExtender Connection Scripts
- Configuring Proxy Settings
- Configuring NetExtender Log Properties
- Configuring NetExtender Advanced Properties
- Viewing the NetExtender Log
- Disconnecting NetExtender
- Upgrading NetExtender
- Changing Passwords
- Authentication Methods
- Uninstalling NetExtender
- Verifying NetExtender Operation from the System Tray
- Using the NetExtender Command Line Interface
- Installing NetExtender on MacOS
- Using NetExtender on MacOS
- Installing and Using NetExtender on Linux
- Installing and Using NetExtender for Windows Mobile
- Passwords in NetExtender Mobile
- Installing NetExtender on Android Smartphones
- Using NetExtender on Android Smartphones
- Related Documents
- Using Virtual Assist
- Understanding Virtual Assist
- Installing and Launching Virtual Assist
- Configuring Virtual Assist Settings
- Selecting a Virtual Assist Mode
- Launching a Virtual Assist Technician Session
- Performing Virtual Assist Technician Tasks
- Using Virtual Assist from the Customer View
- Using Virtual Assist in Unattended Mode
- Enabling a System for Virtual Access
- Using the Request Assistance Feature
- Using File Shares
- Managing Bookmarks
- Using Bookmarks
- Logging Out of the Virtual Office
Using File Shares
113
SonicWALL SSL VPN 5.0 User Guide
Step 6 Virtual Office displays the home File Share screen that you have specified, displaying folders
on the network to which you can navigate.
Table 2 describes the controls at the top of the File Share window.
Step 7 You can now navigate the folders and files in the File Share as you would through Windows
Explorer or other file management systems.
Step 8 To add a new folder in the current File Share location, type the name of the folder in the Add
New Folder: field and click Submit.
Step 9 To add a file in the current File Share location, click the Browse... button. Navigate to the
location of the file on your computer in the Choose file window that opens, select the file and
click OK, and then click Submit in the File Share window.
Table 2 File Share Controls
Button Description
Back Navigate to the previous File Share location.
Forward Navigates forward to the previous File Share location after
you have pressed the Back button.
Reload Reloads the current folder to display any changes.
Up Navigates
Delete Deletes the selected folders and files. Select items by
checking the checkbox next to their name under the Select
column.
Rename Renames the selected folders and files. Select items by
checking the checkbox next to their name under the Select
column.
Bookmark Creates a new bookmark to the current File Share location.
Logout Logout of the File Share service.