
User Guide


SonicWALL Installation Page 18
Performing the Initial Configuration
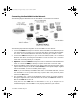
Setting up your Management Station
All management functions on the SonicWALL are performed from a Web browser-based
user interface. Management can be performed from any computer connected to the LAN
port of the SonicWALL. The computer used for management is referred to as the
Management Station.
The SonicWALL is pre-configured with the IP address “192.168.168.168", which is used to
access it during initial configuration. During the initial configuration, it is necessary to
temporarily change the IP address of your Management Station to one in the same subnet
as the SonicWALL. For example, set the IP address of your Management Statio
n to
“192.168.168.200". Restart the Management Station to activate the address change.
Note: Appendix D describes how to change the IP address of your Management Station.
Launching the Web browser
1. Open a Web Browser. Then type the default SonicWALL IP address,
"192.168.168.168", into the Location or Address field in the Web browser.
Note: Your Web browser must be Java-enabled and support HTTP uploads in order to fully
manage SonicWALL. Netscape Navigator 3.0 and above is recommended.
The first time you contact the SonicWALL, the SonicWALL Installation Wizard
automatically launches and begins the installation process.
The SonicWALL Installation Wizard simplifies the initial installation and configuration of
the SonicWALL. The Wizard provides a series of menu-driven instructions for setting the
administrator password and configuring the settings necessary to access the Internet.
Note: To bypass the Wizard, click Cancel. Then log into the SonicWALL Management
Interface by entering the User Name "admin" and the Password "password".
integrated_manual.book Page 18 Friday, October 12, 2001 2:56 PM