
User Guide


SonicWALL Installation Page 16
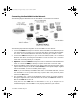
Connecting the SonicWALL to the Network
The following diagram illustrates how the SonicWALL is connected to the network:
The following steps describe integration of the SonicWALL into the network.
1. Connect the WAN Ethernet port on the back of the SonicWALL to the Ethernet port on
your Internet router or modem. Use a crossover cable when connecting the SonicWALL
to a router. Use a standard Ethernet cable when connecting to a modem or a hub.
2. Connect the LAN Ethernet port to your Local Area Network (LAN). Use a standard
Ethernet cable when connecting the SonicWALL to a hub or switch. Use a crossover
cable when connecting directly to a computer.
3. Optional: Connect the DMZ Ethernet port to a hub or switch with a standard Ethernet
cable. Or connect the DMZ port directly to a public server with a crossover cable.
4. Plug the SonicWALL power supply into an AC power outlet, then plug the power supply
output cable into the port on the back labeled Power. Use the power adapter supplied
with the SonicWALL, do not use another power supply.
Note: If you are installing a SonicWALL PRO 200 or a SonicWALL PRO 300, connect
the SonicWALL to an AC power outlet using a power cable. Then press the power
switch to the On position.
5. The SonicWALL runs a series of self-diagnostic tests to check for proper operation.
During the diagnostic tests, which take about 90 seconds, the Test LED remains on.
Wait for the Test LED to turn off.
Verify that all used Link LEDs are illuminated. If not, go to Chapter 14 for
troubleshooting tips. The SonicWALL is now properly attached to your network.
integrated_manual.book Page 16 Friday, October 12, 2001 2:56 PM