
User Guide


Page 146 SonicWALL Internet Security Appliance User’s Guide
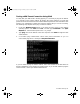
9. Select a VPN encryption method from the Phase 2 Encryption/Authentication
menu. Since data throughput and security are the primary concern, select Ecrypt and
Authenticate (ESP DES HMAC SHA1).
10. Define a Shared Secret. Write down this key as it is required when configuring the
San Francisco Office SonicWALL TELE3.
11. Click Add New Network... to open the VPN Destination Network window and
enter the destination network addresses.
12. Enter the IP address and subnet mask of the destination network, the San Francisco
office, in the Network and Subnet Mask fields. Since NAT is enabled at the San
Francisco office, enter a private LAN IP address. In this example, enter "192.168.1.1"
and subnet mask "255.255.255.0."
Note: The Destination Network Address must NOT be in the local network's
address range. Therefore, the San Francisco and Chicago offices must have different
LAN IP address ranges.
13. Click Advanced Settings. Select the following boxes that apply to your SA:
• Use Aggressive Mode - requires half of the main mode messages to be exchanged
in Phase 1 of the SA exchange.
• Enable Keep Alive - if you want to maintain the current connection by listening for
traffic on the network segment between the two connections.
• Require XAUTH/RADIUS (Only allows VPN clients) - if you are using a RADIUS
server.
• Enable Windows Networking (NetBIOS) broadcast - if remote clients use
Windows Network Neighborhood to browse remote networks.
• Apply NAT and firewall rules - to apply NAT and firewall rules to the SA or just
firewall rules if in Standard mode.
• Forward packets to remote VPNs - if creating a “hub and spoke” network
configuration
• Enable Perfect Forward Secrecy - if you want to add another layer of security by
adding an additional Diffie-Hellman key exchange.
• Phase 2 DH Group - select the type of DH key exchange in Phase 2 for Perfect
Forward Secrecy.
• Route all internet traffic through this SA if forcing internet traffic from the WAN
to use this SA to access a remote site.
• Default LAN Gateway - if specifying the IP address of the default LAN route for
incoming IPSec packets for this SA. This is used in conjunction with the Route all
internet traffic through this SA check box.
14. Click Update to add the remote network and close the VPN Destination Network
window. Once the SonicWALL PRO 200 is updated, a message confirming the update
is displayed at the bottom of the browser window.
integrated_manual.book Page 146 Friday, October 12, 2001 2:56 PM