
User Guide


Page 104 SonicWALL Internet Security Appliance User’s Guide
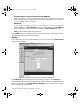
To configure One-to-One NAT, complete the following instructions.
1. Select the Enable One-to-One NAT check box.
2. Enter the beginning IP address of the private address range being mapped in the
Private Range Begin field. This is the IP address of the first machine that is
accessible from the Internet.
3. Enter the beginning IP address of the valid address range being mapped in the Public
Range Begin field. This address should be assigned by your ISP.
Note: Do not include the SonicWALL WAN IP (NAT Public) Address or the WAN
Gateway (Router) Address in this range.
4. Enter the number of public IP addresses that should be mapped to private addresses
in the Range Length field. The range length can not exceed the number of valid IP
addresses. Up to 64 ranges can be added. To map a single address, enter a Range
Length of 1.
5. Click Update. Once the SonicWALL has been updated, a message confirming the
update is displayed at the bottom of the browser window. Restart the SonicWALL for
changes to take effect.
Note: The One-to-One NAT window maps valid, public IP addresses to private LAN
IP addresses. It does not allow traffic from the Internet to the private LAN
.
A rule must be created in the Rules section to allow access to LAN servers. After One-
to-One NAT is configured, create an Allow rule to permit traffic from the Internet to
the private IP address(es) on the LAN.
One-to-One NAT Configuration Example
This example assumes that you have a SonicWALL running in the NAT-enabled mode, with
IP addresses on the LAN in the range 192.168.1.1 - 192.168.1.254, and a WAN IP address
of 208.1.2.2. Also, you own the IP addresses in the range 208.1.2.1 - 208.1.2.6.
Note: If you have only one IP address from your ISP, you cannot use One-to-One NAT.
You have three web servers on the LAN with the IP addresses of 192.168.1.10,
192.168.1.11, and 192.168.1.12. Each of the servers must have a default gateway pointing
to 192.168.1.1, the SonicWALL LAN IP address.
You also have three additional IP addresses from your ISP, 208.1.2.4, 208.1.2.5, and
208.1.2.6, that you want to use for three additional web servers. Use the following steps to
configure One-to-One NAT:
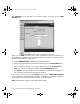
1. Log into the Management Interface, and click Advanced. Then click the One-to-One
NAT tab.
2. Select Enable One-to-One NAT and click Update.
3. Type in the IP address, 192.168.1.10, in the Private Range Begin field.
4. Type in the IP address, 208.1.2.4, in the Public Range Begin field
integrated_manual.book Page 104 Friday, October 12, 2001 2:56 PM