
User Guide


Table Of Contents
- Check Package Contents
- Any Items Missing?
- What You Need to Begin
- Record Configuration Information
- Overview of the SonicWALL Email Security Appliance
- Before You Register
- Creating a mysonicwall.com Account
- Registering Your SonicWALL Email Security Appliance
- Activating Your SonicWALL Email Protection Subscription and Dynamic Support
- Apply Power to the SonicWALL Email Security Appliance
- Connect Directly to the SonicWALL Email Security Appliance
- Login to the SonicWALL Email Security Appliance
- Navigate the SonicWALL Email Security Interface
- Change the Default Administrator Password
- Enter the License Keys for Each Service
- Set the Time and Date
- Use Quick Configuration to Set Up Email Management
- Verify Your SonicWALL Email Security Appliance Configuration
- Route Mail to Your SonicWALL Email Security Appliance
- Verify Mail from the Internet Through Your SonicWALL Email Security Appliance
- Configure Outbound Mail Filtering
- Windows XP
- Windows 2000
- Windows NT
- Weitere Hinweise zur Montage der Modell
- FCC Part 15 Class A Notice
- Notice About Modifying Equipment
- BMSI Statement
- VCCI Statement
- Canadian Radio Frequency Emissions Statement
- Regulatory Information for Korea
- Lithium Battery Warning
- Cable Connections
- German Language Regulatory and Safety Instructions
SonicWALL Email Security Getting Started Guide Page 27
Configure Outbound Mail Filtering
You can have your SonicWALL Email Security appliance filter outbound mail from your
mail server to the Internet. To configure outbound mail filtering, you configure both your
mail server and your SonicWALL Email Security appliance for the outbound mail path.
Configure the outbound mail destination of your mail server to point to the IP address or
host name of your SonicWALL Email Security appliance. This is typically done by
configuring a Smart Host on your mail server.
The configuration steps for Exchange Server 2003 are provided here. See the
documentation on your mail server for specific instructions.
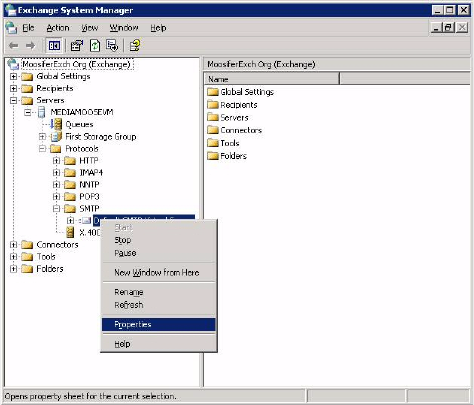
1. In the Exchange System Manager, navigate to the Servers > [servername] >
Protocols > SMTP > Default SMTP Virtual Server (or active server instance), right
click, and select Properties.