
User Manual


Table Of Contents
- Document Contents
- SonicWALL NSA E6500
- Pre-Configuration Tasks
- Registering Your Appliance
- Deployment Scenarios
- Selecting a Deployment Scenario
- Scenario A: NAT/Route Mode Gateway
- Scenario B: State Sync Pair in NAT/Route Mode
- For network installations with two SonicWALL NSA E-Series appliances configured as a stateful synchronized pair for redundant high-availability networking.
- In this scenario, one SonicWALL NSA E6500 operates as the primary gateway device and the other SonicWALL NSA E6500 is in passive...
- Scenario C: L2 Bridge Mode
- In this scenario, the original gateway is maintained. The SonicWALL NSA E6500 is integrated seamlessly into the existing network...
- Initial Setup
- System Requirements
- Connecting the WAN Port
- Connecting the LAN Port
- Applying Power
- Accessing the Management Interface
- Accessing the Setup Wizard
- Connecting to Your Network
- Testing Your Connection
- Activating Licenses in SonicOS
- Upgrading Firmware on Your SonicWALL
- Obtaining the Latest Firmware
- Saving a Backup Copy of Your Preferences
- Upgrading the Firmware
- Using SafeMode to Upgrade Firmware
- Configuring a State Sync Pair in NAT/Route Mode
- Configuring L2 Bridge Mode
- Selecting a Deployment Scenario
- Additional Deployment Configuration
- Support and Training Options
- Rack Mounting Instructions
- Product Safety and Regulatory Information
Page 12 Front Bezel Configuration Example
Front Bezel Configuration Example
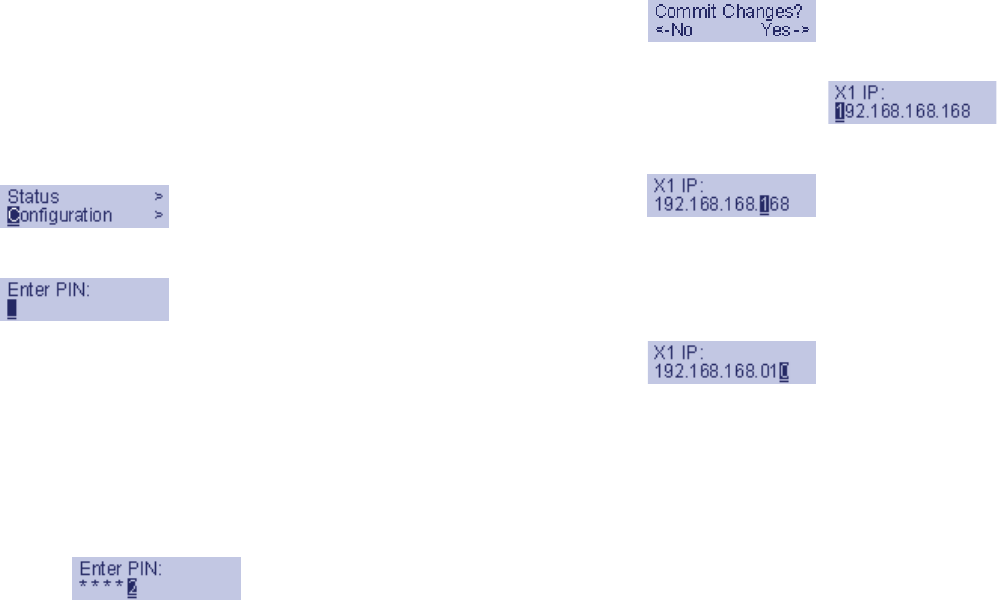
LAN IP Configuration
The SonicWALL NSA E6500 is assigned the default LAN IP of
192.168.168.168. Complete the following steps to change it to
192.168.168.10.
1. Press Right to exit screen-saver mode if not at the root
menu.
2. Press Down to select the Configuration entry.
3. Press Right to enter Configuration Mode.
4. Input PIN (76642 by default; SONIC on a phone keypad.)
a. Press Up or Down until the cursor displays 7,
press Right.
b. Press Up or Down until the cursor displays 6,
press Right.
c. Press Up or Down until the cursor displays 6,
press Right.
d. Press Up or Down until the cursor displays 4,
press Right.
e. Press Up or Down until the cursor displays 2,
press Right.
f. Press Right.
5. Press Down until X1 IP is selected (four times).
6. Press Right to configure X1 IP.
7. Edit X1 IP:
a. Press Right ten times to select the tenth digit.
b. Press UP or Down until the cursor displays 0.
c. Press Right once to select the next digit.
d. Press UP or Down until the cursor displays 1.
e. Press Right once to select the next digit.
f. Press Up or Down until the cursor displays 0.
g. Press Right to finish editing the X1 IP.
h. Press Right again to confirm changes.
NSA_E6500_GSG.book Page 12 Wednesday, June 17, 2009 7:16 PM